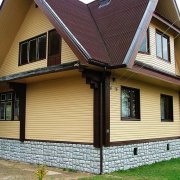
Wall of timber in different installation options

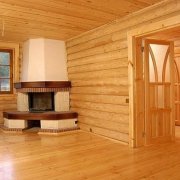
Walls made of timber in the interior look quite attractive. There are many design solutions for this design. But this material has a lot of positive qualities of a technical nature.
Today we will consider the technology of laying a wall of timber and you can do all the work completely independently. Also, the video in this article and photo will show the most critical areas of this work.
The content of the article
All about bar partitions
To date, products from timber partition walls are considered to be one of the strongest. The beam used as a support is able to withstand quite impressive pressure and does not sag, since it relies on flooring or logs. And provided that there are no openings in the structure, the need for auxiliary supports disappears.
It is worth noting that making walls from a bar with your own hands you will not only save time, but also get a stable structure that will serve you for many years. In addition, if there is a need to transfer or dismantle, then it will be very simple to do.
In the photo you can see how effective this material is. In terms of thermal conductivity, it is second only to expanded polystyrene (seeHow is wall polystyrene insulation) But you will not make walls of it.

Its main advantages also include:
- Reliable thermal insulation and sound insulation;
- You do not need to spend money on additional decoration and then the final price will be much lower;
- The technology of laying a wall of timber is not so complicated. If you first figure it out, then everything can be done quickly enough;
- Also, this material has not so much weight, and therefore less cost will be spent on the foundation;
- The design is able to withstand huge loads, so you can install massive cabinets and weighty shelves on it.
Attention: Walls from timber are also flaws, and durability can be considered the most significant. Without preliminary treatment with antiseptics, the material will not last long. So this issue must be taken into account.
How to assemble a timber partition
When assembling, it is necessary to take into account several nuances of the process itself. Knowing them, you can not only avoid mistakes in work, but also make the inner wall more durable and wear-resistant. After all, it is not enough just to choose the beam correctly, you need to correctly lay it and connect it.
There are several rules that should be observed when laying:
- Start laying only with the lower beam, so the base should be perfect and made to zero in relation to the level in the ground;

- A waterproofing layer is mandatory laid on the foundation in order to protect against excess moisture. Below it is recommended to use a bar, which is made of quality wood.

- In the openings that form between the beams, jute fiber should be laid, providing high-quality thermal insulation. It will be useful to insulate and joints with the same material.

- It is recommended to connect the links with wooden or iron pins to achieve greater structural rigidity. They should be mounted with a distance of at least 150 cm, and at the same time retreat from the corners by 150 mm. This way you’ll create some kind of checkerboard layout,

- The material selected for the partition walls from the timber should have a cross section of at least 100x100 mm and 100x150 mm. Its height should be the same as that of the material used on the main walls, while the width should not be too large.
Having completed the assembly, it is necessary to grind and cover the walls with a special primer. Please note that you can mount the structure not only after assembly, but also when it is still being implemented.
The main methods of connecting the bar with the main wall
There are several wood compounding techniques.
The most common two options:
- One of the easiest ways to bond a building to the main wall is to cut a groove. In this case, a special tenon is cut through in the construction, and grooves will be inserted into it. When the width of the partition is small enough, the groove is cut out based on its size, and the beam is inserted only with the ends, no other special cuts are made.
- The second method involves joining using a timber frame, which is attached to the wall, which serves as the basis, with the help of special screws having a sufficient length. This is done in order to maintain the stiffness of the device as long as possible and to prevent it from breaking.
Installation Steps
Surely, you wondered how many stages of installation of such a design exist and how much they differ from each other. It is worth considering the fact that you can use different materials, which means that the steps for them will be different.
But not only the subtleties of installation depend on the raw materials used, it also greatly affects the way in which you want to install the structure. And since the installation when using beams and grooves is different, then its main stages will depend on the final choice.
Frame timber partition
Now in retail there are frame structures in the form of timber. They significantly speed up the work. There is a specific installation here.

So:
- The collection of this design is carried out only on the basis, it serves as a timber frame, consisting of small beams with a size of 50x50 mm. Drawings should be applied to the wall, which will serve as the basis for the frame.
- Fasten the product from the sides and vertically to the floor, using self-tapping screws. After this, you need to indent from the ceiling by about 10 cm. And make a spacer over the entire width. The structure is attached to the ceiling using long screws.
Attention: Do not forget that an additional beam must be screwed down to the floor, its ends will be connected to the side parts.
- To connect all the particles of the construction with the bars that are on the sides, it is necessary with the help of corners of metal. Having outlined a place for the hole, from the beam located above to the one below let 2 beams. Only after this you can skip the bars vertically, observing a distance of 60 cm. Between them you should make struts from a rather short beam, and an additional strut is needed above the opening.
- Sheathing the frame can be with materials such as GCR (seeGypsum plasterboard cladding: finishes) or KVL, but first, sheathing work is carried out only on one side. And only after the sheets of polystyrene foam or mineral wool are placed in the cells, you can close them on the other hand with the above materials.
- Do not forget that between the layers of insulation and GCR there must be a vapor insulator that will protect the device from excess moisture.
Installation of a one-piece partition using a block frame:
- Installation works are very similar to those described above, but in this case you should get a double-timber frame. Its opening will be approximately 90 mm. It is in it that it will be necessary to insert the ends of the beam of the future design. However, before this, care should be taken that the floor covering is covered with jute insulation.
- The beam, which goes first, is fixed to the floor with special anchors. A special hole is drilled in it for the pins, which retreat about 14 cm from the main wall on both sides. A hole for a dowel is also drilled in a subsequent beam, and fiber from jute is laid between all the elements.
Mounting with spike and groove
First, draw a straight line on the wall, which is the main one, having previously deviated half the width of the planned spike from its edges. It should be done in a bar from the ends, using a saw or a hacksaw.
In height, it should be at least 30 mm and not more than 50 mm. After doing this, proceed to sawing the groove with a depth of not more than 50 mm. The timber going first is laid on the floor, which was previously covered with a jute ribbon.

- Having screwed the product with self-tapping screws, drill the holes for the nagle and lay the second beam, its spikes should exactly fall into the groove. Continue laying in this way to the very top of the partition.
- In those cases when an opening is provided in the frame of the partition, several additional rigid ribs are made, which are attached to the upper bars of the frame using corners of iron. This option is most suitable for houses that consist of a profiled beam.
Installation in a groove without thorns
This type of installation should also be started by drawing a straight strip on the wall adjacent to the future structure.

- From it should retreat half the width that the beam has. For example, for a beam 100 mm wide, 50 mm should be retreated. After doing this, draw 2 parallel lines. At their edges you should cut a groove. There you will insert the ends of the beam and lay the jute.
- As with other types of installation, plugs and jute should be used.
Caution: When you are finished assembling the partition, proceed with pumping out the jute. If during assembly you insulated the structure with a high-quality tape, then this is not necessary.
Warmth insulation
Please note that the average wall thickness of the timber does not exceed 20 cm. If we are talking about small country houses, then it is permissible to use materials that are about 9 cm in diameter.
There are also different purposes of the premises. If this is a bath, then warming is simply necessary. If the apartment building made of timber is not thick enough, it will also need to be insulated.

But also take into account the fact that regardless of the thickness of the walls, the building still needs to be insulated. After all, without this, housing will become unsuitable for wintering in it.
The process of warming the walls of the beam is practically no different from that carried out in brick buildings. The main difference is that different materials are used for interior and exterior decoration.
Phased insulation:
- Begin the procedure by marking the wall. At the same time, clearly observe the distance between the profiles of the crate, which is equal to the width of the insulation itself. The crate can be made both wooden and metal, but remember that when using wooden battens, they must be covered with antiseptic agents.
- Next, proceed to the installation of suspensions, they should be strengthened with the help of self-tapping screws.

- After the suspensions are installed, attach either metal profiles or wooden slats to them.It all depends on what material you prefer.

- Having finished working with profiles, make sure that insulation is laid between them. The best option for walls made of timber is the use of mineral wool slabs, since mineral wool is a modern insulation with good data.
- The penultimate stage of insulation works is the laying of a waterproofing layer, which will serve as reliable protection for mineral wool from moisture. It is highly undesirable to neglect this point due to the fact that even a slight contact of mineral wool with water threatens it with the loss of most of the characteristics.

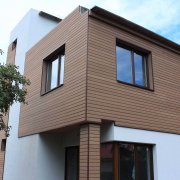
And the last thing you need to do is do the wall decoration. An acceptable option is to finish the facade with siding.
The process of leveling the wall of the timber
Quite often, owners of wooden houses face one extremely unpleasant problem, namely, the unevenness of the walls.

There are 2 factors that can lead to such unpleasant consequences:
| Poor quality material | Often, edged timber is transported wet to the construction site. Drying takes place directly in the wall and therefore, over time, the wall can lead. However, this only happens if the material is purchased from unverified suppliers who want to save money.
|
| Errors made during the construction of the walls | If an incorrect installation of a special insulation was made, then moisture that fell into the empty gaps will cause a negative process in the wood called rot.
|
If you plan to make a fireplace in the wall from a beam, then you need to read another article on our website. After all, here you can’t get off in two words and you need a planned approach. If the walls are made of vertical timber, then here the principles will be the same as described above. The instruction will help you do everything efficiently and in the shortest possible time.