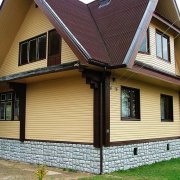
How to decorate chopped wooden walls
Chopped wooden walls are a rather simple, but not very durable construction. Drawings have now been developed and various types of finished houses, summer cottages, baths made of logs are being built, they can be bought and then assembled on your own site. But financial opportunities are not always possible to implement such a project.
In forest areas, in rural areas, you can buy the necessary material much cheaper, and then build a chopped house out of it, as the article tells you.
The content of the article
Features of chopped wooden houses
Chopped houses used to be the cheapest option for suburban construction, but with the development of technology, the construction of frame and timber houses that do not require highly skilled workers has become cheaper. While chopped houses, on the contrary, continue to rise in price due to the maximum share of manual labor in their construction.
Besides:
- A chopped house will not work in one season to put into operation. Such a house can be populated not earlier than in a year, but a large one with a complex layout, even after two.
- After putting it into operation for several more years, the owner will need to carefully monitor the structure.
- When ordering the manufacture of a chopped house, it is difficult to determine clear and unambiguous rules and regulations. In this case, the width of the groove, the diameters of the logs, and the moisture content of the wood are specified. But many parameters of a chopped house are purely subjective.
However, chopped houses have positive aspects.
These include:
- Greater durability compared to other wood buildings. When treating any wood mechanically, in addition to using an ax and a planer, the structure of the tree begins to collapse, the most dense, outer layer of wood is cut off and becomes waste. Other things being equal, chopped walls will last much longer.
- Originality of the chopped house. Regardless of size, such a structure is unique.
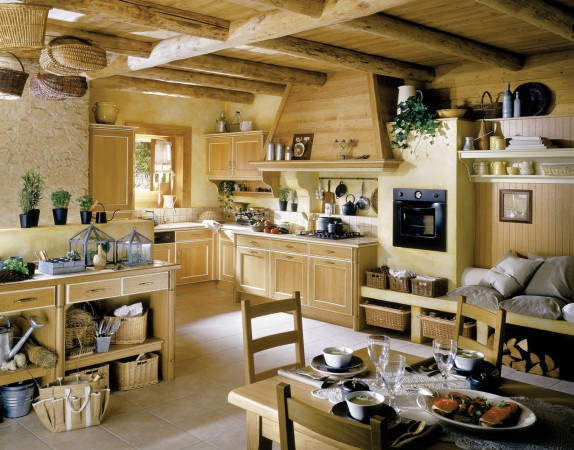
- The feeling of the novelty of life and freedom can be given only by a house made of chopped wood. After urban correct form city buildings made of plastic and concrete walls, in a chopped house is another world.
- In addition, the price of the already built chopped house will only grow with time.
In addition, wooden structures:
- Able to withstand significant compressive, bending and tensile loads.
- The tree holds sounds well.
- Correctly and qualitatively folded log house does not require additional insulation.
- Responding to changes in nature depending on the season, log walls inside the room create the most favorable temperature and humidity conditions.
Chopped wooden walls are:
- Cobblestone.
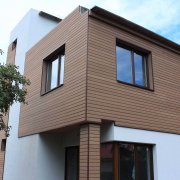
- Log (see Interior decoration of a log house: types of finishing material).
Features of the construction of a log house
For the construction of a log house, it is best to use coniferous wood: spruce or pine.
This is due to the fact that:
- Coniferous wood is widespread.
- It is much cheaper than hardwood.
- Such wood species are less susceptible to decay, which increases the durability of the structure.
- The sizes of coniferous logs are ideal for erecting a log house.
Tip: For the crown or the bottom row, preference should be given to oak logs, and even better - logs of bog oak or aged in water for several years.
When purchasing logs, you must keep in mind:
- If timber harvesting was carried out in winter, they can be safely used for the construction of a log house.
- Harvested logs in the summer, it is better not to use them - they are more prone to decay.
Tip: To build a house, if possible, should be made of local wood, it not only costs less, but also better withstands the impact of climatic conditions.
- For the construction of a log house, wood must be healthy, high-quality, logs - without damage to rot, woodworm, fungus.
- All logs should have one caliber or one diameter of 20 - 25 centimeters. The change in diameter from the bottom to the top of the house should not be higher than one centimeter for every meter of the element.
- To reduce the likelihood of formation of cracks in the log during drying, they are cut along the entire length to the center.
Tip: Before starting construction, all logs must be prepared.
- With unequal thickness of the logs in length, their butt ends should be trimmed to a thickness that is equal to the diameter of the tops of the log.
- Teska should start from the top, gradually moving to the butt part, which will help to prevent teasing on wood.
- The walls of the building are immediately best placed on the foundation, and only if this is not possible can the walls be installed on wooden piles and then a foundation is laid.
- On top of the foundation waterproofing under the logs, a lining of boards treated with bitumen must first be laid, the thickness of the element is at least 50 millimeters.
- A heat-insulating layer of tow or felt is placed on this lining.
- The logs themselves are laid.
Instructions for laying logs:
- Chopped walls are erected by horizontal laying of rows or crowns. In this case, it is necessary to alternate the location of the butt on different sides.
- The first two opposite logs are laid at the very bottom of the wall, after preliminary cutting them from the side that is laid on the foundation and from the inside. The width of the edges, for greater stability of the wall should be at least 150 millimeters.
- All subsequent rows are connected to the previous ones in a groove selected from the bottom of each log. This will avoid the formation of gaps, which will reduce the thermal conductivity of the walls.
- In the grooves, if necessary, insulation is laid. It can be:
- tow;
- hemp;
- felt.
- At temperatures up to (- 30 ° C), the width of the groove is taken at least 15 centimeters.
Tip: To ensure the same width and depth of the groove over its entire length, you must use a template made according to the diameter of the log.
- Vertical diameters are marked at the ends of the installed log with a plumb line, a template is applied to them so that its vertical line coincides with the diameter indicated on the log.
- Marks are applied at the edges of the log.
- Lines beat off the line to the entire surface of the log, they will indicate the edges of the groove.
- Across the entire width of the groove are made between the notch lines.
- Wood is carefully selected, the groove curvature is checked with a template.
- The method of cutting corners of the walls, which can be:
- without a trace "in the paw." This is a more economical, but also quite time-consuming method;
- with the rest "in the cup", as in the photo. It is faster, corners are less blown by the wind, but wood consumption increases.
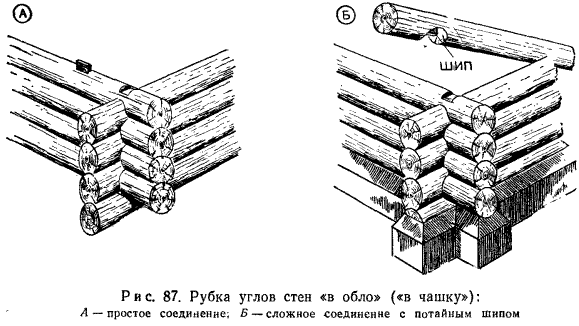
On the image:
- and - connection with a cup down.
- b - a complex connection in which a countersunk spike.
Both of these methods are equivalent in structural strength. More details about stacking logs are shown in the video in this article. After the “final” installation of the log house, the butt joints between the logs must be caulked.
This operation is performed according to some rules:
- The walls are caulked outside the house, then inside.
- First, a butt seam between the logs of the first ordinary and flange crowns along the entire perimeter of the log is caulked.
- The seam is processed between the remaining rows from the bottom up of the wall around the entire perimeter.
Tip: You can not caulk each wall separately to avoid distortions of the building.
Narrow slots and grooves caulk in this way:
- A small width of a strip of felt or hemp, tow are attached to the groove and are pressed into it with force with a blunt chisel or caulked special spatula, the method is called "stretching".
- The wide grooves between the crowns, caulk "vnabor". In this case:
- a twisted rope is spun from tow or hemp, wound with loops from a ball, hammered into slots and grooves;
- The upper and then lower edges of the seam are sealed with a chisel or narrow spatula.
- After the process of settling the house from logs or shrinking its walls, approximately 1.5 years after completion of assembly, the caulking operation is repeated. Simultaneously with this process from the gaps above the window and doorways the insulation is removed and the gaps are sealed with wooden blocks.
- The corners of buildings chopped "in the paw" are insulated:
- closed with a layer of heat-insulating material;
- lined with boards.
Features of the construction of paving
The block-shaped log house in color loses a little to the log, but it is much easier to assemble and then finish.
For external walls, the section of the beam, the depth of the grooves are selected, as in a log house, depending on the climate:
- At temperatures up to (-30 ° C), a square beam with a side of 150 millimeters is used for external walls, a rectangular section of a beam of 100 x 150 millimeters is used for internal walls.
- For lower temperatures, for external walls, the cross-section of a square beam increases to 180 millimeters, the thickness of the inner walls remains 100 millimeters, and the height corresponds to the side of the section of the element for external walls - 180 millimeters.
- In places with a warm climate, if it is planned to sheathe the cabin with boards and arrange heat-insulating gaskets, you can use bars with a section of 120 x 120 or 140 x 140 millimeters.
The assembly of cobbled timber is made:
- Horizontal rows or crowns between which heat-insulating material is necessarily laid.
- Every two meters, the crowns are spliced together with special rectangular spikes made of dry wood or cylindrical pins with a diameter of about 30 millimeters. This technique strengthens the entire structure as a whole and prevents wall expansion.
Bandaging the corners of the log house can be done in several ways:
- Dowel.
- On the root spike.
- In the tree.
All of them are quite reliable and relatively easy to assemble.

They simply pair the outer walls and the inner ones, which can be:
- Dressing.
- Half-baked.
- Frying pan.
Beams of overlapping and the upper crown are connected in a block-type log house in the same way as in the construction of a log house. If the logs need endurance to dry in the room, then when building a house from a beam, you can use parts that went through the drying process - a draft version is not performed when assembling a blockhouse - the building immediately gathers "full."