How is enamel painting by bath

Enamel for painting the bath is in retail chains. It's not a problem. But restoration, this process is quite laborious and how much it costs to paint the bath with enamel may not suit everyone. But in principle, everything can be done with your own hands. And then the price will be acceptable.
How to paint the bath with enamel, we will consider below. Also in the video in this article and photo you can see the most difficult areas of the work.
The content of the article
Rules for bathroom restoration
Painting the bathroom with enamel with your own hands is a rather painstaking process. You can’t rush here and you must use personal protective equipment.
Protective equipment
Paint to restore the enamel of the bath is different in its characteristics
The choice is already yours to make:

- In order to start painting the bathroom, it is necessary to open all the windows in the house / apartment and isolate all residents from the premises for at least 5 days. You need to find a respirator, with a special M3.
- You can use a military gas mask, it will come in handy for this purpose, but if you decide to take the usual “Petal”, this option will not work.
- Buy an apron from oilcloth or rubber, simple rubber gloves. This can be purchased at any hardware store. Of course, it is advisable to take a few pairs.
Consumables, tools and accessories
Before you begin, you need to make the purchase of materials:
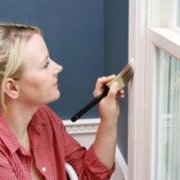
- Buy two flutes - brushes (70 - 90 mm from natural material), since one can come into contact with something, fall, so it will easily deteriorate - you will have to throw it away and go to the store for a new one. Having bought two, you simply save time and be safe.
Attention: After the purchase, wrap the brushes in a bag so that there is no effect on them (dust, water, grease, etc.). Before starting the painting, you only need to expand the brushes.
- Also need a cord brush (grinding nozzle) and Durex wheel preferably on a rubber or plastic base, so that it is flexible. All this is needed for a drill.
- Do not forget about tweezers or a knife, they will help get rid of unnecessary bristles that came out of the brush.
- In addition, we procure consumables, namely: half a liter of acetone or solvent 646. Remember, White Spirit (gasoline - solvent) and similar solvents can not be used! Find a rag that won't leave a lint. Before use, it must be washed and dried well. If there is an opportunity and finances - get special napkins for glasses, they will perfectly cope with their work.
Choose a cover
So, the tools were assembled and it was time to buy paint. Choose between acrylic and epoxy.
Let's see what the difference is:
- Acrylic paint began to be used when painting bathtubs about ten years ago. It is absolutely inferior to epoxy in durability, but it costs much more. It is difficult to prepare a mixture of acrylic: the paint is viscous, and the hardener is liquid, it becomes much more difficult to interfere, while still maintaining the necessary proportions. But applying this mixture is not difficult.
- Epoxy enamel has been used for over twenty years. At a cheaper price, it holds as much (if more) with proper application, but there is one drawback - the application technology itself is very complex, not everyone can do everything one hundred percent correctly.
Attention: If this is your first time doing such work, take acrylic, it is a little easier with it, if everything is done carefully. Epoxy is more suitable for experienced craftsmen.
Quick “treatment” of a tin bath
Often there are times when cracks form in the tin bath. What if there is no finance for a new one?
You can fix it quite easily:
- We take women's tights, cut off the required length of fabric and fold 4 times, close the gap so that there is a grip of at least five centimeters on all sides. We get the most ordinary epoxy glue just for these purposes.
- If you use fiberglass instead of tights, you need to boil it for an hour, after twenty minutes we lower some of the water. All this is done in order to remove the paraffin, which is usually covered with fabric. When using tights - we wash well.
- At the same time, we are processing the cleaved enamel with Durex, and of course the places near it (up to fifteen centimeters) until the shiny metal appears. After work, dust remained, it can be removed with a conventional vacuum cleaner, preferably without the use of nozzles.
- The next step will be degreasing with acetone, we carry out the procedure until the rag ceases to become dirty. On the outside we put a small piece of plastic film, fix it all with tape (long tapes crosswise).
- We proceed to the preparation of epoxy glue. We smear the place where they degreased, make a patch of about three centimeters on it and brush it with a brush until the unnecessary bubbles disappear. As you will notice that the epoxy has become jelly-like, apply again and make another patch of about 5 centimeters. Thus, it is necessary to make from two to five patches. Make sure that the glue has completely dried out, it must be hard - remove the edges of the patches and start painting.
Interesting: There is a known case when a person, in addition to repairing the bath in this way, also managed to fix the yacht. There was a hole, the ship was stranded and repairs began, ordinary cowards served as patches. By the way, she has been serving him for eight years!
We are preparing for painting
All work begins with a quality foundation preparation: For painting, the bath itself should be very carefully processed and degreased, and surface roughness created. Adhesion during repair depends on the number and size of various kinds of irregularities, while resistance depends on ductility.
In most cases, the new enamel comes off and cracks due to the high temperature.
To avoid this, read the tips:
- Tip number one: When working with epoxy glue, in addition to solvent, always add compound. It is used to repel mosquitoes. Masters, ship builders and fiberglass manufacturers use this trick.
- Tip number two: Use the first emery to sand the bath. You will spend much more time, but it is better to use it. If you remove it with a rough skin, smooth it over - small scuffs will remain, and the enamel will not be able to penetrate under any conditions, various impurities will begin to accumulate and so on - new cracks will form.
Bathroom preparation
Remove all things from the bathroom, lockers, absolutely everything except the bath itself. And why? Everything that we will use for finishing and repairing the bath contains volatile chemical components.
Attention: If suddenly there is a washing machine or a sink in the room - they can be left, the only thing - cover the washing machine with some kind of tape, the gaps can be sealed with tape or adhesive tape. Just take care of the taps, the shower must be removed.
Now do the surface preparation:
- First of all, we clean the entire surface from various contaminants. To do this, pour any good detergent or oxalic acid into the bath.
- Next, spray water drops on the product until porridge forms. Take a sponge for dishes (new) and clean the entire bath from the bottom to the edge of the walls. We do all this with the windows and doors open, if oxalic acid is poured, we use gloves and a gas mask or a respirator.
- We leave the mixture of detergent and water for ten minutes, then we wash everything off and fill the bathtub with water to the brim. We wait twenty minutes, drain the water. Abrasive start processing.
Abrasive treatment:

- As you already know, we process with abrasive in order to create the necessary relief on a clean surface. All rust must be removed if rust stains are left, later the iron will oxidize and cracks will form on the enamel. There are times when rust and dirt are eaten in such a way that it is impossible to wipe with any means, then you need to erase all the original enamel to metal, the main thing is to do everything carefully and do not wipe until holes form.
- The first step is to remove the drain and overflow hole, with a drill with a durex or brush, smooth the entire surface until the dirt and rust disappear, until dullness appears.
- We carry out a fingernail in a smoothed manner, under no circumstances should it slide, everything should be rough. You can check the flashlight, there should be no shine on the surface.
Dust removal and degreasing:

- Degrease and remove dust very carefully, you must not allow contact with the surface. You cannot climb into the bathtub and touch it with your hands! Please note that when removing and installing the drain, you need to think over the necessary actions, all the tools for work (knife, pliers, etc.), since you will not be able to touch the surface.
- Before the degreasing process, we collect all the dust with a vacuum cleaner; we take absolutely any rags (clean), drip solvent onto it and begin to wipe absolutely every millimeter, especially we take time to wipe the places near the drain. All of this is described above. Next, insert the drain into place.
We take gloves and an apron.
Attention: Only with them you can carry out this procedure!
- Pour a liter or liter into the bath with an acid-based active detergent, do not use alkaline. We take a new sponge for washing dishes and rub it over the entire surface from the bottom to the edge of the wall with the same layer. We leave the bath for an hour and a half.
- By further progress we collect a full bath (to the brim), wait about two hours, without touching. During this time, the bath should warm up, if the water in it is not warm, add another bottle of acid-based detergent. We are waiting for the liquid to cool completely. As soon as the whole mixture with water has become cool, we merge everything.
Attention: It is important to have a chain on the drain plug or at least attach a fishing line to it so that it doesn’t reach there.
- After the work done, we again draw water to the brim, leave for an hour and drain. If possible, repeat the action up to five times - the effect will be better.
After that, we immediately dry the entire surface with a hair dryer, since it is no longer possible to stop work (dust or something else may get in). - You can find out exactly about the lack of fat with the help of a shower, for a while screw the hose and run the water, it should drain evenly, and not stop with drops. It is better to check for cleanliness with an ordinary clean rag - everything is described above. Only on condition that the bath is fat-free and completely clean, you can start painting.
The first option: How is the epoxy painting process going
We prepare the compound strictly according to the instructions - this is how the process of painting the bathroom begins.

Attention: It is very important to read and do everything as it is written on the package in this case, since the composition of enamels is different for all manufacturers and you will not guess here, there is no standard set for everyone.
- It happens that they indicate that it is necessary to heat up before use, so we take and heat in a pan with water, and at the same time we establish temperature control.
Caution: Do not pour the entire hardener into the base, we may not have time to finish it. Even if everything works out on time, a durable layer will not work in any case.
- The foundation needs to be created in small portions, two hundred and fifty milliliters, and divide them into equal parts. The proportion is approximately the following: we make six parts for a half liter of base. Remember that after adding the hardener to the base, mix everything well.
- Be sure to add a colorless oily liquid to each serving, which dissolves well in organic solvents (dibutyl phthalate) and mix thoroughly again.
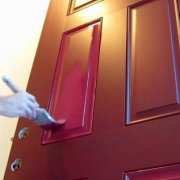
- We paint with a flush brush. It must be moistened and a strip drawn vertically (from bottom to edge), rub in different directions as much as possible. We draw another strip so that the grind overlaps everything by half. If necessary, use tweezers or a paint knife to remove unnecessary pile. Do not touch the surface.
- We apply the first layer, leave it for a quarter of an hour. Next, apply the second one, work in the same direction and start painting from one place. So the coating will be even, uniform and smooth.
- As soon as the work is done, we close the door to the bath room for at least five days, it is advisable, of course, to leave the room closed as long as possible. It’s better not to go there during this period of time, only after the allotted time will you be able to see and evaluate the result of your work.
Smudge Summary
Inflows and smudges
No matter what painting method you use, sagging or smudging can occur. Their education is controlled within fifteen minutes. If there is still an influx, it must be removed with a smear. When a smudge forms on the drain, we wait for the paint to completely dry and only then cut the drop with a knife.
Now you know how to paint the bath with enamel and choose a coating, what material to use and the most important thing: they learned about precautions. The instructions will help you do everything right. We wish you good luck, let everything work out!