How to paint a ceiling foam skirting: do it yourself

Before describing how to paint ceiling skirting boards, let's think about when to do it. There are several options: before they are fastened to the joint of the wall and ceiling; after installation, but before wall decoration; after finishing the walls and ceiling.
In fact, there is no definite answer - you can do it the way you like, but the second option is still preferable. But why exactly, and how to do it right, read below.
The content of the article
When and why to paint skirting boards
Why is it better to paint the skirting board after its installation, but before Wallpapering and painting the ceiling?
Because:
- So you do not stain the paint finish, and if the ceiling is painted in the same color as the curtain rod, then it is more convenient to do this at the same time;
- During installation, fragile foam can become dirty or damaged.Leave dents and scratches on them. In addition, the junction of two elements in corners or in a straight line is always noticeable. All these defects are repaired and putty. Of course, this can be done only after installation in place.

Note. Wallpaper should be glued after mounting the cornices, not only because they can be stained when stained. But also in order to facilitate repairs in the future: when removing old wallpaper, the baseboard will remain in place. In the case when it is glued on top of the finish, there is a risk of them coming off together with the canvas.
Now about why paint ceiling eaves in general. This question most often arises when you do not need to change its color. White ceilings and skirting boards are a very common option, and foam and polyurethane products are initially white.
One of the reasons you already know is the concealment of docking sites and minor installation flaws. But she is not the only one.
Also, painting is needed for a number of other reasons:
- These moldings look, frankly, not very respectable. Especially cheap foam. And with the help of paint, they can be given a more solid look and even imitate gypsum stucco, natural wood or stone. The appearance of the finish will be on top, and the price will be much lower;

- Baguettes may have their own defects.in need of elimination;
- They are pretty fragile, the coating gives them additional strength, paints an unsightly loose structure;
- Material turns yellow over time, dust, soot and other particles, which are absorbed by the surface, settle on the cornices. It is difficult to wash it to its original whiteness without damaging it. Whereas painted products are easily and quickly cleaned with a damp cloth.
Painting technology
Before painting the skirting board ceiling, you need to putty it, leveling all the flaws on the surface, and choose the right paint.
What paint to use
Unlike wood, polystyrene can not be painted with solvent-based compounds, in particular white spirit. These substances dissolve not only the paint, but also the synthetic material itself, which is instantly "eaten up" by an aggressive liquid. Therefore, you can use only latex, acrylic and other water-dispersible compositions, diluted with water.
Read also:
- Acrylic paint: specifications
- Latex paint: how to work with it
- Water-based paint: features of the material and work with it
They are most often white and the basic tones of the color palette.If you could not find the right shade, you can add tinting paste to such paint and mix well.
Tip. In order to precisely get into the right tone, it is advisable to do this with the help of special tinting machines, which are available in any large building materials store.

As for the application method, for painting already mounted cornices, you can use both ordinary paint and paint in spray cans. Of course, if the walls and ceiling are not finished yet. Working with it is much more convenient, the result is high-quality, but changing its color will not work.
How to prepare skirting boards for painting
Fine plinth putty finishing putty using a small rubber spatula or just do it yourself, since the work is quite small, jewelry. Instead of putty, you can use white or colorless silicone sealant.
The repair composition is applied to the joints from top to bottom with a slight pressure so that it penetrates into the cracks and depressions, but the brittle material is not deformed. In this case, it is necessary to repeat the profile relief, therefore it is more convenient to work by taking a little putty on the tip of the finger.

It is important. Do not forget to protect the skin of your hands - work with rubber gloves.
Excess solution is removed from the surface with a sponge moistened with water and wrung out. Corner joints are similarly sealed. In addition to mounting defects, the gaps between the cornice and the ceiling / wall should be eliminated, if any.

When the putty dries, the remaining small irregularities are smoothed out with a null-skin, the surface is cleaned of dust and primed.
How to apply paint
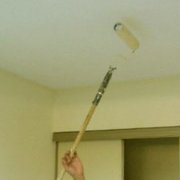
The painting technology depends on the degree of decoration of the walls and ceiling. If it is not there, we are not wise, we simply paint, as usual, trying to apply an even thin layer. We use a brush, since it is unrealistic to paint over a relief surface with a roller.
If the walls are already finished completely, it is advisable to protect them from paint, despite the fact that it is easily washed off before drying. You should not risk it - along with it you can erase a part of the paint from the wall or spraying it with wallpaper.
The instructions for painting ceiling cornices are extremely simple:
- Masking tape is glued along them: only on the wall if the ceiling is painted in the same color, or on both sides if it is already painted in another;
- A little paint is drawn on the brush, which is applied along the length of the molding and spreads with a thin layer. It must not be allowed to collect in drops and run down;

- After the coating has dried, you need to visually evaluate the result. If it suits you, you can carefully remove the tape. If not (putty spots are peeking through the paint or it lay unevenly), repeat the procedure;
- If this is required by the style of the interior and design intent, you can highlight the protruding parts of the relief in a different color, for example, gilding. To do this, a thin brush is taken, dipped in the appropriate paint and carefully wrung out on the edge of the can or bath so that the bristles are almost dry. This brush and painted convex sections of the baguette.

Unfortunately, after finishing it is not always possible to use masking tape, since when peeling it off, it can pull the wallpaper along with it or tear off some of the paint or decorative spraying. Get out of the situation will help a wide thin spatula, a sheet of thick paper or something like that.
The putty knife is applied close to the baseboard from the staining side and gradually moves along it as needed. That is, if protection of both walls and ceiling is required, then the cornice is first painted on one side of the longitudinal axis, then the spatula is moved to the other side to paint the second half.

Conclusion
In fact, there is nothing complicated in this work, and it’s not necessary to hire finishers to complete it - you can do everything yourself. Especially after watching the video in this article, which describes in detail the entire process from start to finish. Only your own laziness or elementary unwillingness can prevent you, but not the lack of experience.