How to paint the ceiling with water-based paint
How to paint the ceiling with water-based paint? The abundance of a variety of finishing methods does not exclude the popularity of painting the ceiling today. Such a coating attracts with its availability and the ability to do all the work with its own hands. However, not everyone knows how to properly paint a water-based ceiling.
The article talks about the nuances in preparing the basis for applying paint, about the technology of painting the ceiling with water-based paint with your own hands.
The content of the article
What compounds are used for painting the ceiling
In the old days, the most popular coatings for ceilings were chalk and lime mortars. The only advantage of such coatings is low cost.
Now similar work is carried out with water-based paints:
- The most popular of these types of coatings are acrylic paints. Their features:
- quite good properties during operation;
- the use of different compositions depending on the type of premises where repairs are required.
Compared to other similar ones, their cost is slightly higher.
- Latex paint. Their advantages:
- perfectly fit on almost any basis;
- wash well.
The only drawback is the high price. Such material belongs to the high-end segment in the market.
- Silicate paints. At the heart of their manufacture is liquid glass. They are best used on concrete and stone surfaces.
Tip: In homes such compositions should not be used. They are better to surface ceilings in industrial premises.
- Enviable elasticity silicone based paints. They are not afraid:
- cracks up to 2 millimeters;
- high humidity.
In addition, before painting the ceiling tile with a silicone-based aqueous emulsion paint, a preliminary primer does not need to be applied, they are perfectly laid on any foundation, but the rather high cost makes the composition not very popular.
- Polyvinyl acetate paint reigns in the budget segment of the construction market. Despite the fact that the composition can not be washed, it does not tolerate humidity, but for working in dry rooms, with its help it is possible to get a very decent appearance of the ceiling.
A large selection of paints allows you to purchase the desired composition, but their characteristics can differ significantly, which requires before you wash the ceiling painted with water-based paint, determine what paint was applied to the surface and whether the ceiling can be washed.
Tip: When purchasing material for the decoration of the ceiling, you must immediately buy a detergent composition for it, because updating the ceiling painted with water-based paint, removing dirt from it, will be much easier than doing the whole painting process again.
What tool will be needed and how to prepare the room
The instruction for high-quality painting of the ceiling with a water-based emulsion consists of several stages, of which the simplest is the painting itself. The application of such a coating refers to the types of work that require careful ceiling preparation.
To paint the ceiling you will need:
- Airbrush (see Types of spray guns: how to choose the right). The use of such a device is the most convenient, fairly fast and high-quality coating method.But such an apparatus costs serious enough money, which is often inaccessible to the average amateur to make repairs on their own. In this case, it is worth using cheaper tools that are shown in the photo.
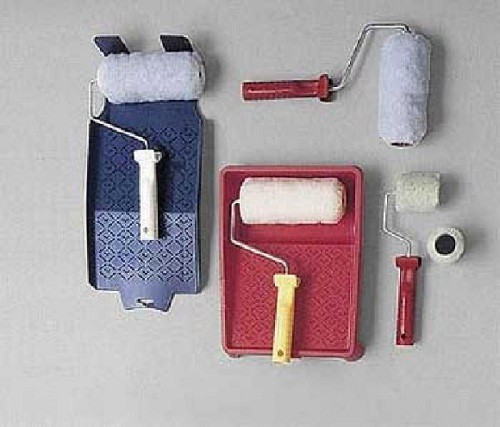
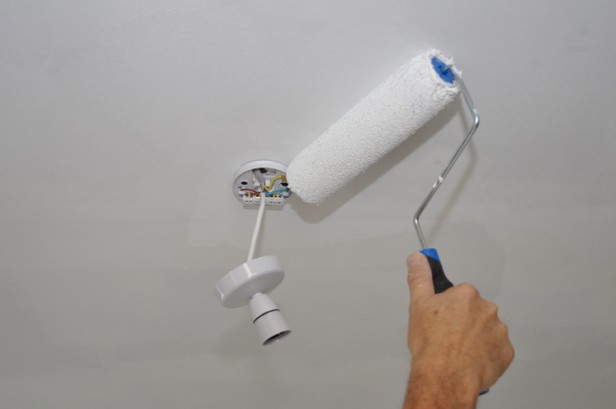
- Paint roller Is the main tool for ceiling decoration.
Tip: Do not use foam products for painting the ceiling, they will leave traces of a large number of small air bubbles on the surface.
- They paint a little and require a very smooth surface. Velor rollers.
To paint the ceiling, it is better to use fur rollers on which a medium or long pile.
- Use of a stepladder or special scaffolding when painting the ceiling with a water emulsion, it is very inconvenient, they will need to be constantly rearranged. To facilitate work and convenience, it is worth buying a roller with a long handle.
However, a stepladder or other stand may still be needed, before painting the ceilings with water-based paint, they must first be prepared, which would be quite difficult without lifting devices.
Tip: Replace the stepladder with a sturdy table and stool to make it easier to climb the table. In this case, the latter should have a classic look, on four legs, otherwise other designs will not support the weight of an adult.
- It’s convenient to work with a roller, but it’s easier to paint over corners, butt joints and other hard-to-reach areas with brushes about 4 centimeters wide.
- Cuvette. This device is a container with a corrugated area for rolling the roller, paint is poured into it. You can do without this tool. But the cost of the plastic device is not large, and you should not save on this device.
- Polyethylene film, special masking tape will protect the walls, floor, stationary furniture from paint on them.
- Metal spatula, sandpaper, bucket and foam sponge will be needed when cleaning and preparing the ceiling for painting.
The preparation of the premises is as follows:
- Whenever possible, all furniture and other small items are carried out.
- The room is covered with plastic wrap or old newspapers.
How to remove the old coating from the ceiling
If there is an old water emulsion on the ceiling, in addition to losing its attractiveness, it can simply collapse when applying new paint to it.
Tip: Remove any old flooring from the ceiling.
The removal of wallpaper, chalk and other compositions is performed in the following sequence:
- The ceiling with a roller or a rather simple hand sprayer is abundantly wetted with water.
- The surface is left alone to get wet for about 20 minutes.
- The wetting procedure is repeated and immediately all the windows and doors in the room open wide.
- After half an hour, the ceiling will begin to bubble and peel off. It is known that such coatings are afraid of drafts.
- A metal spatula scrapes old paint or wallpaper from the surface.
- The ceiling is washed with clean water using a sponge.
- When small cracks and shells appear on the surface, they are sealed with putty (see How to putty the ceiling - the basics of craftsmanship), and after it dries, everything is sanded emery.
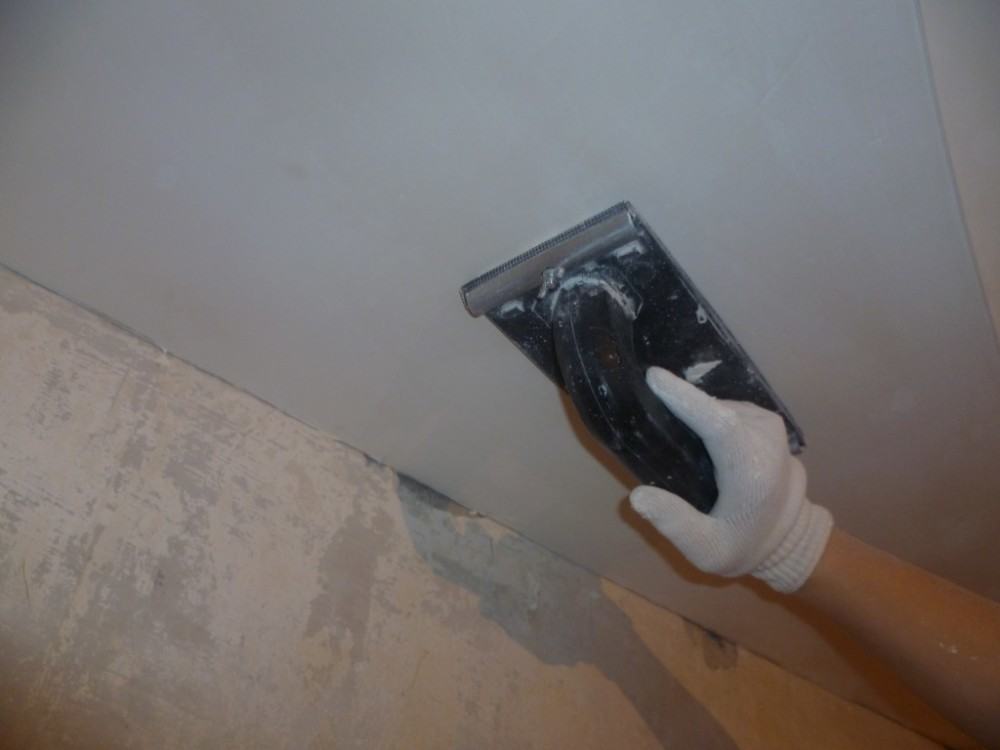
- It is easier to putty the ceiling with a ready-made universal polymer-based compound. Gypsum or cement mixtures are cheaper, but it is more difficult to work with them, and ceiling repair is a specific matter and it is better, in this case, not to risk it.
Tip: With large defects in the ceiling, without the proper skills, do not align it yourself. One cannot do without an invitation from a master or arranging suspended, suspended ceilings.
Primer Ceiling
Before painting the ceiling with a water-based emulsion, it should be primed (see How to primer the ceiling: we understand in stages) The most acceptable primer for surface treatment is to prepare the solution yourself.
For this:
- The selected type of paint is taken.
- Diluted 1: 1 with water.
For the formation of a film on the surface of this composition is enough, and the solution itself lays down best.
How to paint the ceiling
You can paint the ceiling after the primed surface has completely dried.
The procedure for painting the ceiling with water-based paint is as follows:
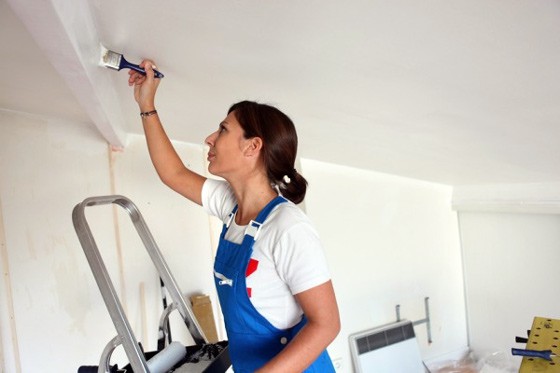
- All corners and hard-to-reach areas for painting with a roller are thoroughly stained with a brush.
- Smooth planes are painted with a roller. The paint is poured into a tray or cuvette, the roller is half dipped into it and rolled out on the corrugated portion of the container.
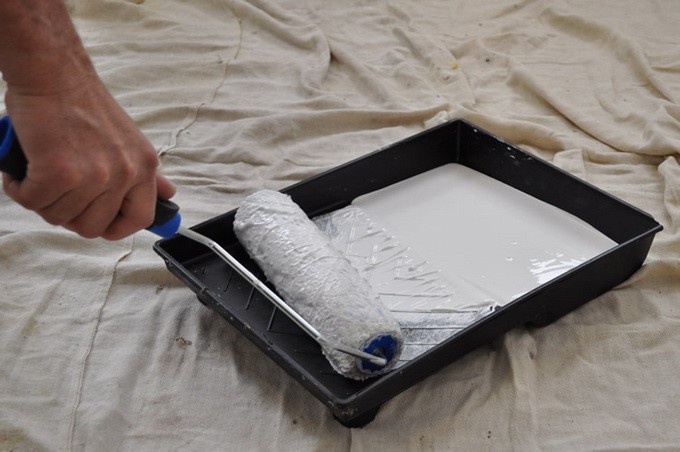
This is done to evenly distribute the coating over the surface of the roller.
Tip: To obtain a high-quality coating, paint should be applied with a minimum of three layers.
- The first layer is coated parallel to natural light or from a window. Staining is carried out with an overlap on the previously applied strip, 1/2 of the width of the roller. It is most convenient to move along a W-shaped path.
- The ceiling after complete staining is allowed to dry, about 12 hours.
- The next layer is applied in the direction perpendicular to the previous one and also left to dry.
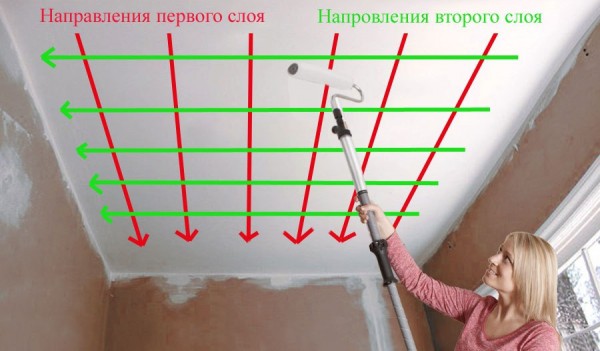
Tip: If there are spots on the ceiling, after the second layer dries, you need to walk on a dry surface with a fine emery cloth, and then wipe the dust with a sponge. On a rough second layer, the third, finish will lie much better.
- The last layer is applied similarly to the first - parallel to the light rays from the window. This is the finish layer so that it is better to use a completely new roller. During the work and when drying the surface, drafts are not allowed, which requires closing all windows and doors.
What defects are possible after staining?
After coating, some errors are possible:
- Appearance of streaks during staining. This indicates an uneven distribution of paint. In this case, it is necessary to make an additional several passes with a roller.
- With poor mixing of the paint, stripes and spots of different shades may also appear.
- If all operations were performed correctly, but different shades and flares still showed up, this indicates a roughness in the ceiling. In this case, it can save only the alignment of the surface using putty or gluing with a ceiling tile.
What to do if the ceiling is painted with water-based paint? How to repaint the surface with minimal cost, but a good effect, tell the video in this article.


In general, a lot depends on the putty. If putty evenly, then paint with water-based paint is not difficult. The main thing is to choose the right roller and walk several times on the ceiling with paint.