Preparation of drywall for painting: materials, tools, technology

Our topic today is the preparation of drywall for painting. We will find out what materials can be used at different stages of work and how to properly perform these works. So, on the way.
The content of the article
Goals
First, we formulate the requirements for a ready-to-paint surface.
She must be:
- Perfectly even. If the wallpaper (especially textured) is able to hide quite serious defects in the base, then the paint will emphasize them;
Note: this primarily refers to dyes with a glossy texture. Gloss highlights the slightest bumps in the shadows. Matte surfaces are not so sensitive to potholes and protrusions.

- Clean. Dust will drastically degrade the adhesion of the paint to the substrate. In addition, she, gathering in lumps, is able to make the painted surface uneven, and its color - heterogeneous;
- Moderately absorbent. Weak and excessive absorption of moisture is equally harmful: in the first case, adhesion (adhesion of paint to the surface) will suffer, in the second, the paint consumption will unjustifiably increase.
Stages of a Long Way
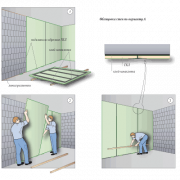
So, it is given: GKL is fixed on the frame or crate (as an option - on the main wall with plaster glue). The surface of the walls and ceiling is decorated with open mounting seams and fasteners (self-tapping screws recessed just below the level of the cardboard shell).
To get acquainted with them more clearly you will video in this article.
Drywall finishing for painting includes:
| Picture | Stage of work |
 Sewn joints | Stitching of seams between sheets cut into place. In contrast to the factory edges of PLUK (thinned semicircular), the edges of the additional sheets of drywall have a rectangular section. The purpose of the joint is to make the joints available for putty. |
 Rolled fiberglass for reinforcing cracks and joints | Reinforcement of seams. With fluctuations in temperature and humidity, the linear dimensions of the drywall sheets will vary slightly. This often leads to cracks at the joints between the sheets; reinforcement completely solves the problem of cracking. |
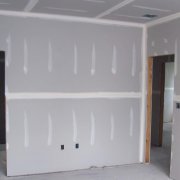
 Seams and fasteners after termination | Sealing joints and fasteners. Filling is carried out in two (sometimes even three) layers. |
 The joint of the additional sheets is markedly marked by the thickness | Optionally - putty of the entire surface of the walls. Its purpose is to level reinforced seams at the joints between the edges of the notorious additional sheets with the surface that stand out in thickness. |
 Sanding for painting | Grinding. It eliminates the inevitable putty flaws. |
 The best tool for dusting GKL - industrial vacuum cleaner | Dust removal with a vacuum cleaner or panicle. |
 Acrylic adhesive penetrating primer | Padding. Penetrating soil finally prepares GCR for painting by gluing dust particles remaining on its surface and filling part of the pores of the cardboard shell and core. Thus, the soil reduces the absorption of paint, and reduces its consumption when applying the first layer. |
And now we will analyze each item in more detail.
Stitching
Processing of drywall for painting begins with the expansion of the seams between the U-shaped edges. Tool: stationery knife (or, in its absence, a sharp kitchen knife with a short blade). Technology: all U-shaped edges are cut at an angle of about 45 degrees by two-thirds of the thickness of the GCR.

Reinforcement
Materials: serpyreka or having lesser thickness fiberglass.The width of the canvas is 5-8 cm.
Technology: having an adhesive layer, a serpentine is glued along the seam immediately before its filling with the first pass, and then it is covered with a second layer of putty.

Fiberglass is used on a slightly more complex technology:
- The seam is filled with putty;
- After drying, along the seam, PVA glue is glued onto water diluted with water;
Tip: do not try to stick reinforcing material along the entire length of the seam in one go. It is much easier to cut it into pieces about a meter long and then glue these pieces butt.
- After the glue dries, the seam is repacked.
Putty joints
Material: universal or finishing gypsum putty.
Its advantages against competing solutions:
- Low price (from 12 rubles per kilogram of dry mix);
- Excellent adhesion to the gypsum core and gypsum plaster;
- Simple processing (gypsum is a fairly soft mineral and is easy to grind).
Tools - gypsum board putty a pair of spatulas is used for painting: wide (30-35 cm) and narrow (10-12 cm).

Note: in addition to spatulas, you will need a container for mixing gypsum. Its optimal volume is 6-10 liters (for a single serving of putty 3-4 liters). The author uses a plastic bucket for water-based paint for this purpose.
Putty preparation:
- Pour water into a clean container (no more than 1/2 volume);
- Pour the dry mixture into it, distributing it evenly on the surface of the water;
Caution: Never pour water into dry gypsum when preparing your own putty. The instruction is due to the fact that in this case, very dense and practically insoluble lumps are formed at the bottom, which are almost impossible to break when kneading.
- Wait a few minutes and mix the filler until smooth. This can be done with a narrow spatula or, which is much more convenient, with a drill with a whisk inserted in its cartridge.

Sealing of joints: at first, the seam is filled with crosswise movements with a narrow spatula (see How is plasterboard joints puttying performed) That is how you can achieve the most dense filling of the cavities between the sheets of drywall.
The second layer is superimposed on top of the reinforcement with sliding longitudinal movements of the wide spatula and hides the texture of fiberglass or sickle.

Fixing fasteners: a self-tapping screw is putty in a couple of movements of a 10-centimeter spatula. First, you fill the hole with putty in a sliding motion, then remove the excess with the second pass (“on the curtain”).
Attention: after working out the putty, immediately clean the tool and utensils cleanly. Lumps of dried gypsum can completely spoil the finish, getting under the spatula, and leaving extremely untidy furrows in the putty.
Puttying the surface
On the entire surface, gypsum board for painting is puttyed with the same gypsum putty.
Only the technology of its application differs:
- The putty is evenly applied to the wide spatula with a narrow one;
- Then it is applied to the surface of the GCR by sliding movements. The layer thickness should be approximately equal to a millimeter;

- If you are unable to apply a layer of constant thickness - putty the wall in two steps with extremely thin (“cut”) layers. The second layer is superimposed at right angles to the first: thus the inevitable strips from the edges of the spatula will stand out less.
Grinding
Tool: grinder (disk or vibration), in extreme cases - a hand grater.

The author uses a vibrating grinder to grind GCR, in which grinding nets are fixed instead of paper. Mesh No. 80 is used for basic grinding, No. 120 - for finishing.
Attention: we strongly advise you to wear glasses and a respirator, or at least a gauze bandage, before grinding. Gypsum dust breathing is not so useful, in addition, it noticeably irritates the eyes.
Technology: grinding is performed by circular motions of a grater or grinder in bright light incident on the gypsum board at an oblique angle. In this case, the shadows will help you see the slightest bumps.

Dedusting
It is most convenient to use an industrial vacuum cleaner: its filters are impervious to gypsum dust. A household vacuum cleaner is also suitable, but be prepared for a significant reduction in its service life: gypsum is a great abrasive and contributes to the accelerated wear of all moving parts of any equipment.
If there is no vacuum cleaner at hand, use a regular sweeping brush or a whisk for the floor.
Primer
Drywall Primer for painting it is carried out with primer on the same binder on which the paint of your choice is prepared. Latex primer will prepare GKL optimally for painting with latex dye, acrylic - acrylic, silicone primer is ideal for moisture-resistant silicone paint.
Attention: priming and painting are carried out before the installation of floor and ceiling skirting boards, lamps and various decorative elements. Exception - plaster lamps for painting, stucco molding and baguettes.

Priming is carried out in a single layer.
Primer can be applied:
- Wide brush;

- Long hair roller;
- Airbrush;
- Sprayer for flowers.
Drying water-based soil takes no more than two hours, but do not rush to proceed to painting immediately after priming: there must be at least two weeks between filling the joints and finishing. During this time, all the chemical processes associated with its hydration will be completed in gypsum. If you hurry, the seams will stand out in a dark shade through any number of layers of paint.

Conclusion
As you can see, when using drywall for finishing, preparation for painting will not take much time and effort. Get acquainted with it more clearly you will video in this article. Good luck!