Drywall manufacturing technology: from layout to decoration

Our topic today is the technology of manufacturing drywall walls. We have to find out from what and how to make the frame of the future partition, how to properly sheathe it and prepare it for finishing. Let's get started.
The content of the article
Material selection
First, a few words about the materials from which the walls are made of drywall in apartments and private houses.
Frame
Partition frame can be assembled from a bar with a cross section of not less than 40x40 mm or a galvanized profile.

The bar is somewhat cheaper, however, we strongly recommend that you opt for a profile.
There are several reasons for this:
- A bar, unlike a profile, needs sorting. You may encounter geometry defects (humps, propellers) and wood defects (dropping out knots, rotten, oblique);
- Wood warps when dried. If you acquire material of the so-called natural moisture, deformation of the frame during evaporation of moisture residues may well lead to the appearance of cracks in the skin;

Note: the same thing happens with fluctuations in atmospheric humidity (seasonal, in dry and rainy weather).
- Finally, the tree is rotten and is a tasty food for some insects and for mold.
Author's note: I myself build drywall walls solely and exclusively on the frame from the profile. The difference in price with a bar against the background of the total cost of materials is insignificant; in this case, after finishing the partition, you can not be afraid of cracks and deformation of the frame in hot or wet weather.
What profiles are needed to build a drywall wall frame in a house or apartment:
| Picture | Description |
 Guide profile | Guides (PN). Their total length should be equal to the perimeter of the wall. These profiles are responsible for fixing the frame to adjacent structures - floor, ceiling and main walls. The height of the walls of the U-shaped profile is 40 millimeters, and the width of the base (50-100 mm) is determined by the requirements for the strength of the wall, its noise insulation qualities, and also depends on the diameter of the utilities located inside the frame (water supply, ventilation, sewage, etc. ) |
 PS profile | Rack (PS). Their size varies from 50x50 to 100x50 mm and must correspond to the size of the guides. Rack profiles are usually mounted vertically in increments of 600 mm. |
Drywall
Which one to choose for gypsum plasterboard wall?
In stores you can find three main varieties of it:
| Picture | Description |
 Drywall. Just drywall | GKL itself, intended for dry rooms, has a white front surface. |
 Green indicates moisture resistance | GKLV (moisture-proof drywall) has a blue-green color and is distinguished by antiseptic additives in the composition of the gypsum core, as well as a cardboard shell resistant to soaking. |
 GKLO production Knauf | GKLO (fireproof GKL) has a high resistance to heat and is able to prevent the spread of flame in a fire. |
From what to assemble a partition - it is not difficult to guess:
- Walls in the nursery - from white drywall;
- Bathroom railing or soul walls - from drywall with high moisture resistance;

- Partition in a wooden house (including erected from sip-panels or frame) - from GKLO, capable of delaying the spread of fire.
For wall sheathing, wall gypsum wall board with a thickness of 12.5 mm is needed. The length of the sheet should ideally be equal to or slightly greater than the height of the ceilings (you can find on sale drywall with a length of 2.5, 2.7 and 3 meters).
The total area of gypsum plaster with single-layer sheathing is calculated as the doubled area of the future wall, plus 10-20% for trimming (complex walls made of drywall require more material consumption).
Reference: GKL comes with a sheet thickness of 12.5, 9.5 and 6 millimeters. In addition to the wall we already know, drywall is also ceiling (not intended for significant operational loads) and arched (flexible).

If the partition has to withstand significant operational loads (this is important, for example, for a drywall wall in a nursery or hallway), the lining is double. Fireproof walls or partitions with protection against penetration can have triple sheathing and (in the latter case) be reinforced by galvanized steel sheet laid between the layers of drywall.
Additional materials
In addition to materials for the frame and its lining, we will need:
| Picture | Description |
 Self-adhesive damping tape | Self-adhesive damping tape. It will provide a seal for the connection of the frame guides with adjacent structures and exclude the transmission of low-frequency sound from the partition to the main walls and ceilings. |
 Dowel nails 6x60 mm | Dowel nails (usually 6x60 mm in size). They are needed for mounting the guides and are purchased based on the step between the mounting points in half a meter. |
 Galvanized metal screw | Self-tapping screws 9 mm long for metal (with pointed tips). Their racks will be connected to the rails. For each rack there are 4 self-tapping screws. |
 Phosphated screws for GCR | Drywall screws. They will fasten the casing. For one GCR layer, their length is 25 mm; with a two-layer sheathing, the second layer is fixed with 40 mm fasteners. |
 Reinforcing fiberglass mesh | Serpyanka. So they call a reinforcing self-adhesive fiberglass mesh, which reinforces the seams between adjacent sheets. Without reinforcement, fluctuations in humidity and temperature over a year or two lead to cracks. |
 Glued Mineral Wool | Glued slabs of mineral wool. They provide sound insulation between adjacent rooms. With a plate width of 600 mm, it is installed between the racks of the frame without undercutting. |
 Fugen putty from Knauf | Universal or finishing plaster putty. She seals the joints between the sheets of drywall and the grooves from the screws. |
 Penetrating primer on acrylic resins | Penetrating primer for mineral substrates. She prepares the surface of the wall for finishing. In general, acrylic primer is used. |
It is worth clarifying: if you plan to paint the walls with a dye on a silicone, silicate, latex or vinyl acetate binder, the primer should have the same base.
Tools
For the assembly and pre-finishing of the wall with gypsum board with our own hands, we need:
- Plumb, level, long metal ruler and marking pencil;
- Hammer drill with a 6 mm drill for drilling holes in the walls, ceiling and floor for mounting rails;

- Hammer and hammer for hammering dowel nails;
- Screwdriver for screwing in screws;
- Drywall knife;

- A pair of spatulas - 25-30 and 10-12 cm wide;
- Capacity for mixing gypsum putty with a volume of 5-10 liters. In this role, you can use an empty plastic bucket of water-based paint;
- Metal scissors for profile cutting.
Please note: abrasive cutting is contraindicated in galvanizing.Zinc is a low-melting metal and evaporates even at a temperature of 900 ° C, so heating when cutting profiles with a grinder partially deprives them of the anti-corrosion coating.

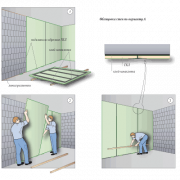
Technology
So, how to build drywall walls in a room or any other room?
Frame
- Mark the position of the partition on the floor;
- Using a plumb line and a ruler, transfer the markings to the ceiling and adjacent walls;
- Expose a directing profile with the attached damping tape and directly through it drill holes for fixtures;

- Fasten the guides with dowel nails;
Hint: this type of fastener, despite the presence of slots on the cap, does not screw in, but drives in. Slots only allow you to unscrew the nail if necessary.
- Mark the position of the racks on the floor and ceiling. Recall that the step between their axes in the general case is exactly 600 millimeters: so the edges of adjacent sheets of drywall will be exactly in the middle of the rack;

Tip: apply labels so that they are visible after sheathing the frame. They will help you get the screws into the rack profiles when attaching the gypsum board.
- Trim each rack in place, align with the previously applied marks and fasten to the lower and upper rails with 9 mm self-tapping screws (4 per rack).
Caution: Do not cut all racks to the same size. The spread of the ceiling height in different sections of the slab floors can be measured in centimeters.
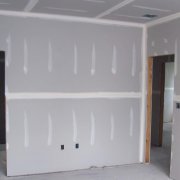
Sheathing
Each full-sized sheet is placed in a vertical position, aligned in the center of the rack and attached to all frame elements covered by it (including guides), with self-tapping screws on drywall with a step of 150-200 mm. To get into the intermediate rack profile, the author uses a plumb line: it is hung on a self-tapping screw screwed on to the top mark.

It is most convenient not to cut additional sheets, but to break them into cuts: in this case, an order of magnitude less dust rises into the air.
This is done like this:
- Cut the sheet on the front side along the ruler by about a third of the thickness;

- Lay it with a notch line on the edge of any elevation (table, GKL stack, etc.);
- Break drywall by sharply pressing on the hanging edge;
- Turn the sheet over and cut the back of the shell.
A few tips for skinning the frame:
- Use a screwdriver with a special drywall bit: it limits the screwing depth of the screws. In the absence of such a bit, adjust the screwdriver so that the ratchet works when the head of the self-tapping screw is immersed. The fastener hats should be recessed about 1 mm below the surface of the gypsum board;

- Do not screw fasteners closer than a couple of centimeters from the edge of the sheet - it may crumble;
- Do not be afraid to leave gaps between the sheets (primarily additional). Putty will hide them;
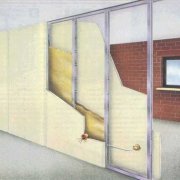
- After sheathing the frame on one side, fill it with mineral wool. To trim the plates in length, use a sharp knife;

- At the same stage, all communications are laid inside the frame;
- Two-layer sheathing is performed with the overlap of all joints of the first layer. Only the second layer of drywall is putty and reinforced.

Putty
It begins with the jointing: from the rectangular edges, cut to the size of the sheets, the chamfer is removed with a knife. Stitching will allow you to fill the joints with putty to the full depth.

Then the seams are glued with a serpentine and immediately filled with putty directly through the cells of the fiberglass mesh. The second layer of putty is applied after the first has dried and completely hides the sickle.
Fasteners are also putty, not less than twice: even the so-called non-shrink putties in practice give some shrinkage during drying.

Do I need to prime the joints before puttying?
Let's just say this will not be worse. However, dust-free joints do not need a primer: putty adheres well both on the surface of kraft paper and on exposed gypsum cores of additional sheets.

Is there a need for putty of the entire surface of the GCR?
This is done in two cases:
- Under the wallpaper. They firmly adhere to the gypsum coat, and when you try to remove the coating during the next repair, you have every chance to tear off the kraft paper from the gypsum base. A layer of putty will allow you to remove the wallpaper without damaging the wall;

- To level the surface according to the level of the joints, in the event that they remain noticeable after puttying. If the factory edges of the PLUK (thinned with fillets) allow the reinforced seam to be brought out flush with the surface of the sheet, then the rectangular edges of the sheets cut in place do not give this possibility. A millimeter layer of putty will completely hide the seams.

A few subtleties of puttying:
- When mixing the putty, pour plaster into a container with water, and do not pour water into a container with a dry mixture. The price of non-compliance with this requirement is insoluble lumps at the bottom, which will leave grooves during puttying;

- The manufacturer's instructions for the dosage of water and dry gypsum mixture must be strictly observed. Too liquid putty will constantly drain from the spatula, and too thick you can not put on the wall with a thin layer;
- When sealing joints, shut at a time no more than 1-2 kilograms of dry mix. Gypsum putty is suitable for work no more than 45-60 minutes and is produced quite slowly;
- Be sure to wash the dishes and spatulas after making the next portion of gypsum. Otherwise, the seized putty from the previous portion, again, will leave grooves in the finish;

- When applying the second layer of putty on the joints and when filling the entire surface of the gypsum plaster, use a wide spatula, imposing a narrow gypsum on it;

- If it is difficult for you to apply a uniform layer of millimeter thickness - putty the wall in two layers “on the side”. The final coating thickness will be the same.
Finishing Finish
Preparation for finishing consists of three stages:
- The wall is polished in bright slanting light. Lighting will let you see the slightest putty defects. For work, you can use a hand grater, a vibration or disk grinder;

Useful: the author does not use sandpaper for grinding, but sanding nets. Coarse grinding is carried out with mesh No. 120, finishing - with mesh No. 180.
- Then the surface is cleaned of dust. This can be done with a vacuum cleaner (preferably an industrial one; its filters completely trap gypsum dust) or with a regular whisk;
- GCR is primed with penetrating primer using a wide brush or roller (see Do-it-yourself primer for drywall).

Attention: wallpaper can be glued immediately after the soil has dried, but painting with water-dispersion paint should wait at least two weeks. If gypsum hydration processes are not completed in the putty, the joints will be tinted regardless of the number of layers of paint.
Problems and Solutions
How to make walls in a gypsum board room completely impenetrable to sound?
Make the partition frame double (with a minimum distance between the rails and the racks) and sheathe it in two layers. This design will provide maximum sound insulation due to the acoustic isolation of the two sides of the casing.
")
How to build sliding walls from drywall (with a sliding door)?
In the same way, but with an increased distance between the frames. In the role of a bridge over the opening, a beam is mounted with a cross section of at least 100x50 mm: it will have to absorb the load from the weight of the doors.

By the way: a double frame with a gap is also used in cases where large diameter communications (ventilation or sewage) need to be laid in the wall. Racks of frames for greater rigidity are connected by horizontal jumpers.

Is it possible to make a wall as rigid as possible without increasing its thickness?
Yes. Here are the easiest ways to achieve this:
- Put in rack profiles on a bar with a section of 5x5 cm;
- Embed PS profiles in each other and mount them in pairs;

- Reduce the pitch between the uprights to 300 or 400 mm. The main thing is that the width of the GCR remains a multiple of this step.
How to install the door to the wall from the GCR?
This is done when mounting the frame:
- Make a gap in the lower guide to its width;

- Expose one of racks adjoining a door and fix it;
- Assemble the door block and wedge the door leaf in the box to prevent it from overwriting the jambs in the future;
- Put a strip of mounting foam on the rack and pull it with self-tapping screws to the door block exposed strictly vertically;
- On the opposite side, fasten in the same way and pull the second rack to the rails;
- Connect the racks with a horizontal jumper.

How to make it possible to mount hinged furniture on a plasterboard partition?
Place wooden mortgages (timber or thick plywood) in the frame on the side of the shelves or cabinets fastening.

Conclusion
We hope that our tips will help the reader in the repair and decoration of their homes. You can see more clearly how the drywall walls are assembled, in the video in this article. Good luck!