Alignment of the wall with drywall on the crate and without the frame

The topic of this article is leveling the wall with drywall. We have to find out what auxiliary materials may be needed for this work, and get acquainted with the GKL installation technology. Let's get started.
The content of the article
Why drywall
But in fact, why do we align the walls with drywall and not plaster?
There are several reasons:
- Great performance, directly resulting from the solid size of the sheet (1.2 * 2.5 meters);
- Perfectly smooth GKL surface, which does not require filling;
However: drywall is often covered over the entire surface with a thin (about 1 mm) layer of gypsum putty. Putty helps to hide reinforced seams between sheets that stand out in thickness.
- GKL installation on the crate - it is an opportunity to use the space behind the false wall for insulation or installation of utilities (wiring, water supply, sewer pipes, local network, ventilation, air-conditioning mains, etc.).

GKL selection
What kind of drywall do we need?
Wall, 12.5 mm thick. If you purchase a thinner (9.5 mm) ceiling gypsum board - alignment of the wall will not provide its acceptable strength in relation to mechanical stress.
Not only that: with especially stringent requirements for strength, the walls are sheathed with wall gypsum board in two layers.
In addition to the usual (white) drywall, in construction stores you can find two more of its varieties, differing in the color of the front surface:
| Picture | Description |
 Fire-resistant GKL is marked in red | Fire-resistant (red) is distinguished, as you might guess, by its high resistance to high temperatures. It can delay the spread of flame in a fire, giving you the opportunity to eliminate a fire. Its use will be appropriate, first of all, in wooden houses (including frameworks and buildings made of sip-panels). |
 GKLV from the German company Knauf | Moisture-resistant drywall (GKLV) has increased resistance to fungus due to antiseptic additives. In addition, its cardboard shell does not soak in direct contact with water. If you plan to align the walls of the kitchen with drywall, GKLV will be the ideal material for this room. |
Mounting options
So, how to level the walls with drywall? There are two main technologies: installation of gypsum plaster on the crate and fastening on mounting gypsum adhesive. We will get to know them today.
To the crate
The frame allows you to level almost any wall defects - blockages, bends, potholes and through holes. In addition, as we mentioned above, the frame can hide the insulation or engineering communications laid behind the false wall. The limiting factor is only the length of the suspensions with which the crate is attached to the main wall.

What do we need to do the wall cladding on the frame with our own hands?
Supporting materials
| Picture | Description |
 Ceiling CD | Galvanized ceiling profile (CD, PP) 60x27 mm in size for the role of the actual crate. The length of the CD profile must be equal to or greater than the ceiling height, and the total number of profiles is calculated based on their step of 60 cm. |
 PNP profile | The directing ceiling profile (PNP, UD) in the size of 27х28 mm. He will be responsible for attaching the frame to adjacent structures - adjacent walls and ceilings. |
 Direct suspension. Reasonable minimum metal thickness - 0.7 mm | Direct suspensions are responsible for fixing the battens to the main wall. Their number is calculated based on the installation along each CD profile in increments of 60-80 cm, depending on the requirements for the rigidity of the cladding. |
 Dowel-screws for fastening the lathing to the capital structures | Dowel screws 6x60 or 8x80 mm in size for fastening direct suspensions and guides to capital structures. |
 Screws for metal with a drill | 9 mm metal screws for connecting the elements of the crate to each other. |
 Drywall Phosphated Self-tapping Screws | Drywall screws for mounting gypsum plaster on the crate. With a single-layer sheathing, the length of the screws is 25 mm, with the installation of the second layer of a two-layer sheathing - 40 mm. |
 Fiberglass for reinforcing seams | Serpyanka (fiberglass with an adhesive layer on one side) for reinforcing the seams between the sheets. |
 Exceptionally high-quality Turkish putty ABS Saten | Gypsum putty (finishing or universal) for fixing fasteners and seams. |
Note: we intentionally do not consider the installation of a battens from a bar. Its only advantage over the galvanized profile is a slightly lower price. At the same time, the bar loses in all other parameters: durability, resistance to moisture and biological influences, correct geometry.
Tools
Here is a list of them:
- Roulette, pencil, level and plumb for marking the crates;
- Puncher for drilling holes for dowels;
- Metal scissors for profile cutting;
Please note: it is undesirable to cut the profile with a grinder. In abrasive cutting, the heating of the metal causes the zinc coating to burn out, and the ends of the profiles become vulnerable to corrosion.

- Screwdriver (mains or cordless) for screwing in screws and self-tapping screws;
- Sharp knife for cutting gypsum plaster and jointing;
However: the curly parts are cut out of drywall with a hacksaw or jigsaw. GKL cut by a knife into a third of the thickness breaks only in straight lines.
- A pair of spatulas - narrow and wide (10 and 30 cm, respectively).
Lathing assembly

We state everything in order:
- Mark the installation line of the rail on the floor or on the ceiling. Then, using a plumb line, transfer it to the second floor. Connect the markup with vertical lines on the walls;
- Fasten along the marking the guide profiles of the PNP. The step between the attachment points is about half a meter;
- Mark the axes of the ceiling profiles on the floor and ceiling using a plumb line. The step between them should be exactly 60 centimeters: the width of the drywall sheet (120 cm) should be a multiple of this step, so that the seams between the sheets fit exactly on the center of the crate element;
- Fasten straight suspensions along each axis;
- Cut along the length and insert into the guides of the ceiling profiles;
- Aligning each of them with a plumb line or a long straight rail, fix the profiles to the ears of the suspensions with metal screws. Use the same screws to connect the profiles of PP and PNP;
- Bend the ears protruding from the crate in the direction of the wall.

The frame of the false walls is ready (seeDo-it-yourself installation of a frame for drywall on a wall) How to install drywall on the walls of the finished crate? Vertically, so that the edge of the sheet falls in the middle of the ceiling profile.
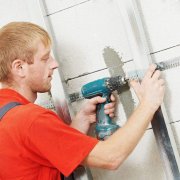
GKL mount
It is carried out with screws with a pitch of 15-20 cm. The screw is screwed at a distance of at least 2 cm from the edge of the sheet (so as not to crumble it) so that its cap is recessed about 1 mm below the surface.

A couple of little tricks:
- Adjust the ratchet of the screwdriver to slip when the head of the self-tapping screw is sunk into the drywall;
- To measure the fastening step, use not a ruler, but a span. This is the distance between the tips of the thumb and forefinger, stretched to the sides.
Reference: a span is an old Russian measure of length translated into SI as 17.78 cm.

Two-layer cladding
We move on:
- The first layer of drywall is fixed with a minimum number of screws (no more than 25 pieces per sheet);
- The second layer is mounted with an overlap of all the seams of the first layer (horizontal and vertical);
- The standard fastening step is 15-20 cm. Due to the longer length (40 mm against the usual 25), the fastener reliably attracts sheets to the frame of both the second and first layers.
The following is the surface finish of drywall.

Sealing joints and fasteners
We carry out the work according to the following instructions:
- Glue the seams with a speck;
- Fill the seam through the sickle cells with gypsum putty using a narrow spatula;
- After the first layer has dried, apply a second spatula with a wide spatula, hiding the texture of the sickle;

- Fill the holes from the screws - also in two steps, with a pause to dry.
After grinding the joints and priming the surface with any penetrating primer, the false wall is ready for final finishing (sticker on wallpaper or painting (seeHow is drywall painting performed)).
Tip: if the reinforced joints are distinguished by thickness, the alignment of the walls of drywall is carried out with the same gypsum putty. It is applied in a continuous layer of millimeter thickness over the entire surface of the GCR.
On glue

In many videos posted on the Internet, wall alignment with gypsum board is performed without crate for mounting gypsum adhesive (Volma Montazh, Perlfiks o Knauf, etc.). However, the authors of the videos are often silent that special glue can be replaced with the first plaster or putty that comes across: the price of dry mixes practically does not differ, the adhesive qualities are also approximately the same (seeHow to stick drywall to the wall yourself).

Glue installation of GKL is permissible subject to three conditions:
- The main wall has minor irregularities (not more than 50 mm);
- It has a strong, not crumbling and not delaminating surface;
- On this surface there are no coatings with low adhesive qualities (chalky whitewash, enamel coating, etc.).
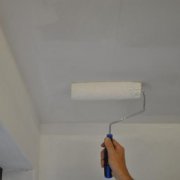
Tip: treat the wall on which you plan to fasten GKL with penetrating acrylic primer. It will improve the adhesion of the wall to the glue by gluing the remaining dust on it, and at the same time reliably connect the upper layers of plaster or putty together.
Tools
In this case, leveling the walls with drywall will require simple tools. Here is a list of them:
- Long level;

- Putty knife for applying gypsum glue;
- Rubber mallet.
Technology
The technology is very simple and everyone will be able to:
- Apply glue cakes with a step of 15 cm on the surface of the sheet or, which is much more convenient, on the wall in the place of its attachment;

Attention: it is better to apply a continuous glue roller above the floor. It will greatly simplify the installation of the skirting board.
- Press the sheet against the wall, and level it with light blows of a mallet;
- When mounting the next sheet, check the relative position of adjacent edges and the position of the sheets in the same plane using the same level.

How to install drywall on the walls, if they have deep potholes or noticeable blockages? Use beacons.In this role, small scraps of drywall pre-glued to the wall, partially screwed in with dowels, or nails hammered into the plaster to the required depth can play the role.

Sealing of joints and their reinforcement are performed in the same way as when attaching gypsum plaster to the frame.
Conclusion
We hope that we were able to answer all the reader's questions. The video in this article will allow you to more clearly get acquainted with how to align the walls with drywall with your own hands. Good luck!