How is the installation of plastic panels on the walls
Plastic panels on the walls - products that are manufactured by extrusion, the material for it is polyvinyl chloride or PVC. In this process, the special composition of the molten dense mass is extruded through the dies, corresponding in shape to the panel being produced. After cooling at a certain temperature, the workpiece is cut to the desired size. The article will tell you how to lay plastic panels on the walls.
The content of the article
Material Features
Before decorating the wall with plastic panels, they need to be purchased in the right quantity and in good quality, taking into account the features of different types of material for different rooms.
For instance:
- When decorating the kitchen, bath or hallway, preference should be given to moisture-resistant products with high strength, without ornaments and protruding elements.
- Balconies should be sheathed with panels immune to sudden changes in temperature, resistant to mechanical stress.
In this case, the panels are available in different sizes:
- According to the thickness of the panel there are:
- 5 millimeters;
- 8 to 10 millimeters. In this embodiment, the same components or moldings are used.
- The width of the plastic sheets ranges from 200 to 370 millimeters. The length of the panels is:
- 2.6 meters;
- 2.7 meters;
- 3 meters.
There is also:
- plastic lining with dimensions of 10x300 centimeters;
- sheets up to 1.2 meters wide and up to 245 centimeters long;
- square or rectangular tiles, the dimensions of which are 300x300 millimeters, 300x600 millimeters or 900x900 millimeters.
The advantages of plastic panels are:
- Long service life.
- High moisture resistance, and a reliable connection of the panels to each other, ensures the tightness of the joints, which prevents the ingress of water between the elements.
- The increased soundproof qualities.
- Resistance to mechanical stress and abrasion.
- Possibility of installing an additional layer of insulation under the panels.
- The ability to use different design solutions to simulate various surfaces under:
- tree (seePanels on a wall under a tree: we select and mount with our own hands);
- ceramics;
- skin.
- Simple installation, which does not require the use of special equipment and special knowledge.
- When installing products, there is practically no dust and dirt.
- Simple maintenance, it is enough to wipe it once a month with a damp rag or a cleaning cloth, and wash strong dirt with a warm soapy solution, without using abrasive detergents or solvents.
- It can be installed on any surface, regardless of its evenness and degree of smoothness, which allows you to install the frame crate, regardless of the previously used cladding.
- Increased fire resistance, can withstand temperatures above 350 degrees.
- No harmful substances are emitted during operation.
- Low price.
With such advantages when mounting on a wall, plastic panels also have disadvantages: they can not be used in places that are designed to evacuate people in case of fire. This is due to the fact that during combustion, plastic begins to emit caustic substances and a lot of smoke.
Such places may be:
- Stairways.
- Platforms.
What types of plastic panels are used for wall cladding
The top layer of plastic panels can be done in three main ways:
- Lamination. At the same time, on the front surface of the plastic panels, using a two-component adhesive, a special film is glued that is resistant to light, moisture and abrasion.
- Offset printing. The image is applied using a two-stage printer in two stages:
- printing a pattern using inks;
- coating the panels with antistatic varnish.
With this method, images imitating marble are applied. The main advantage of the offset method is the moisture resistance of the product, its resistance to chemicals and physical effects.
- Thermal Transfer / Thermal Printing. Drawings and patterns are transferred to the surface from the thermal film pressed to the panel, and then rolled on it with a hot silicone roller. The process occurs at temperatures from 150 ° C to 180 ° C. Under the influence of heat, the varnish and pigment available for dyeing on the film are transferred to the PVC blank. In this case, the film becomes transparent and begins to be wound on coils in order to use it in the future. With this method:
- the formation of an additional protective layer from varnish is not provided;
- the surface gains resistance to external influences, to UV rays;
- panels have an original design and rich color.
What is necessary for the installation of plastic panels
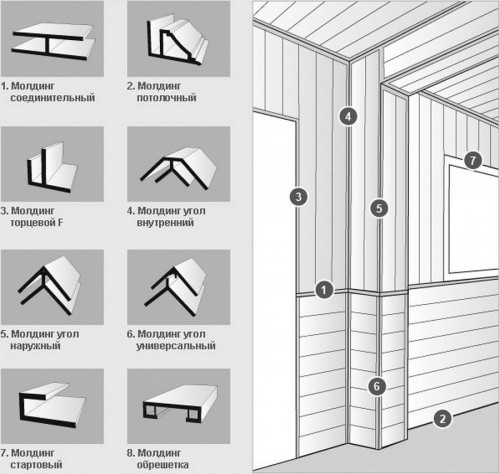
Before covering the walls with plastic panels, you need to purchase accessories for them:
- Starting bar.
- The finish bar.
- Profile for mounting the inner corner.
- Profile for setting the outer corner.
- Connecting strip.
- Plinth floor and ceiling.
- F profile.
- Soft universal corner, for external and internal corners.
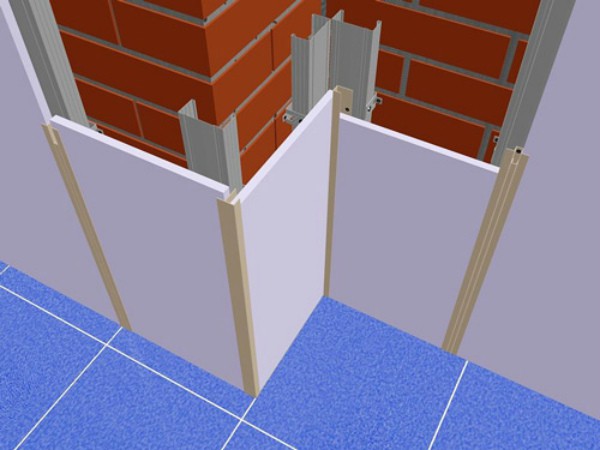
Installation of accessories is shown in the photo.
Tip: To install moldings or accessories, use galvanized self-tapping screws or nails. You need to purchase accessories to match the color of the panels.
When buying plastic panels, you need to pay attention to:
- Appearance of products. It is better if they are from the same batch and match the same color scheme. In this case, the application of paint should be an even continuous layer, and the surface without damage, absolutely smooth.
- Number and condition of stiffeners. The increase in the number of partitions inside the panel makes them stronger, but at the same time, the stiffeners must be without deformation or damage, even and often located.
Tip: If it is visually difficult to determine the number of internal partitions, you should be guided by the mass of one panel - it should be large enough, but also not very heavy.
- Castle connection. The groove and the crest must absolutely correspond to each other, which will allow when connecting the elements:
- eliminate the formation of gaps or irregularities;
- to provide ease of connection, without much effort.
- Price range. The lowest cost of production will not allow to achieve high surface quality. Do not buy too expensive panels, usually, the brand premium is included in their price.
- Raw materials. The high content of chalk in the product, when bending the part will leave a noticeable mark on it or even dents.
How to calculate the amount of material
Before how to sheathe the walls with plastic panels, it is necessary to calculate the quantity of the material itself, the elements for the crate and other accessories.
Instructions for calculating parts for the lathing:
- Calculations can be made in several ways. The simplest one can be considered by the example of a wall in a room 2.5 meters high and 4 meters long. The optimum distance between the profiles is up to 50 centimeters.
Tip: When installing the crate with your own hands, it must be borne in mind that its elements are attached perpendicular to the panels: with horizontal placement of the strips, the panels should be installed vertically, and when vertical - vice versa.
- By choosing the position of the cladding, the desired number of profiles is calculated.To determine the number of racks for vertical placement of the crate:
- the length of the wall is divided into a step between the racks;
- the extreme profile is added.
The result is: 400: 50 + 1 = 9. In this case, you need to purchase 9 panels, the length of which is 2.5 meters.
- The lathing is performed around the entire perimeter, which means that at least two guides are added, with a length equal to the surface to be decorated. This determines the total length of the required elements. Approximately 10% is added to this figure, which will allow you to take into account undercuts or errors that occurred during assembly of the frame.
- When placing the crates horizontally, calculations are performed taking into account the height of the ceilings. In addition, door and window openings should be taken into account, if any, their area is subtracted from the obtained value.
When calculating fasteners:
- When installing the crate on concrete or brick walls, you will need to calculate the number of dowels, taking into account the total length of the wall. At the same time, for every 0.5 meters, one fastener is installed, adding a few percent for the stock.
- Installation with the help of clamps is carried out on the basis of: for 1 m² - 20 pieces of elements for fasteners.
The procedure for calculating PVC panels is as follows:
- The length of the wall is determined, in the example it is 4 meters.
- The resulting figure is divided by the width of the strip: 400: 20 = 20 pieces equal to the height of the ceiling when installing the panels vertically.
- If the panels look like individual tiles, the calculation is based on square meters, add up to 10% of the material. Calculation of the elements around the openings of windows and doors is best done separately, subtracting the result from the total value.
When calculating components and accessories:
- The length of components is most often 3 meters. When using angular profiles, the angles that are available on the surface to be decorated are calculated, which will correspond to the number of components purchased.
- The length of the ceiling and floor skirting boards is made according to the size of the perimeter of the room, dividing this value by the length of the skirting board and rounding, the result is upward.
- Connecting internal and external corners for skirting boards are calculated by the number of corresponding corners.
How to mount the crate
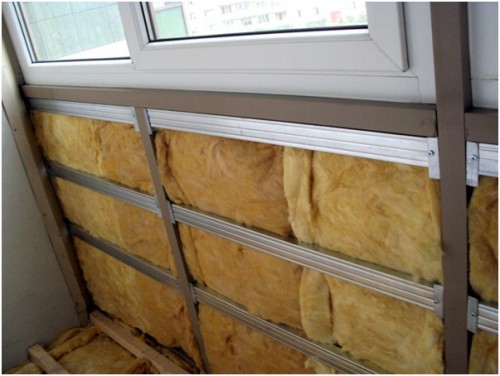
After acquiring the necessary materials, you can begin the installation of the crate, which is necessary if there are large irregularities on the walls, differences in height and the laying between the panels of an additional insulation layer.
For the wall lining, you can use:
- Wooden slats with a cross section of 2.5x4 centimeters or 4x4 centimeters. Their fastening to the base is carried out with self-tapping screws or dowels.
When installing the battens vertically:
- right and left guides are installed;
- horizontal crossbars are placed between them, withstanding one step.
You can increase the rigidity of the structure by installing additional vertical posts.
- Plastic profiles. This is a modern material, its cost is more than wooden and for its installation requires a more even surface. Its advantages:
- not subject to decay;
- not susceptible to mold or mildew;
- a special mounting method allows the installation of panels in a very short time;
- the use of special fasteners that snap the panel in and hold it securely allows you to quickly dismantle the lining and reuse the panels - they will not be damaged by brackets or screws.
Tip: When installing a plastic profile, special attention should be paid to placing the racks in one plane - even a slight deviation can result in the clip not snapping into place.
- Metal guides.
This type of crate is more expensive than wooden, but the most reliable and durable. Profiles are made of aluminum. At installation:
- installed under the ceiling U-shaped starting profile;
- the same profile is placed on the floor;
- guides perforated with dowels or self-tapping screws are fastened, for fixing the panels, the step of fasteners is up to 90 centimeters.
How to install plastic panels
The plastic panel on the wall can be installed in two ways:
- To the crate.
- On the glue.
When mounting on a crate:
- The corner element is set.
- The panel is inserted tightly.
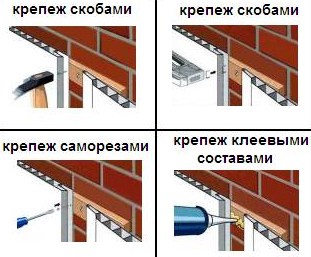
- The part is screwed with screws or fastened with a construction stapler to a wooden crate, or with a clamp with a metal frame.
- Connecting the groove and the comb carefully, the second panel and all the subsequent ones are joined.
- Special accessories are installed for mounting panels on another wall.
- The last panel is not attached to the crate, but latches onto the finish part, which will hold it securely.
- If there are switches or sockets on the wall, plastic is cut and a box is placed on it.
- Floor and ceiling skirting boards and plugs are mounted on them.
- Corner elements are placed, they are glued on top to plastic panels.
Sometimes plastic panels are used on the floor of the wall, which will protect parts of the surfaces that are most susceptible to the appearance of dirt on them. How to do this will tell the video in this article.
When attaching the panels with glue directly to the wall, the main thing is to prepare the surface correctly, it should be perfectly smooth, you can fix the lining with liquid nails.
The procedure is as follows:
- The surface of the wall is cleaned of the existing cladding: wallpaper, painting (see How to wash off the paint without problems).
- Surfaces are puttied with antibacterial putty or covered with a primer layer with protective components against mold and fungi.
- The adhesive composition is bred strictly according to the instructions.
- The solution is applied with a roller, brush or notched trowel to the wall.
Tip: Do not immediately apply the product on a large area, cover with glue should be a section for one or two panels.
- Corner elements are installed.
- The first panel is inserted and pressed tightly against the wall until the glue seizes.
- The rest of the trims are set.
- Mounted finish element.
How to install plastic panels, everyone chooses for himself, depending on the type of wall and the material of the lathing.
