How is the wallpaper border sticker

Sticker wallpaper and border set the tone for the entire interior, are, as it were, its basis. And to refine this foundation, to make it bright and elegant, allows the curb. It is difficult to overestimate the importance of this decorative wall element in creating a harmonious stylization of the interior. The border makes the interior more informative, affects the perception from different angles, forcing to notice the nuances.
Today we will tell you how to sticker wallpaper with borders. There is nothing complicated and everything is completely within our power to do it yourself. And watching the video and photo questions will not be at all.
The content of the article
Wallpapering Rules
The sticker of the border on the wallpaper will be the completion of the interior of the plane. Only the wallpaper itself needs to be glued correctly, then the border will be easy to fix.

Let's look at the most basic, one hundred should pay attention when wallpapering:
- Wallpaper fixing is done only on a prepared plane and always primed (cm. Primer for wallpaper: which one to choose and how to use) After all, the quality of the fastening will depend on this;
- Installation starts from the corner of the room. Then it will be better seen how the pattern matches;
- The first line of fastening must be repulsed. First, marking is done using a plumb line and after that the line itself is drawn. By which gluing is done;
- You should never do this with windows open., when dried in this case, the wallpaper just disappears;
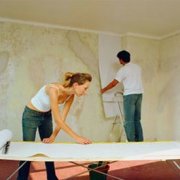
- Before mounting, be sure to cut the sheets of wallpaper in the right size. After fasting, after applying the glue, we first let the material soak in and after that we do the fastening.
Functionality Borders
The versatility and variety of decorative edging makes its presence appropriate in almost all rooms, from the children's room to the work office. With the help of a border, you can transform an old mirror or chest of drawers, so that they do not resign, but can still serve.
So:
- First of all, this interesting wall bordering can say - “thanks for the evidence!” Since it was the border that got the role of emphasis in the artistic transformation of walls, windows and doorways.
- Secondly, competently located, it is able to delimit and visually zonize the space, visually increase or decrease the size of the room.
Attention: And the third important property of a practical nature. A dark border will help to hide small impurities or minor errors that tend to appear on the lower edge of the wallpaper adjacent to the floor.
Raw material:
- Edging on a paper basis (just glued, but short-lived and fade in the sun)
- Vinyl border (practical look; does not fade, washable)
- Textile edging goes well with classics
- The acrylic look of the edging is similar to the vinyl look, with an additional layer of acrylic emulsion
- Velor curb impractical, capricious in care, collects dust, but creates a pleasant tactile experience
- Fiberglass edging is easy to clean, good for kitchens and baths.
On a texture basis, borders are:
- Smooth
- Embossed effect
- Fishnet
- Silver and gold plated
Attention: Sticker wallpaper with a border is a complex issue. So before buying it is worth deciding on the style of the room. The price of borders is not high, but they should be in the subject.
Styles and sizes of decorative borders
Borders are mainly sold in the form of rolls, 5 or 10 meters long. The edging width varies from 1-100 cm.
As for such parameters as the color type and the border pattern, there are a huge number of them, for every taste. The scope for imagination is great. And there is every chance, without exaggeration, to create an interior that you will not find anywhere else.
Possibilities of location of borders:
- Edging above, under the ceiling around the entire perimeter of the room
- Vertical Border Sticker
- Floor to one third of the total wall height
Let's consider each area in more detail:
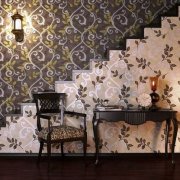
- Most often, the border is glued to the upper edge of the wallpaper, near the ceiling. In this case, you can beat the width (a wider strip will create a framing effect), and perception contrast (light wallpaper - a dark edge, and vice versa).
- The vertical placement of the edging visually divides the room and emphasizes the target orientation of a particular zone. For example, using this method, you can select a doorway or window.
- A fashionable trend among admirers of non-trivial ideas is the use of two-level wallpapers in combination with a dividing edge. They look good only in rooms with a high ceiling.
- Pasting the lower third of the surface with a meter border requires a logical coordination of the difference between the color of the lower and upper parts. Inaccuracy in tone - and harmony is broken.
Attention: Among designers there is a taboo that cannot be ignored. They do not recommend gluing the edging in the area of the "equator" of the wall. This method of encircling narrows the room, making its space uncomfortable.
Informed choice
Buying a border will put you before a rich but difficult choice. The assortment range is huge. In specialized stores, wallpapers are sold complete with appropriate decorative ribbon.
All tapes have their own classification. Each type of border corresponds to a certain room, with its own functionality.
- The interior of the kitchen will be decorated with edging with the image of bright vegetables or fruits. A fringe with a picture depicting toys, animals or school supplies will refresh the children's room.
- When choosing a paper tape, you need to take into account the moment of contrast, it should be 4 -5 tones darker than the main color of the previously selected wallpaper. Or match the color scheme with furniture, curtains (see The combination of the color of curtains and the color of wallpaper) or flooring. Choose any of the dominant shades in the room. This will give originality to your interior.
- Wallpaper with a pattern blends well with plain borders of the same color as the picture.
- Decorative ribbons look pretty with a pattern similar to a wallpaper pattern, but of a larger caliber. With plain wallpaper, paper decor with a pattern matching the tone of the wall rhymes well.
Attention: Buy those tapes that match the wallpaper in three ways - material, color, style. And if you do not have skills in pasting walls, then pick up a border with a pattern that will be easy to dock at the seams.
Sticking Rules
All work is done in several stages. The basis for mounting is important here. It is on it that the coating will lie. And if the plane is not even, then it will be visible even more. So preparation should be given special attention.

Inventory (necessary materials):
- Glue
- Putty knife
- Brushes (various sizes)
- Roller
- Building level
- Scissors
- Wallpaper brush
First of all, you should prepare the working surface (future location of the curb):
- Wash the required area with soapy water (there should be no dirt, dust and other foreign particles on it), or clean it with a special brush (if you plan to stick a border on the wallpaper)
- Get rid of mold, if any (this can be done using a solution of 100 ml of bleach per liter of water)
- If desired, paint can be removed from the surface; this will improve the adhesion of the wallpaper border to the working plane
- Using suture sealant, repair cracks in the wall; then remove any irregularities / defects with sanding paper (remove remaining dust with a damp cloth)
- Mark the upper and lower edges of the wallpaper edge with a pencil on the wall (for accuracy, use the building level and tape measure)
- Calculate the number of rolls required (to fit the pattern, you may need additional material, therefore, it is better to purchase it in advance with a small margin)
- Apply a layer of primer sealant along the strip on which you are going to glue the edging (this process should be carried out - at least one day after processing with this sealant), trying to stay within the mark, as it can paint the wall; wait until completely dry
Glue preparation
As a rule, a dry mixture is placed in a container with water, mixed slowly, and insisted for 20 minutes. Further, the resulting mass must be re-mixed to a homogeneous consistency (without lumps).
But it’s better, nevertheless, to familiarize yourself with the instructions, since some types of mixtures are diluted in a non-standard way. Adhesive having an acrylic base, which, in turn, provides excellent adhesion, can be used immediately, without additional action. Now you can go to work with the curb.
Training:
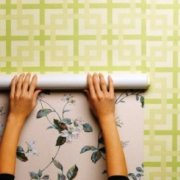
- For convenience, roll the roll along the work wall and lay it upside down
- Divide it into the necessary parts (slightly more than the intended length by - 8-10 cm); roll them, face inward
- If you are dealing with self-adhesive material, then it is enough to moisten it slightly, after which, you can safely place it on the wall
- On the back side of the curb from ordinary wallpaper, you need to apply ordinary glue (if you place it on other wallpapers, then use a special glue designed to apply vinyl to vinyl)
- Fold the wallpaper edge in harmony, and leave it in this position for several minutes to activate the glue and impregnate the paper
The gluing process is best to start from the most inconspicuous corner in the room, or from the edge of the doorway; this way, it will be easier for you to form even seams:
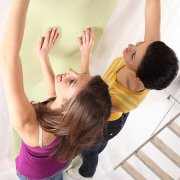
- Wallpaper should be gradually spread on the wall surface, smoothing out bumps (from the middle of the strip to the edges); remove accumulations of glue with a rag, (avoid getting on the front part of the edging)
- The wallpaper edge located directly below the ceiling should be aligned along its edge.
- If there are markings on the walls, the strip of the curb should protrude quite a bit on the top line
- To avoid the formation of a gap in the corner zone, place the border lines slightly overlapping, the end of one line should occupy part of the adjacent wall (excess material, subsequently cut with a knife)
Original border
Not always the assortment of wallpaper edges meets all the taste and style needs of the buyer. There are several ways to create borders yourself:
- The simplest is the edging cut from a roll of matching wallpaper
- Edge made of multi-colored paper, photographs, children's drawings, postcards
The process of manufacturing the screen edging:
- Using sketching tape, mark the edges of the border strip on the wall.
- Cover the strip with paint of a suitable shade (in the end, it will act as a background); let it dry completely
- Separate the required part of the plastic film along the width of the border
- Cut a pattern from the film, at your discretion (for example, geometric figures)
- After fixing the film (using the sketch tape), carefully paint the pattern with a brush
With the successful selection and skillful use of the decorative border, you can create a beautiful and harmonious interior that will look simple and creative. Sticker wallpaper border is not a difficult issue if you do not rush and do everything deliberately. The instructions will help you avoid mistakes.