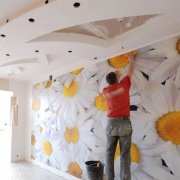
Preparing the walls for wallpapering: do it yourself

Preparing walls for wallpapering is the work on which the quality and duration of the coating service depends. This stage of work can, if desired, be performed by any person without special training. The main thing is patience and a desire to get a good result. And how to do it yourself, the article will help.
The content of the article
Features of preparing surfaces for wallpaper
The main reasons why it is necessary to prepare walls for wallpaper are:
- The quality of gluing panels improves. If the surface is porous, they will not be retained on it for a long time. This is due to the presence of pores that do not allow the base of the wallpaper to stick to the wall. As a result, only 50 percent of the area of the paintings will be glued, which is easy to verify when dismantling old wallpapers that were applied to a poorly prepared wall. The coating is very easy to remove. The same reason will serve to open the seams between adjacent strips of wallpaper.
- Wall roughness. Even very dense and fairly thick wallpapers will not hide on the surface tubercles and pits.
- May cause dampness and fungus. This is more true for exterior walls that have direct contact with the street. Small cracks that appeared in the plaster, especially in the corners, will receive cold air, because of which moisture will condense in this place and a favorable microclimate will be created, which will eventually lead to the development of fungal parasites.
- Creates better adhesion or bondability, which increases the duration of wallpapering on the walls.
Tip: Despite the fact that many people think that re-sticking wallpaper after 3 to 5 years is correct, due to a change in their appearance, this is not entirely true. Expensive materials, when properly glued, last at least ten years or until bored.
The main requirements for the walls when applying wallpaper are:
Tip: If the walls are not processed before wallpapering, in unprepared uneven places over time, any materials begin to tear, deteriorate or wipe. This requires a smooth and cleaned wall. This rule should be observed on concrete foundations in the hallway or plasterboard walls in a small children's room.
- Most wallpaper sheets are unable to hide even very small defects.
- A mandatory surface requirement is dryness, good cleanliness and impregnation of the wall with a primer.
An abbreviated instruction for preparing walls looks like this:
- The old coating is removed: wallpaper / paint.
- The walls are treated with a primer.
- Plastered (seeHow is wall plastering with cement mortar).
- Are polished.
- Putty.
- Re-primer is performed.
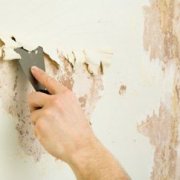
How to clean old wallpaper

Before preparing the walls for wallpapering, the old coating is removed.
To do this, you need to purchase:
- Putty knife.
- Good quality roller.
- Spray for liquid.
- Water and other auxiliaries that will ensure quick removal of old canvases.
- A stepladder or a special construction bar, for convenient and quick execution of work in hard-to-reach places.
Tip: Before starting work, you should take precautions: relieve tension in the power supply of the working room, wear protective clothing.
Work order:
- In the areas where the panels are joined, the quality of their coupling on the wall is the lowest. It is from these places that you need to start tearing the canvas, without the use of auxiliary means.
- Non-removed parts of old wallpaper are abundantly wetted with a roller or spray from hot water.
- The surface is thoroughly cleaned with a spatula, everything that is easy to remove is removed from it.
Tip: To speed up the process of removing wallpaper in water, add vinegar or another adhesive solvent. You can use special chemical compounds that are designed to remove from the walls of previously glued wallpaper. But their price is quite large and such a purchase is not always justified.
Before preparing the wall for wallpapering, old paintings should be completely removed.
How to clean old paint

Removing the paint yourself from the wall is quite simple.
With minimal effort, this can be done in several ways:
- The paint is pre-dried using a building hair dryer, then it is easily removed with a conventional spatula. The method is quite effective, but harmful. This requires a constant circulation of fresh air in the room. Due to the heating of the paint, the release of toxic substances hazardous to health begins, they can not be breathed for a long time.
- The walls can be cleaned with a grinder or grinder.
Tip: This method is very dusty, it can not be used by people who suffer from asthma. During work, all adjacent doors to other rooms should be tightly closed, and windows should be left open.
- The use of flushing mixture is the most effective option. The disadvantage of this method is that when working with chemicals, all safety precautions must be carefully observed and the manufacturer's instructions carefully followed.
How to process the walls before wallpapering, everyone decides for himself. After cleaning, the suitability of the surface for gluing the material is controlled. After this stage is completed, you can begin to primer the surface.
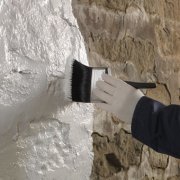
How to prime walls
The primer of the walls is carried out in order to:
- To prevent the exfoliation of small particles of plaster or concrete, penetrating deep into the thickness of the wall and fasten its surface layer.
- Primer composition (see Types of construction primers and their scope) increases the drying period of subsequent layers of putty, depriving the wall of the ability to quickly absorb moisture, which improves the quality of the coating.
Tip: When quickly drying any mortar, nothing good will work, the minimum defect is the formation of cracks on the surface.
- Applying a primer removes dust. You need to apply the solution with a large brush or mowls. The composition should be rubbed into the surface until a white foam is obtained.
The next step is how to prepare the wall for wallpapering, should be done after the walls have completely dried.

Application procedure:
- The primer solution is applied to the entire surface with a roller, as shown in the photo, evenly. Hard-to-reach spots should be treated with a brush.
- With the rapid absorption of the composition into the wall, several more layers are applied additionally.
- After the primer dries, a rough surface leveling is performed.
How to repair potholes and cracks
Putty walls it will hide cracks and potholes only superficially, and such defects can again quickly appear.
When closing cracks:
- They need to be increased to about one centimeter wide.
- Open these areas with a primer.
- Cover everything with cement mortar or glue used for tile, which is much better.
Cracks in the plaster simply do not appear by themselves. This indicates that at this point the stucco began to lag behind the base of the wall. In this case, it is necessary to remove the falling plaster with a hammer.
Tip: When shedding old plaster in large pieces, a major overhaul is required, which involves performing a leveling with a solution of the walls a second time.
- After the sites have completely dried, they are well primed and you can proceed to the next stage of surface preparation.

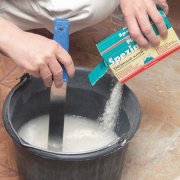
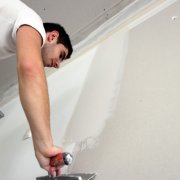
How to putty walls
How to prepare the walls for wallpapering? The next step is to apply at least a small layer of putty. It is necessary to reduce surface roughness and increase the bonding area. Putty just smooth out all the bumps.
Tip: Finishing putty should be applied only in thin layers, otherwise large ones will crack when dried.
All irregularities are eliminated by several strokes, sometimes up to five times, until the wall becomes flat. After the solution dries, all defects are removed from the walls with an abrasive mesh: tubercles and sag. Small overhangs after puttying can also be removed with a spatula.
How to make the last primer

At the last stage of the work, which involves preparing concrete walls for wallpaper, their primer is again applied.
Tip: When preparing the walls for gluing wallpaper, after each step, a surface primer should be performed.
What and how to do before wallpapering, how to process the walls to improve the quality of the video will tell in detail.

The most time-consuming and difficult is precisely the process of preparing the walls for wallpapering. The fact that ripping off the old is self-evident and more or less simple. But the most important thing at the time of the pre-milking state of the walls is to remove all the bumps and bumps, putty and subsequent cleaning with sandpaper or a cleaning net. Especially with plain wallpaper and side lighting with wall lamps, all the hillocks will become visible !!!!