Is it possible to putty on chipboard: finishing wood trim

All sheet materials, which include wood-shaving and wood-oriented boards, need finishing finishing. Their surface can simply be polished, as in the photo, and left without decorative finish, or plastered and painted. Therefore, the answer to the question of concern to everyone: "Can I putty chipboard?" - must be unambiguous.
Of course, it is possible and even necessary! After all, to hide such a pronounced texture of this material is quite difficult, how many layers of paint do not apply. The video in this article on the topic: “Particleboard: Puttying” will present the technological part of the production of these works.
The content of the article
Putty options
We note right away that there is no special composition “putty for particleboard”. For finishing all materials in the production of which wood is used: particleboard, fiberboard, OSB (see How to putty OSB boards and whether to do it), plywood - apply compounds designed for wood. There are a lot of them on sale, and you just need to understand their properties.

Acrylic and latex putties
Acrylic based putties (see Acrylic putty - types, features, application) are perhaps the most popular in construction. As it most often happens, the most acceptable combination works: quality and price. An important criterion for the choice of material is also its versatility, which allows it to be used for both interior and facade works.
So:
- Acrylic resin, which is part of this material, makes the putty highly plastic and significantly increases its adhesion to the base surface. Such properties make it possible to put a relief on the surface that imitates the texture of brushed wood during the filling process.

- That is, on the surface of the boards of wood origin, it is possible to perform real decorative plastering. After hardening, the screed becomes solid and perfectly protects the wood from moisture and deformation. So, acrylic putty for chipboard is a great choice.
- Almost all the same can be said about latex putties. But their plasticity level is even higher, and due to this, it is possible to apply thinner layers. Naturally, this significantly reduces the consumption of material, which fully compensates for its higher cost.

As a rule, acrylic putties are sold in white, and they are intended only for preparation for painting. Latex based formulations can be colored, but it is mainly a woody range of shades. After grinding, such a screed may not be painted, and the result will be approximately the same as in the picture above.
Epoxy putties
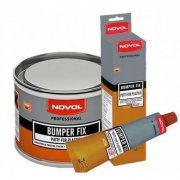
Mixtures, which include epoxy resin, are called two-component. The thing is that, in addition to the resin itself, it includes a hardener, which provides the screed with timely hardening. It is in a separate bottle and is added to the putty immediately before application - the proportions are always indicated on the label.
- It is the resin and hardener that give the putty the necessary properties. First of all, this is the high strength of the screed, which can not only mask the imperfections of the base, but also update the surface, which has damage of varying degrees.
- For this purpose, manufacturers often add metal shavings or fiberglass (polymer fiber) as a filler in the putty. So, this type of putty can be called repair rather than finishing. In order to tidy up the parquet or plank flooring, this is the best option.

- Depending on the filler fraction, such fillings are also divided into two types: base and finish. First, to seal cracks, chips and potholes, the starting composition with coarse dispersion is used, and then for final smoothing it is finely dispersed, finishing.
- If you consider that acrylate putties dry in one to two hours, then it takes almost a day to harden the epoxy screed. After this period, it gains high strength and you can begin grinding. The advantages of epoxy compounds include the fact that the surface does not need to be primed before their use.
It is convenient to work with such putty for beginners who do not have high-speed skills in work, but want to do everything with their own hands. After all, if the acrylic mixture did not have time to develop before the start of setting, then it cannot be resuscitated in any way - you can only throw it away.
As for the epoxy putty, it is enough to heat it in a water bath to 75-80 degrees - and you can continue to work.
Putty application
As a rule, the manufacturer's instruction recommends that the surface be primed before starting puttying (see Primer before puttying walls - is it needed) Naturally, the primer should be designed for wood processing. You can take a universal option, if the label says: "for all types of surfaces."
So:
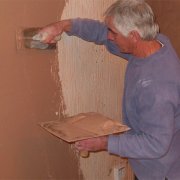
- The putty is applied with a wide steel spatula on level ground and a narrow rubber spatula at the joints and in the corners. By the way, before filling the chipboard, the joints between the sheets are glued with fiberglass tape. The admissible layer thickness is regulated by the manufacturer of the mixture, but in the case of acrylic and latex putties, it cannot exceed 3 mm.

- The key to a quality screed is the proper surface preparation of particleboard. It is very important not only to clean it from dust, but also to remove tarry discharge, degrease the base. If there are potholes and cracks on the sheets, they must be repaired before embossing the entire surface.
- Putty on chipboard is made only at positive temperature (above +7 deg.), And at normal humidity. Humidity of the base itself should not exceed 10-12%. If there is a need to apply 2-3 layers, then each of them must dry before the next one is applied. Primer layers are not required.

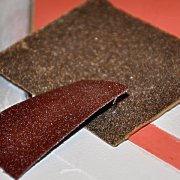
After the finish layer has dried, the screed is sanded, the dust formed during its execution is removed, and decorative painting or sticker of the roll material is carried out. As you can see, this technology is not too different from preparing for painting drywall.


If, as a result of measurements, you have a difference in height difference of up to 5 mm - consider that your floor is almost perfectly smooth, and it does not make sense to align it additionally.The only thing that can be done is to putty the surface with an acrylic sealant, which is distinguished by its ductility, while remembering that the surface is primed beforehand.