How to cook your own putty for walls

How to make putty yourself? The obligatory stage of the repair of the premises is the putty of the walls. In this case, it will absolutely not matter what kind of finish coating is taken: a sticker on a wallpaper or painting a wall. How to prepare the putty correctly, the article will tell.
The content of the article
Why putty is needed
Putty in appearance - a creamy mass of white or grayish color, which is the finish layer applied to the wall before the final decoration of the room, to give the surface perfect smoothness. With it, you can hide minor defects on a porous surface made of concrete or cracks, the finishing putty of the walls is carried out with a very thin layer up to two millimeters. But if there are deep grooves, holes, seams from masonry or roughness due to fallen pieces of plaster on the surface, the putty on the wall simply will not hold.
To prevent this phenomenon, it is necessary to apply the plaster first - the surface for putty should be very smooth, the main task of the coating is not to level the wall, but to make it smooth. The main advantage of putty is the possibility of applying a minimally thin coating layer. It is very difficult to apply it with other dry mixes with a thickness of less than one millimeter.
Tip: When purchasing material, you need to make the right choice. Putty is of two types: regular - KR; special - VH, for use in wet rooms.
Types of putty material
In terms of readiness, such coatings are:
- Dry. The most popular option used for leveling walls comes in bags or sacks. Material Advantages:
- just getting ready;
- you can get a mixture of any viscosity;
- convenient to store and transport;
- low price;
- long storage period, regardless of temperature.
Cons of the material are:
- the need to perform additional work to prepare the mixture;
- the solution should be prepared strictly according to the manufacturer's recommendations;
- limited application time after preparation of the mixture.
- Ready to use. The basis for putty is dispersion or latex. Go on sale in buckets or tanks. Material Advantages:
- can be used for a long time, closing the lid tightly after finishing work;
- no additional time is required for preparing the solution and acquiring the tool;
- The material is environmentally friendly.
Putties in composition can be:
- Oil-glue based on drying oil. Their advantages:
- low cost;
- simplicity in work.
Disadvantages:
- unsafe from the point of view of environmental friendliness;
- short-lived;
- low mechanical strength;
- poor compatibility with many materials, with the exception of oil paints and varnishes.
- Dry based on gypsum (seeGypsum putty: its advantages and problems of use) or cement.
- Acrylic. These are the most waterproof and durable materials.
- Based on PVA, the cheapest option that can replace acrylic materials. Lack of putty - afraid of water.
By appointment, the composition is:
- Leveling - for leveling surfaces. It is distinguished by good adhesion to the base, which allows you to evenly fill all its defects, smooth out irregularities, while maintaining high strength.
- The finish (cm.Finishing putty: how to apply qualitatively) - to prepare surfaces for decorative finishes.
- Specialized - used for a specific task:
- sealing joints between panels;
- urgent repair.
- Universalcombining the properties of the two types listed above and used on almost any basis.
Tip: When choosing and purchasing putty, you should carefully study the recommendations that the instructions for its operation offer.
How to cook putty yourself
How to cook putty? There are a large number of recipes for the preparation of compounds.
Usually added to it:
- Plaster, pre-sifted.
- Pure chalk.
- Laundry soap.
- Drying oil.
- Lacquer.
- Animal or wood glue.
Before making plaster putty, you will need to purchase:
- Chalk - from 2 to 3 kilograms.
- Gypsum - one kilogram.
- A solution of wood glue from 2 to 5%.
In this case, the glue solution is used until the mixture reaches the required consistency. In addition, you will need the tools shown in the photo:

- Capacity for solution.
- Electric drill with stirring nozzle. For small volumes, this can be done manually with a conventional spatula.
- A gauze bandage to protect the respiratory tract from fine gypsum dust.
The order of preparation of plaster putty:
- Plaster and chalk mix well.
- The resulting powder is gradually poured into the container where the adhesive solution was placed.
- The mixture is mixed again until a uniform texture is formed.
Tip: Putty prepared in this way hardens quickly. For the treatment of small defects, it should be done in small quantities in order to use everything at once.
The plaster composition is suitable for decoration:
- Concrete surfaces.
- Plasterboard seams (see Putty of drywall joints - how to do it).
- For other surfaces located in dry rooms.
When painting the surface with oil paints, a universal oil composition is used.
To prepare it you will need:
- Drying oil - one kilogram.
- Desiccant - 100 grams, is used to accelerate drying.
- Chalk powder - 2 kilograms.
This composition is good to use for surfaces that are often exposed to the negative effects of moisture and temperature fluctuations, for example, for wooden windows. When painting the surface with adhesive compositions or ceilings and walls after plastering, adhesive putty is used.

To prepare it, take:
- Drying oil - 25 grams.
- Glue solution 10% - one kilogram.
- Sifted chalk - 2 kilograms.
The order of preparation of the composition:
- Glue is heated.
- The glue is mixed with drying oil until a uniform mass of solution is obtained.
- Chalk is added to the desired consistency.
- Shredded laundry soap can be added to the mixture, which allows the putty to spread easily over the surface.
How to properly prepare a solution using dry convenience foods
To obtain a high-quality putty composition, strict adherence to the manufacturer's instructions, which is available on the packaging of the mixture, is necessary.
Before preparing the material, you must:
- Purchase a clean, wide tank of the right volume. An ordinary plastic bucket or facade paint is best suited, which should first be cleaned of residual contents.
- An electric mixer, to obtain a high-quality solution, it must be thoroughly mixed during preparation.
Rules for the manufacture of the solution:
- The mass prepared at one time of the mixture should be such that it is used up in about 40 minutes of operation.
- A quarter of pure room temperature water is poured into the mixing tank.
- Gradually, the required amount of dry mixture is poured, according to the requirements of the instruction.
- With a mixer or a nozzle on a drill, the mixture is stirred until a homogeneous composition is obtained, avoiding the appearance of lumps.
- The solution settles for about 10 minutes.
- Mix thoroughly.
- The finished solution should match the consistency of thick sour cream. If the composition is too thick, it will get worse with the treated surface, and when applied to it, it will crumble. Too liquid mass simply drains from the spatula, forming inflows on the wall.
Tip: The unused polymer-based finished solution should be poured with water, and it can be used the next time by carefully draining the water without stirring the solution.
How to put putty on the wall
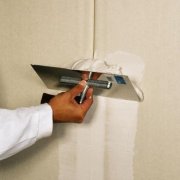
When applying the finished mixture, it is better to use two metal spatulas:
- Narrow, for sealing cracks, filling existing shells and cracks, finishing joints between walls.
- Larger widths for application over the entire surface of the leveling and finishing layers.
Labor efficiency and coating quality will be higher when using a special spray for the solution, but to work with it you will need to purchase special compressor equipment, which is not very rational for small amounts of work.

Coating Procedure:
- Preparing the starting putty mortar, characterized by a rougher texture and having a large fraction of the components.
- All damaged places of walls, cracks, cracks are putty, joints between panels are closed.
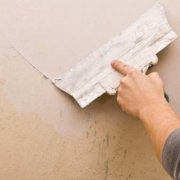
- A leveling layer of the mixture is applied and thoroughly smoothed with a wide spatula. During operation, the geometric parameters of the walls are checked using a long rule, a plumb line and the usual building level.
- After processing the entire surface of the walls, the room is left for 23 hours until the coating completely dries.
- One coat of soil is applied (seeTypes of construction primers and their scope).

- The room is left to dry for several hours.
- The finishing mortar eliminates any irregularities after the starting layer.
- The entire surface of the walls is evenly covered with a thin layer of the finishing composition.
- After drying, the walls are treated with an emery cloth, which is best fixed on a flat bar. This allows you to permanently remove roughness and small irregularities on the surfaces.
Tip: For further wall decoration with ceramic tiles, the finishing layer of putty and grinding of surfaces should not be performed.
Preparation and application of putty - responsible operations. This is the process of preparing the base of the walls for applying layers of paint, wallpaper stickers.
Putty, prepared correctly and laid in a timely manner, will not cause shrinkage and cracks on the surface of the walls. How to properly prepare the solution, how to make a putty of the walls with your own hands, the video in this article will show in detail.