Why putty is needed, how to cook and apply it

Today we have to find out why wall putty is needed, what types of putty can be found on sale, how to prepare this mortar from a dry mixture and how to apply it correctly on the prepared surface. Let's get started.
The content of the article
What it is
Putty is called a leveling mortar, including:
- Fine fraction filler (sand, chalk, etc.);
- Astringent (cement, gypsum, glue);
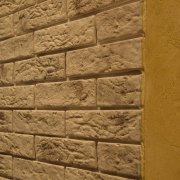
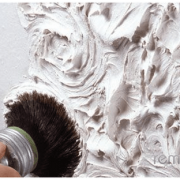
- Optionally - pigments and other functional additives (antifungal, decorative, surface structuring).
Areas of use
Why do you need to putty the walls? It is not difficult to guess - puttying is the last stage of the surface finishing. The goal is to make the wall or ceiling perfectly even, completely ready for painting or wallpapering.

Why is the putty of walls made of drywall with its perfectly flat surface (see. How to putty drywall quality)?
It allows you to hide the mounting seams at the joints between adjacent sheets and the head of the screws, which GKL is attached to the frame or crate. In addition, drywall is often putty over the entire surface.
This operation has two objectives:
- Create a separation layer between kraft paper (GKL shell) and wallpaper. In this case, bored or worn out wallpaper can be removed from the walls without damaging the drywall;
- Hide the seams at the joints between the dry-cut sheets of drywall (cm. Putty of drywall joints). If the factory edges of the PLUK (semicircular with thinning) allow you to hide the reinforcing seam material, then the joints of the additional sheets after reinforcement and putty will be distinguished by thickness. However, it is worth applying a layer of putty about a millimeter thick over the entire area of the drywall construction - and the seams will become completely invisible.

In addition: putty is often used for minor repairs of cracks and potholes in walls and ceilings. It gives a surface that is perfectly smooth and ready for further finishing.
The video in this article will tell you in more detail about what the putty is for and how to apply it.
Putty or plaster
Plaster mortars differ from those intended for puttying in two ways:
- A larger filler giving a much coarser surface;

- As a result, much less shrinkage during drying. The plaster after application retains its original layer thickness. Shrinkage of putty is especially noticeable when sealing joints and fasteners on drywall constructions - they have to be putty in 2-3 passes.
That is why the areas of application of these building mixtures are clearly divided:
- Rough surface leveling is always done with plaster. Its layer can reach 5 or more centimeters;
However: with a thickness of more than 30 mm, the plaster needs reinforcement with a metal or fiberglass mesh.
- Puttying involves the application of a leveling layer with a thickness of not more than 5 mm, more often 1-3 mm.

Varieties and features
The full list of all varieties of putties will be too long, in addition, most of the materials in this list are not used in construction (for example, wood putties or automobile). Therefore, we list only the most popular solutions.
Cement
Cement binder mixes are sold dry and prepared immediately before use. The life of the solution after mixing with water is no more than a couple of hours.
Key features of cement putty:
- High mechanical strength, allowing it to withstand abrasion and shock;
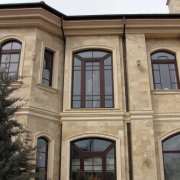
- Water resistance. Cement mixes can be used in bathrooms, showers and for decoration of building facades.

- Special mention deserves a mixture of white cement. They do not require staining., and when painting, the base does not shine even when applying paint in one layer.

Gypsum plaster
Gypsum binder automatically means applying the mixture only for interior decoration. Gypsum cannot boast of water resistance, and in a humid environment it swells and softens. The life after mixing is from 30 to 60 minutes.
However: gypsum mixtures can be used when decorating bathtubs, if the final finish (tile, paint, wallpaper, etc.) is waterproof. In addition, the room must be equipped with effective ventilation.
The main advantage of gypsum, which made putties based on it so popular, is the ease of grinding. Putty blemishes can be fixed with a hand grater or a grinder with a grinding mesh.
Depending on the size of the aggregate fraction, two main types of gypsum mixtures are distinguished:
| Picture | Description |
 Starting Siva Turkish production | The starters are designed for basic surface leveling and give a moderately coarse coating. These mixtures occupy an intermediate position between the putty itself and the plasters. |
 Finish Vetonit LR + | Finishing options are intended for finishing and give the smoothest possible surface (see How to finish the putty wisely). |
Curious: the so-called universal putties, their properties do not differ from the finish, however, due to minimal shrinkage, they can be applied with a slightly thicker layer (up to 1 centimeter per pass).
Acrylic
Unlike the previous two, acrylic fillings are sold ready to use. The shelf life in sealed packaging is at least three years; after the packaging is opened, the acrylic binder begins to dry out and become unusable.

The advantage of acrylic is its exceptionally smooth surface due to its extremely fine filler. The flip side of high-quality finishes is the equally high price: if you pay 10-15 rubles per kilogram of dry (emphasize dry!) Gypsum mixture, then a kilogram of finished acrylic putty costs at least fifty.
Depending on the presence of functional additives, acrylic putty can be used for interior work, or be universal (for interior and exterior decoration).
Payment
How to calculate how much putty is needed per square meter of surface for decoration?
Data on the consumption of building mixtures are always present on the packaging or, in extreme cases, on the manufacturer's website. As an example, let's find out how much putty is needed per 1 m2, as applied to the Fugen universal gypsum mixture from the German company Knauf.

The Knauf company publishes the following data: when filling gypsum board joints, the consumption of dry gypsum will be 0.25 kg / m2; when applied in a continuous layer, for every millimeter of the coating thickness, 0.8 kg of the mixture will be consumed.
Now let's turn our attention to the domestic manufacturer and find out how much putty is needed per 1m2 when decorating the facade. The test will be a mixture on the white Portland cement “Volma Aquastandard Light”. The information we need is on the official website of Volma; claimed consumption is 1.8-2 kg / m2.
How on the basis of these data to calculate how much putty is needed on a room of known sizes:
- Calculate the area of the walls of the room;
- Decide on the average thickness of the coating layer. If the walls were plastered along the lighthouses, it can be taken equal to 2-3 millimeters, if they were leveled with drywall - 1 millimeter;

Captain Evidence recalls: in the second case, do not forget to take into account the flow rate of the mixture for sealing joints and screws.
- Multiply the area of the walls by the average thickness of the putty layer and the consumption declared by the manufacturer, and you will get the volume of purchases in kilograms;
- To count it in the number of bags of the mixture, divide the result by the weight of one bag (usually 22-30 kg).
Getting to work
Now let's move from theory to practice and find out how to prepare the surface for putty and do it yourself.
Tool
What you need to putty walls or ceiling:
- A pair of spatulas - wide (30-40 cm) and narrow (10-12 cm). The first is used for the actual filling, the second - for applying putty on a wide spatula;

- When decorating corners - angular spatula;
- When using dry mixes - a wide container for mixing the mixture and a construction mixer or drill with a whisk.
Foundation preparation
The surface for putty should be:
- Durable (that is, without peeling or crumbling coatings);
- Clean - free of dust and grease stains. Dust is removed with a vacuum cleaner or a brush, oils and fats - by degreasing (with a rag with any organic solvent);
- Primed with penetrating primer. It will bind the remnants of dust and strengthen the surface.

Mixture mixing
The manufacturer's instructions always include the exact ratio of mixture to water when kneading. Do not shut the putty on the eye: a solution that is too thick will fall unevenly, and too liquid will drain off the wall and tool.
Caution: mixing gypsum mixtures has one subtlety. You need to add gypsum to a container of water, and not vice versa. If water is filled with a gypsum mixture, practically insoluble lumps form at the bottom of the container.
After mixing, the putty is mixed and aged for 3-5 minutes, then mixed again and used as intended.

A couple of tips:
- Do not cook the mixture in large portions. Shut as much as you can develop within 30-60 minutes;
- Always wash the container and tools after making another serving. Otherwise, clumps of lumps will fall under the spatula, and spoil the finish with untidy grooves.
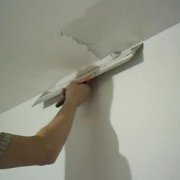
Application
Putty is applied with a narrow spatula to a wide one, and is applied to the wall or ceiling with sliding movements. When applying several layers, each of them is superimposed parallel to the previous one. It is better to putty in the brightest light falling on the work surface at an oblique angle: this way the shadows underline all the irregularities.

A few subtleties:
- When sealing joints in drywall constructions, the first layer is applied directly through the cells pasted along the seam of a serpyanka (rolled fiberglass mesh);
- For alignment of external and internal corners use an angular spatula;
- If you use putty to repair cracks in the walls, first expand the cracks with a chisel and a hammer;
- With a large number of small cracks in the plaster, putty it on a fiberglass or fiberglass. Reinforcement will prevent cracking to the surface.
Post processing
After drying the last layer (one day after applying gypsum or acrylic putty), the finished surface is ground with a grater or grinder. The author uses sanding nets No. 80 for the first pass and No. 120 for the second. After polishing, the surface is vacuum cleaned and primed for painting or wallpaper.

Note: cement mixtures dry longer - at least two to three days with a minimum layer thickness.
Conclusion
We hope that we were able to answer all the reader's questions. Good luck!