Cement wall plastering: doing it right

Plastering walls with cement is most often found in the decoration of non-residential and residential premises. It can be applied with your own hands or machine-applied cement plaster can be used. This method will be effective for large areas of application.
Today we will tell you what cement plasters are about their preparation. You will familiarize yourself with the rules for applying this composition.
The content of the article
All about cement plasters
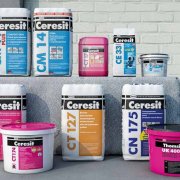
Cement-sand mortar (see Cement-sand plaster: material features) is widely used in masonry and plastering. With proper proportions, preparing the solution yourself will be simple. Its price will not be high, you can make a quality surface. Now many companies are engaged in the production of these products, these are brozex and lux. It is only necessary to make the right choice. After all, cement compositions are of two types.
Cooking rules
When erecting a foundation or other objects, as well as on soil of high humidity, in the manufacture of cement mortar, pay attention to the high grade mix from M400. There is a high cement content. If you make simple masonry, then you can use the M300.
More information about the proportions of the components of cement plaster can be found in tables SP 82-101-98
Respect proportions exactly. An insufficient amount of sand will cause the mixture to solidify quickly, and excess - to shed it. Water is also of considerable importance, it can affect the density and quality of the mixture. Cement mortars are divided into types.
The amount of water distinguishes them from each other:
| Fatty | Mix with a small amount of water. Such a mixture quickly hardens, but after application can form cracks. |
| Skinny | Mix with plenty of water. The mixture is unlikely to catch. |
| Normal | A composition in which all proportions are precisely observed. The mixture will solidify for a long time, but after solidification does not form cracks and will last a long time. |

Note: Some craftsmen replace plasticizers with a universal detergent or liquid soap. These tools give the solution softness, it becomes more convenient to use. However, do not abuse their number. This will lead to the fact that the solution will foam, get cotton and lose the desired properties.
There are two ways to mix components, manually or using a concrete mixer. If large volumes of mortar are needed, then a concrete mixer is indispensable; for small volumes, a manual mixing method is suitable.
Do-it-yourself cement plaster should have a uniform mass, let's look at how to do this:
- We take a clean container of water, add detergent to it and stir. Next, pour cement and half of the right amount of sand, pour into a container, once again mix everything thoroughly.
- A homogeneous mass should be obtained.
- After that we fill up the second half of the sand, we interfere for about 5 more minutes. In the resulting solution should not be air bubbles and lumps.
Attention: for kneading it is better to take a container without stiffeners. Then make a quality composition will be much easier.
What tools do we need
Cement-based plasters are applied with a tool.
This is not textured, so almost any owner has such tools:
- We will make notches with a trojan, a cog and a buchard (a hand hammer with teeth on working surfaces).
- For cleaning, you will need metal brushes of different sizes and stiffness.
- Metal scraper.
- The falcon is convenient to use, the necessary portion of the solution is laid in it, it will allow you not to bend over each single portion.
- The level and plumb line are useful for checking and controlling directions.
- With a finishing trowel (desired sizes from 120 mm to 180 mm) we will stir the solution, apply it to the surface and grind it.
- Grater will be needed for grouting the plaster.
- A rule is a tool to control surface irregularities.
- One-half - for leveling the solution on the surface.
- Plaster mix.
Read also:what wall plaster tool would you need.
How to apply plaster correctly
You can watch videos and photos about wall plastering with cement mortar. This is not such a difficult job, you just have to follow the sequence and acquire quality material. The execution instruction is as follows.
Preparation: we provide adhesion
Apply baumit or glims cement plaster. Not only the appearance, but also the durability of the coating will depend on this preparation.
- The surface should be cleaned with dust and dirt.
- Next, you need to wet the surface with water. You can do this with an ordinary broom, but for convenience you can use a garden sprayer.
- The seams in the brick wall should be deepened by about 1-1.5 cm. In order for the mortar to better adhere to the surface.
- If we are dealing with a concrete wall with a smooth surface, we need to make a buchard or a serrate on the surface of the notch. The notches should have a depth of 3 mm, a length of 15 mm. Approximately 250 notches should be made per square meter. Next, the surface should be cleaned with an iron brush and dampened with plenty.
- If we are dealing with a wooden wall, we need to lay boards and fill the shingles on top. Fittings from plywood 15 mm to 4 mm are suitable. Get a diagonal crate.
Attention: The shingles can be replaced with a mesh netting. Fill it should not be on the wall, but on plywood slats. A gap of approximately 3 mm should remain between the net and the wall.
Technique and step by step instructions

- We take the falcon, we collect in it the portion of solution we need.
- With the corner of a plaster blade we collect a mixture of a falcon, begin to throw it on the wall. So that our solution is not sprayed, we make the throwing movements with the hand, without using force.
Caution: You can resort to another method of applying the mixture to the surface. It is necessary to put the falcon to the surface, pick up a portion of the mixture with a spatula, spread it on the wall. It should be borne in mind that the spraying will provide better adhesion of the mixture to the surface!
| Spray | The first applied layer of plaster is called a spray, it has a rather liquid consistency. It is needed for wooden surfaces, it is about 10 mm. |
| Priming | This is the second layer, in consistency similar to soft dough, is needed to smooth out bumps and defects. The thickness should not exceed 20 mm, this is the maximum limit, even if the layer is applied in several passes. |
| Nakryvka | The third layer, like the first, has a viscous liquid consistency. Only now should cooking be taken more seriously. The required layer thickness is 2-5 mm. A coating is needed in order to smooth out all remaining soil defects. |
Attention: When plastering concrete and brick surfaces, a layer of about 5 mm is enough. For wood, the layer should be at least 25 mm. He must cover up the shingles completely.
- Align the solution with a trowel. It is necessary to lead the half-tier in different directions, until complete alignment. This needs to be done with each new layer. The better we level the ground, the better the coating will be applied.The droplets of the mixture hanging from the spray should be leveled.
Attention: Be sure to control the evenness of the surface as a rule. After the coating has been leveled, we wait until the solution dries.
- Take a grater. With her we will wipe the surface.
First, a circular grout is done. This is done like this: take a grater, press it tightly against the wall, wipe it in a circular motion. The grater ribs should cut off all defects. After that, we grout into the so-called acceleration. To do this, it is necessary to clean the grater from the remaining mixture, firmly press it to the surface, with strong sweeps to clear the surface of circular marks.
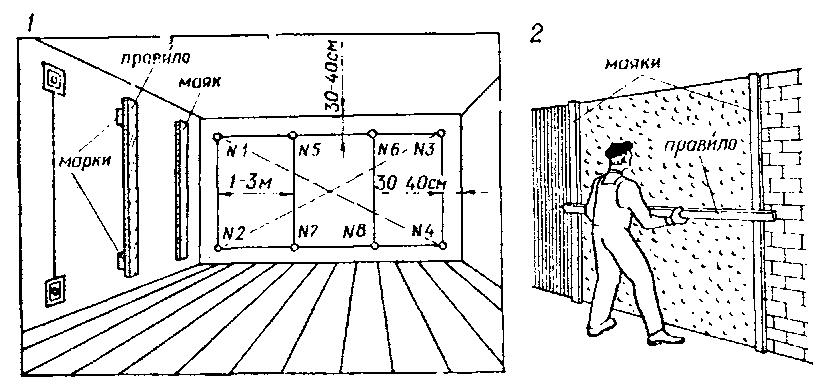
Lighthouse plaster technique
If there are noticeable bumps or other defects on the walls, then need to do stucco on beacons, to obtain a flat surface both horizontally and vertically.
Attention: If we work with wooden, brick walls, or deal with similar soft material, then wooden, steel or aluminum beacons can serve as beacons.
Plaster or stucco can be used if the walls are made of harder material.
Consider the work in stages:
- At an approximate distance of 15-20 cm from the beginning of the wall or corner of the room, a plumb line should be made. Drive a nail on top of the wall, on which we will hang a plumb line in the future.
- We are preparing our cement composition and precisely according to the plumb line, apply it in small blotches with a sketch. Subsequently, the lighthouses we need will be attached to them. If you look vertically, you will need about three blotches.
- We take the lighthouse, apply it to the blotches of the mixture and press it so that its outer end protrudes from the wall by about 15 cm. After that, we need to check the levelness of our lighthouse.
- We take two more lighthouses. We put one at the opposite edge of the wall, and the other between them, exactly in the middle. The installation principle does not change, only the level of their location to each other should be the same. To do this, along with a vertical plumb line, you need to pull a horizontal rope.
Attention: if our wall is too long, then we will need a larger number of lighthouses. They should be located at an approximate distance of 1 m in relation to each other. You should check their location level.
- Next, fix the beacons on the wall surface and seal their edges with the mixture. After this, we wait until the mixture hardens and the lighthouses “settle down” in their places.
- We apply the plaster mixture. Fill the remaining cracks and indentations.
Caution: The mixture layer should protrude approximately 3 mm beyond the edges of the beacons.
- We take the rule and level the plaster. The rule is applied to existing beacons, pressed down and moving from bottom to top remove the excess layer of plaster mix.
- If there are voids left, but the solution was not enough for us, we dump it, filling the voids. Then we ditch the mixture, leveling the surface of the wall to complete evenness. Then we wait when the solution dries. The solution dries in about 9-13 days.
How to plaster slopes
One of the most difficult stages in stucco work is corners, window openings and slopes.

- A husk is an internal corner, which form the connection of the wall and the ceiling or the joint of two walls.
- A whisker is the outer corner that two walls form.
Attention: Beacons are excellent at working with slopes. In the place where the wall and ceiling join, you need to establish a rule, and fill the void formed under it with a solution.
We fix all irregularities and defects and use the rule to check the layer for irregularities:
- In order to plaster a vertical husk, you need to put the rule to the lighthouse first in the lower part of the floor, covering the empty spaces with a solution. We wait until it dries a little and remove the rule. We should get a perfectly even strip of solution underneath. Let it dry.
- We do the same at the top of the wall.We got two stripes that will serve us as horizontal beacons. We have left empty space. Fill it with plaster and level it, focusing on our lighthouses. We check the surface for defects and, if any, overwrite.
- If we are dealing with sunscreens, it’s most convenient to nail on a opposite, already plastered wall, a plank of wood. This bar should be perfectly flat. Next, you should attach it near the edge so that the solution can be leveled along this bar.
- After this, you need to put the mixture on the slope and level the applied mixture with the rule. If you need to plaster the slope of the window opening, then for alignment we will need a corner tool to maintain the correct angle near the window frame.
- Now you need to give the solution time to dry. Next, take a grater and overwrite the excess and bumps. After checking the evenness of the plaster, the auxiliary strips can be removed.
A video on how to plaster walls with cement will help you do everything correctly and efficiently. Than putty cement plaster you will find on the pages of our site, this is a simple job, but it will take a slightly different approach.