How to insulate walls with polystyrene foam - video and photo instruction

How to insulate the walls with foam, we will consider in this article. After all, there are two options, this is on the inside and outside.
So for a start we will decide on this issue. And after that, you will already familiarize yourself with the rules of this work. Also in the video in this article and photo you can see the most difficult stages of work.
The content of the article
From the outside or inside
It is possible to insulate the walls with polystyrene foam on both sides, and in ordinary residential buildings, builders insulate the walls with polystyrene foam only on the inside (seeHow to use polystyrene for insulation of walls inside the house) At the same time, they save well, since workers do not need to pay extra for the insulation of the exterior of the building’s facade.
Caution: Such actions lead to further problems, as moisture collects between the insulation and the load-bearing wall, which can lead to the formation of mold and mildew. Therefore, it is necessary to insulate, both outside and inside, so that nothing accumulates in the construction of the house and does not cause noticeable harm to human health.
It is necessary to use a heater during repair work. It is just necessary to observe the elementary requirements for the installation of the material.
So:
- First you need to make the crate, it is installed on the wall, which is treated with an antiseptic and plaster.
- Then the crate is closed with the material of your choice. For example, you can use MDF panels, laminate, drywall, plywood. Choose any type of material that suits you for the price.
- The insulation itself must be of high quality, here you can not spare financial resources. The best in its class, it is considered a type 20 insulation. It is worth noting that the heating system in the apartment must be modern with two or three profile channels for regulating ventilation.
But still it is preferable to do insulation on the outside of the wall. Then the efficiency will be much higher. But it is worth saying that this is not always feasible purely from the practical side, and here in this case, insulation is done on the inside. To avoid mistakes, you need to know the principle of operation of the insulation.
The principle of operation of the insulation
How to properly insulate the frame walls with polystyrene (seeHow is the insulation of the walls of the frame house) and any others, it will become clear when there will be a clear idea of the work of the insulating structure itself. Then you will understand whether it is possible to insulate the walls with foam in your case and which side of the wall.
- The radiation that comes from the heating system heats the insulation sheathing and in the space of the room begins to lower the heating to the top.
- Due to the heating of the batteries, a reaction is created that expels extraneous moisture from the casing and does not have time to accumulate.
Caution: It is not recommended to ventilate the room with a window in cold weather. Room ventilation should take place with the help of ventilation ducts; if installed correctly, they can achieve a comfortable stay.
In order for moisture to not accumulate inside, the plaster must be appropriate. It is best to choose expanded clay, its cost is slightly higher than usual, but the effect of it is higher.
- The advantages of creating a crate is that inside you can put foam, which does not have a presentation and is not suitable for external work. And this will reduce the financial costs of repairs. With such actions, the ingress of moisture into the structure will be significantly reduced.
- The disadvantage is that such insulation is not durable and durable. Calculation requires knowledge of physical theories, but one conclusion. The insulation inside the structure must be distributed evenly, without any differences. If this is violated, then there will be no benefit from such repairs. Only spend money in vain.
From this we can draw the following conclusion: it is impossible to create a complete thermal insulation of a room, only with interior decoration with a heater, since decoration is needed on the outside of the building. However, with such actions, you can save on energy consumption and increase the temperature in the room to the optimum degree.
There are two main advantages in insulating walls inside the building. The first is soundproofing (seeSoundproofing walls: materials and integrated work), and the second is the fine adjustment of the heating system.
Phased wall insulation
To work with the material for insulation, you do not need to have the special knowledge of a professional. It is enough to familiarize yourself with the main stages of work. To perform installation work, only your desire is needed.

So:
 Choose a heater Choose a foam | We choose a heater. As with all construction, we start by measuring the area of the room. To do this, recall the formula for finding the area, multiply the length by the width of the resulting product of the dimensions of the walls, subtract the area of windows and doors. However, it is worth adding to this the dimensions of the slopes. When choosing a foam, give preference to medium density, but you can always ask for the advice of professionals who sell this material. Since the market offers a large assortment of polystyrene foam, which differs not only in size but also in cost. |
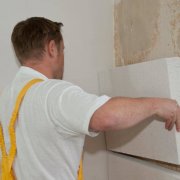
 Preparatory work We are preparing the base | Before starting construction work on insulation, special attention should be paid to the surface of the wall; it should be even, it must be primed, and after drying, putty put on. If you do not perform these works, the foam will not lay down normally and will simply peel off over time. And then a large amount of glue will go to work. |
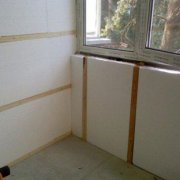
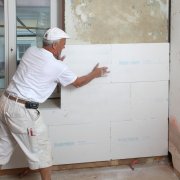
 Glue material Glue foam on the wall | An adhesive agent is applied with a spatula, then glue the sheets of material in a checkerboard pattern. For example, how brickwork is laid out. Pay attention to the fact that the gaps between the insulation should be minimal. |
 Mount Make mount | We fasten the material with the help of special building panels. This stage is important for increasing the service life of the material. Special umbrellas are attached to each corner and one is necessarily in the center, for work you need a drill for working on concrete. Since you need to do a lot of fasteners, but manually this is simply not possible. |
 Mesh reinforcement We apply a building mesh on polystyrene foam | Adhesive does not need to be applied over the net abundantly, so that it feels as if it is drowning in glue. Be sure to consider the weather conditions when performing repairs. Since the glue dries very quickly at high temperatures, there should also be no wind. Otherwise, the glue will dry quickly and continue to work will be inappropriate. The grid should be tightly fixed in the corners. There is a small secret, so that the glue does not dry quickly, moisten its surface with a small amount of water. After the adhesive has been applied to the mesh, it is necessary to drop it, for this there are special requirements. |
 Decorate the wall Styrofoam Plaster | It is problematic to plaster the insulation material (seeHow is foam plastering done?). Experts advise to carry out work in two stages. First, apply one coat of plaster. Let it dry. And the next day, paint the wall again, just treat it with all the care. The second layer should be applied evenly and accurately, as it will become the basis for decorating the wall surface. |
Foam Fixing
Now we will consider in detail how to properly insulate the walls with foam and qualitatively fix the material on a plane. This issue is solved by two methods. This is a fixing with construction umbrellas and a fixing for glue.

So:
- The main requirement for umbrellas is that they must be made of plastic material. Since metal is not combined with polystyrene foam, material expands at high temperatures, and umbrellas cause damage. Also, a metal umbrella can be susceptible to corrosion, which does not favorably affect the foam.
- The umbrella enters the wall at a distance of 70 mm, and the insulation is on average 80 mm thick, it follows that umbrellas need to be bought with a size of 160 mm. The drill must be used in a size of 200 mm, as a reserve must be present.

- It is better to stock up with drills, due to the fact that they wear out quickly. If the drill becomes dull, then the umbrella does not fit into the hole. Since you will have to drill a lot, and so that the repair work does not get up, get 3 drills to start.
- Umbrellas are inserted into the resulting holes, then with the help of a rubber small hammer they are hammered to the end. They also nail plastic nails. The heads of the umbrellas are rubbed with a special mixture so that they are not visible.

- The distances of the umbrellas will be determined by the size of the perimeter. The usual distance between the umbrellas is 150-300 mm, about 200 mm should be retreated from the corners, all calculations are calculated on the wall surface.
Some also mount on the solution. But this option will not be so durable. Polyfoam is glued to the wall surface using special adhesive mixtures. They are divided into two types, the first two-component, and the second one-component adhesive.
- The second glue is easier to work than the first. But it is an expensive tool and it will require a lot of work, and its consumption is high, and not everyone can afford it.
- All adhesives have good performance and durability. Therefore, choose the glue that fits into your budget allocated for repair work.

Foam mesh fixing
When you finish the walls with polystyrene foam, you will need to finish them. Various materials may be used for this. But just as often, polystyrene is simply plastered. Especially in high-rise buildings. For a quality connection, a building mesh is applied.

So:
- After the installation of the foam has been completed, it is necessary to treat it with a grater with a grinding mesh. After completion of the grinding work, the mesh is not discarded; it is needed to smooth the plaster. And when using a new grid, plaster can be damaged. Then we prepare the solution for leveling, and the mesh itself is already glued to its base.
- We start gluing from the corners, slowly unwinding the grid. We fix it with nails on top. The adhesive solution is applied with a spatula to the insulation material.
- Try to stretch the mesh whenever possible so that an ox and flaws do not form. Lightly press the mesh against the material. It is forbidden to attach the net first, and then apply the adhesive. From such work only harm.
Also on the issue of insulation there are recommendations:
- In cities where climatic conditions are severe, corners are planted on special material. It is better to choose plastic corners as an additional element.
- There is a second way to overlay the grid, called “sour cream”However, it is not affordable for everyone.After complete drying, the next day is leveled with this solution, and another day it must be wiped.
- In order for the joint to turn out without a flaw, it is necessary to leave the free edges of the material. Usually at 5 cm, the stock runs at 7 cm.
- After the solution has set, about 3 hours, the edges are folded out, smeared again with a solution and applied to the insulation material.
Before you insulate the walls with polystyrene foam, we recommend that you watch the video - it will help you catch all the subtleties of this work. And the instruction will help prevent mistakes. Moreover, everything can be done with your own hands, then the final price will not be large.