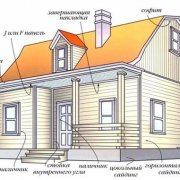
Wooden house: how to paint outside and inside

How to paint a wooden house Interested in many owners. After all, everyone wants the coating to be not only beautiful, but also hold on for a long time. The better it is to paint a wooden house today and we will consider in detail. The hardest part is the dye for the floor.
After all, everyone walks on it and the paint wears out quickly. Therefore, it is necessary to approach the decoration of this particular part of the room most carefully. All work can be completely done with your own hands and then the final price will not be high.
The content of the article
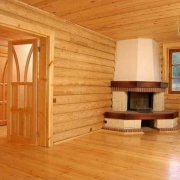
Painting wooden home furnishings
A large number of people think a wooden house than paint (see Paint for a wooden house: which is better to choose) After all, this is a coating of wood that protects the wood from external influences and should also remain attractive in processing.
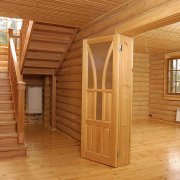
The most difficult thing is to do the floor treatment, because it simply takes up a large area. It is on his example that we will deal with this issue, and how to paint a wooden staircase in the house, you already decide, below is an instruction on this issue.

Making a dye choice
How to paint a new wooden floor (see What paint to paint the floor: make a choice) in the house and other wooden surfaces must be solved initially. When choosing paint coatings, the following should be considered.
Key factors:
- Wood protection aspect
- Safety for health, (absence of harmful substances)
- High wear resistance
- Preservation of the natural appearance of the source material
There are two varieties of the coloring composition for the beam: transparent (glazing) and opaque:
- A natural base (water, linseed oil) is characteristic of the glazing compositions, which allows emphasizing the beauty of the wooden texture. They are used in the process of home decoration.
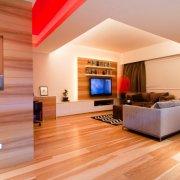
- To create a peaceful atmosphere in the bedroom and the children's room, matte and semi-matt tones of glaze liquids are more suitable.
- At the same time, a glossy finish is ideal for the living room and kitchen, where a brighter color is welcomed.
- Drying oil also belongs to transparent coatings, which for many years has served as faith and truth as a protective compound for wooden structures.
Antiseptics for the home
All solutions of antiseptic action differ:
By composition:
- Water soluble (odorless and no harm; used for interior use)
- Oil solutions (allow the tree to breathe; used for internal and external processing)
- Combined (multifunctional - anti-corrosion and fireproof)
By the method of action:
- Impregnating wood structure and protecting from the inside
- Non-penetrating, forming a surface protective layer
Caution: Antiseptics are used as a main or preliminary coating, for example, before painting. The "health" of the wooden house must be carefully monitored. Therefore, do not postpone treatment with a protective coating for a long time to avoid unwanted damage in the form of fungus or mold.
- Antiseptics for internal work must have confirmation of the harmlessness of their composition for humans and animals.
- Antiseptics intended for outdoor use must necessarily include components that provide resistance to precipitation of all kinds, and should not conflict with the finish.
Wax coatings
The most environmentally friendly protective coating is wax. It is he who is preferable for internal wooden surfaces. The waxed surface looks natural.
To achieve the same visual effect from synthetic materials, you need to try very hard. Although, such a finish is an expensive pleasure. Therefore, in our time, wax coatings are not very popular.
Description of the painting process
This work is done in several stages. Each of them is important and will reflect not only on the appearance of the coating, but also on durability.
A special place is taken by preparation. If you did not attach any importance to it, then it is in vain. After all, it is this work that provides high-quality adhesion of surfaces.
Doing the preparation

You will need:
- Remove all foreign objects from the room, remove the curtains, make furniture
- Get rid of litterdirt and dust, and it is better to wash the floor with hot water and soap
- Remove, if any, remnants of the old coating. (you can use a grinder, wire brush or spatula)
- Carry out a thorough inspection of the work area; if there is any organic damage or mold on the surface (walls or floor), treat it with antifungal and antiseptic solutions; as for areas affected by rot, they need to be removed and replaced with new boards
- Drown hats of screws and nails in woodand grind the cracked boards and knots (knots can be removed with a chisel)
- Get rid of wax or grease if available. (this can be done with white alcohol or soda solution)
- Apply drying oil or primer to the working plane (in this case, the approximate layer thickness reaches 2-3 mm); in the future, this will prevent rotting and mold
We putty the plane
In addition to the well-known ready-made mixtures, there are several simple methods for the independent production of putty:

- Mix chalk and PVA, if necessary, sawdust can be added to the composition; as a result, a thick creamy solution should be obtained; after drying, it provides a strong and reliable coating that allows you to close up large chips and crevices
- A more modernized version is a mixture of acrylic varnish with chalk
- Nitro-varnish putty - consists of all the same wood sawdust (here they act as the main filler) and chalk
We will have the following indicators:
- Match the putty to the tone of your paint (or add a dye of the desired color). Do not forget that adhesive putty is more functional in a dry room, and semi-oily - in a damp, humid environment.
- Fill the voids at the walls and between the planks with ropes or tow, (pre-soak them with glutinous water / oxol). If the gaps are impressive, use sawdust putty (in a proportion of 2: 5: 5: 14 mix carpentry glue, cement, sawdust and water). The remaining irregularities should be sanded with abrasive / sandpaper (you can use "nulevka" soaked in water).
- In the event that any flaws, roughnesses, cracks are still visible on the board surface, you can cover it with a double layer of putty (see Do-it-yourself putty on the wooden floor in stages), and the final result, thoroughly sanded.
Next, the surface will have to be re-cleaned and primed (in order to improve the adhesion of the future paintwork), paying particular attention to the putty areas. In addition to preparing the working plane (floor), it is better to glue with kreppom (masking tape) all adjacent areas in the house, so you protect them from paint.
Floor painting
Before starting work, it is preferable to observe safety precautions and get a mask and gloves, since any colorful coating is toxic.

Thoroughly mix the paint with a wooden stick or a drill with a mixer nozzle.
After making sure that the top coat of the primer is dry, proceed with the staining process:
- Start with skirting boards (for this you will need a small brush), then process hard-to-reach areas under the batteries, corners (pre-cover the walls with masking tape)
- Soak a (preferably short-haired) roller with paint, then apply the first coat along the boards
- During operation, the paintwork material must be constantly mixed to prevent the appearance of stains
- Try to achieve uniform application, without gaps and blisters
- After 2-3 days from the moment of application of the first layer (that is, after its final drying), you can proceed to the formation of the second, which, in turn, should dry for 3-4 days;
- Avoid drafts in the workroom
- Examine the surface of the floor, if it is plain, without white spots, then the third layer is not needed
- Apply the paint according to the direction of the wood fiber pattern
Coloring options
Also, when painting, you can immediately decorate:
- Creating the effect of a striped print - not limited to straight stripes, an ornament with zigzag lines and corners is allowed
- Drawing a rhombic pattern (can be a monochrome combination of cold or warm colors, or be contrasting)
- Hexagons / "honeycombs" - best used for decorating hallways, kitchens, toilets
- Painting (the most spectacular and, at the same time, time-consuming, difficult option) - includes imitation of a genre picture or carpet, the formation of a floral pattern / abstract ornament
Final stage and surface care
To prevent the paintwork from fading, in the first days after the final drying, rinse the floor with hot water (do not use soap and other detergents, this can darken the paintwork), and then repeat the procedure using a damp cloth every day, for weeks.
To get rid of the smell of paint in the room, bring a small number of containers filled with salt water, and leave there for 3-4 days. After a month, if desired, you can apply varnish to the surface of the floor.
Its functions:
- Prevents abrasion coating
- Acts as a kind of protective film
- Able to extend the life of the paint
How to paint an old wooden house you now choose without problems. And the video in this article will help to do all the work efficiently.


I painted the floors in the house and the usual enamel, and all kinds of oil paints. All the same, they wear out quickly, because they constantly have to walk on the floor. Although if the painted and completely dried floors are additionally varnished, then any paint lasts longer. In general, it is better to put linoleum or laminate, then you do not need to think about painting at all.