Is it possible to glue drywall on wallpaper and wallpaper on drywall: 5 frequently asked questions

Today we have to parse the complex relationship of GCR with wallpaper. We will find out whether it is permissible to glue drywall on the wallpaper and vice versa, what glue can be used and how to properly prepare the surface for decoration.
The content of the article
GKL over wallpaper
First, let's look at a few scenarios of fastening GKL according to the old wallpaper.
Drywall wallpaper for screws
- Do I need to remove wallpaper from wooden walls or partitions on a wooden frame before leveling them with drywall?

Not necessary. If GKL is attached to self-tapping screws (directly to wood or through plaster), the intermediate coating will not affect the strength and performance of the finish.
However: dense vinyl wallpapers will drastically limit the vapor permeability of the walls. If they remain under drywall, an effective ventilation system should be provided.
Drywall Wallpaper
- Is it possible to paste gypsum plasterboard on the wallpaper using mounting gypsum glue?

It is impossible. Here is a list of the problems that will arise:
- Sufficiently good adhesion to gypsum, only paper and non-woven are able to provide. Vinyl (dense and foamed), as well as cullet simply will not hold on to itself mounting glue;
Note: paper or non-woven wallpaper should have a rough surface, without gloss and embossing.
- Both paper and non-woven are composed of cellulose fibers and can delaminate. Even if GKL sticks, it can easily come off with a layer of wallpaper;
- Finally, do not forget about the limited water resistance of wallpaper glue. When in contact with gypsum, the wallpaper can simply peel off the wall.
Fortunately, removing old wallpapers is not so difficult:
- It is enough to moisten paper and non-woven 2-3 times with a small interval with water, after which they are easily removed in whole strips. Residues of soaked paper are cleaned with a steel spatula (see How to quickly remove old wallpapers of various types from the walls);

- Dense or foamed vinyl before soaking is rolled over the entire area with a needle roller or cut with a sharp knife. Through holes or cuts, water will get to a paper or non-woven backing. As an option - the vinyl coating can be removed dry, and soak the remaining substrate on the wall with water;
- You can try to soak the glue under the glass wallpaper with hot (60-70 degrees) water or steam it with an iron.

Drywall Wallpaper Foam
- Is it possible to stick gypsum plaster over wallpaper on a mounting foam?
Quite - provided that the wallpaper is firmly held on the wall and does not delaminate. In this case, the type of wallpaper does not affect the quality of adhesion with the leveling coating: polyurethane foam equally reliably holds on paper, fiberglass and vinyl. Foam is applied dotted or in strips.

Wallpaper on top of GKL
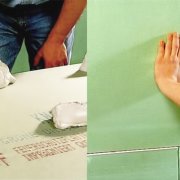
- Can wallpaper be glued on drywall?
It is possible, and they will hold perfectly when using any glue of any quality: the adhesion between kraft paper (GKL shell) and the wallpaper substrate is not difficult to ensure, since both materials are based on cellulose.Problems will arise not with the sticker on the wallpaper, but with the next repair, when you want to update the design of the room.
The fact is that the adhesion between the gypsum core and the cardboard shell is likely to be weaker than the adhesion between the sheet shell and the wallpaper. When you try to remove the wallpaper, GKL is likely to stratify, and instead of decorative repairs you will have to do a major one.

- How to prepare drywall for wallpapereliminating the delamination of the material when replacing them?
Very simple: on the surface of the gypsum plaster you need to put a separating layer of putty about a millimeter thick.
By the way: the putty layer will not only allow you to easily remove the boring wallpaper, but will even out the surface of the walls, masking the reinforced seams that stand out from the thickness between the additional sheets. If the factory refined edges allow you to make the reinforcement invisible, then the rectangular edges of the drywall cut off in place do not.

Here is a complete guide on how to prepare your own wall with plasterboard lined for finishing:
| Picture | Stage of work |
 Stitching between rectangular edges | Embroider the seams between the additional sheets. Stitching is called chamfering from a rectangular edge to 2/3 of the thickness of drywall, which allows to fill the seam as deep as possible during puttying. |
 Reinforcing seams with serpianka | Glue the seams with a serpentine (self-adhesive reinforcing fiberglass mesh). It will prevent cracking during seasonal fluctuations in temperature and humidity. Please note: do not need a sickle if you are going to glue vinyl or cullet, since the final coating itself will perfectly perform the functions of reinforcement. |
 Mixing the closed mixture with a drill with a whisk | Shutter gypsum putty. To do this, add it to a clean container of water at the rate of 1 liter per 1.6 kg of dry gypsum mixture, allow the putty to swell and mix it with a mixer or spatula. |
 Putty joints | Fill the seams with putty through the cells of the sickle and seal the caps of the screws (if the gypsum board was attached to the frame or crate). |
 Puttying walls throughout the area | After drying the first layer of putty, apply the second layer over the entire area of drywall. Puttying is carried out with a wide (30-35 cm) putty knife, on which the putty is applied with a narrower (10-12 cm) tool. If you can’t get a coating of constant thickness - sequentially apply two extremely thin layers on the gypsum board; the second layer should be applied perpendicular to the first. |
 Hand Grater Grinding | Grind the walls with a hand grater with a sanding grid or grinder (see How to grind walls after putty and how to do it right) This operation is performed in bright light, ideally incident on the wall surface at an oblique angle. So it will be more difficult for you to miss a ledge or a hollow. |
 The last step is the primer | Scrub the walls of dust and primer with an acrylic penetrating primer. After the soil has dried, everything is ready for the sticker on the wallpaper. |
As always, there are a few subtleties:
- Prepare putty in portions of no more than 3-4 kg. It is consumed slowly and does not live more than an hour after mixing;
- Wash the putty tool and utensils after each serving has been completed. The price of non-compliance with this requirement is untidy furrows, which will leave lumps of grasped gypsum falling under the spatula on the walls;

- Exactly observe the ratio of dry mix to water. Too liquid putty will drain from the spatula, too thick - you cannot evenly distribute it on the surface;
 will allow you not to make a mistake with the ratio of components")
- Do not putty the walls in the cold (below +5 degrees) and in extreme heat (+ 30 ° C and above). In the first case, the putty will become too viscous or even freeze, in the second - it will set before you even it with a spatula and crack in the joints due to excessively quick drying;
- When mixing putty, do not add water to the dry mix. In this case, dry lumps of gypsum form at the bottom of the container, which will be very difficult to break when kneading.

Conclusion
We hope that our material will save a respected reader from annoying errors in the repair. The attached video will help you learn more about how to prepare drywall for your wallpaper. Good luck!