How to glue drywall on the walls: video, photos, instructions

Aligning the walls with drywall without a crate can significantly reduce repair costs. Today we will tell our esteemed reader how to glue drywall onto walls - a video with a demonstration of technology and photographs of different stages of work will help us with this. So, on the way.
The content of the article
Crate or glue
When it is possible to fix drywall on the walls with glue, and when to prefer traditional crate installation?
The drywall sticker on the wall is acceptable subject to two conditions:
- They do not have pronounced curvature, blockages and other defects larger than 50 mm;
- You do not need to insulate the walls or in the hidden laying of ventilation, water supply, sewage and other large-section engineering systems.

What to glue
On what glue can GKL be fixed? On mounting plaster glue (Perlfix from Knauf, Volma Installation, etc.).

However: it is perfectly replaced by any gypsum putty or plaster. The price of these building mixtures does not differ significantly, and all of them have excellent adhesion to kraft paper - the drywall coating.
Can drywall be glued to a wall covered with old tiles or oil paint?
Can. But in this case, not gypsum glue is used, but polyurethane foam. It has excellent grip on problem surfaces.

Work technology
How to stick gypsum plasterboard on a wall with your own hands using plaster glue?
If you want to more clearly see how we glued drywall to the wall - the video in this article will help you.
Wall preparation
Let's start with the preparation of the foundation:
| Picture | Stage of work |
 Scrubbing loose plaster | Walls are cleaned from fragile and low-adhesive coatings. The crumbling plaster is removed by a perforator (see How to remove old plaster from walls without problems), the whitewash is removed with a spatula after soaking with water, the paints are treated with a universal wash and again removed with a steel spatula. |
 Primer walls | The cleaned surface is primed (see Why do we need a primer: technological nuances of finishing work) The primer will improve the adhesion of the gypsum adhesive to the wall surface, making it more durable and sticking dust particles. On plaster and brick walls, penetrating acrylic soil is used, on a concrete monolith or panel - concrete contact (adhesive primer with sand). |
Caution: if there are large oil or grease stains on the wall, they must be removed before the primer. Degreasing is carried out with a normal rag with gasoline or any organic solvent.
Glue mixing
Glue preparation instructions are quite standard for gypsum building mixtures:
- Pour clean water into a metal or plastic container;
- Pour plaster glue into the water at the rate of 2 kg per 1 liter of water;
- Stir the mixture until smooth with a construction mixer or whisk, clamped in a drill or perforator chuck in drilling mode.

Useful: after mixing, the glue is suitable for use for about half an hour. The average consumption is 5 kg of dry mix per 1 m2.
GKL installation
How to paste over walls with drywall after their preparation:
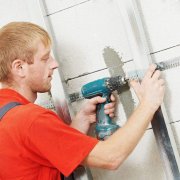
- Apply glue on the back of the sheet or on the wall. Step - 15-20 centimeters;

Nuance: along the edge of the sheet adjacent to the floor, it is advisable to apply a continuous roll of mounting adhesive. It will greatly simplify the mounting of the skirting board.
- Press the GCR and level it on a long level with blows of a rubber mallet or palm;
- When mounting the next sheet, carefully make sure that both the edges and surfaces of adjacent sheets lie in the same plane. Installation flaws will have to be fixed with a thick layer of putty.

How to glue drywall on walls with large (over 2-3 cm) irregularities?
Use beacons to help put the sheet in the same plane. GACL scraps fixed with the same mounting glue, partially screwed into the wall with dowels, screws and any other improvised material can act as lighthouses.

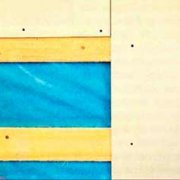
How to glue drywall to the walls with mounting foam:
- Apply it in strips in increments of about 20 cm;
- Press the sheet against the wall and rub it with a couple of sliding movements. This is necessary in order to destroy the bubbles in the structure of the foam and turn it into a regular polyurethane adhesive, which will not expand during polymerization;
- Above the potholes and rubble in the wall of the gypsum board, it is necessary to additionally fix with dowel-screws with a pitch of no more than 25 cm. The reason is the notorious expansion of the foam, which can bend drywall.

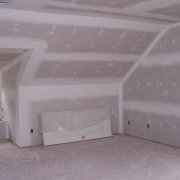
Finishing Finish
We figured out how to glue drywall to the wall. However, the work is still far away: the walls are decorated with untidy seams between the semicircular edges of individual sheets. How is the preparation of drywall walls for wallpapering or painting?
Tools and materials
To do this, you will need:
| Picture | Description |
 Reinforcing mesh-sickle | Serpyanka is a reinforcing material, which is a narrow (5-8 cm) fiberglass mesh with an adhesive layer on one side. Reinforcing the joints will save them from cracks during seasonal fluctuations in humidity and temperature in the room. |
 Turkish ABS made a particularly favorable impression on the author | Gypsum putty (universal or finish). |
 A plastic bucket comes in handy for kneading putties | Tank for filling putty. The author uses for this purpose a plastic bucket from a water-based paint. |
 Putty tools | A pair of spatulas (10-12 and 30-35 cm wide). |
 Grinding with mesh No. 120 gives a smooth surface, ready for priming and painting | Grater or grinder with abrasive mesh. |
 Acrylic Penetrating Primer | Penetrating soil. It will reduce the consumption of paint or wallpaper glue, and at the same time glue the dust remaining on its surface to the GCR. |
Technology
- We chamfer the rectangular edges cut off at the place of the sheets. The so-called jointing will allow to fill the joint as deep as possible during puttying, making it extremely durable;
- Glue a serpentine along the seams and immediately putty them directly through the fiberglass mesh. For filling with the first layer it is convenient to use a narrow spatula. Putty is best applied crosswise with transverse movements: this way the seam will be filled most densely (see Putty of drywall joints - how to do it);
- We are waiting for the drying of the first layer (6-18 hours depending on humidity and temperature), after which we cover the sickle with the second layer of putty, already with the help of a wide spatula;

- After the gypsum has completely dried, we grind the seams. When polishing, it is desirable to brightly illuminate them at an oblique angle: so you will not miss a single unevenness;

- We sweep dust off the walls or vacuum them, after which we prime with penetrating soil.
Nuance: under GKL wallpaper, it is desirable to putty on the entire surface with a millimeter layer. Otherwise, later on, removing the wallpaper, put on gypsum plasterboard walls with glue, you can tear the cardboard GKL from the gypsum core. The separation layer of putty will help you to do without excesses.

Fine finish
It does not have any features against the background of the finishing of the plaster walls: gluing wallpaper on plasterboard walls It is carried out on ordinary wallpaper CMC glue; water-dispersion dyes are used for painting. GKL tile can be laid on ordinary tile glue or on spot-applied silicone sealant.

Conclusion
As you can see, the frameless alignment of the walls is not difficult and is completely affordable for a beginner. Good luck!