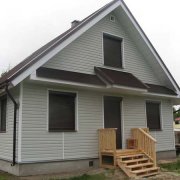
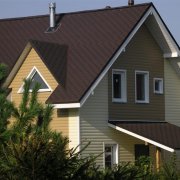
Facing the metal siding of your home

Wall cladding with metal siding is quite relevant in our time. This material can be found quite often.
Today we will tell you how the outer cladding of the wall surface is made with a metal siding device. This work can be completely done with your own hands and then the price of the whole structure will be much lower.
Complete instructions will be given for the proper execution of this work.
The content of the article
Why exactly siding
Facing with metal siding has many of its advantages that distinguish it from other materials.
Let's get acquainted with its advantages:
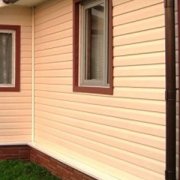
- Wall covering metal siding allows you to not align the reference plane. And this reduces the cost of work. It will be enough just to clean the surface;
- Facing the surface with metal siding, it is an environmentally friendly design that does not harm your health. It tolerates temperature extremes and high humidity;
- You can immediately make wall insulation with metal siding. In this case, a layer of insulation can be put almost any. Only it should be decided at the initial stage of construction;
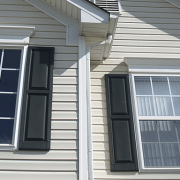
- Can be made and facing vertical metal siding. It all depends on your desire. Although this installation is not recommended. Just at the joints, then water can penetrate under the panels;
- The price of this material is not high. Therefore, a person of almost any income can afford it;
Attention: If you will do the work yourself, then the technology of facing with metal siding should be performed flawlessly. Otherwise, the design will not last long.
Siding installation
So, we proceed directly to the question of how the facing of the wall surface with metal siding is done. This work can be divided into several stages in a certain sequence. And each of these stages is quite important.
Calculation of the number of siding panels
Before buying the material, it must be correctly calculated. And it should be noted that during the work there will be waste and they will make up at least 10 percent.
So:
- Buy panels with a length that exceeds the length of the building - six meters. Their area is 1.37 square meters. m, and the width is 0.229 m.
Attention: You need to make a drawing diagram where you need to specify all the dimensions of the building and depict each wall of the facade. According to this drawing, it is necessary to understand which panels and where to install, how it is advantageous to place trim parts.
- In the calculations, the entire area of the walls, doors and window openings. It is also necessary to calculate the area of the gables and the number of planks for decoration, the number of metal profiles for the construction of the crate and the number of screws.
Facade cladding tool
For work, it will be necessary to prepare:
- Metal ruler;
- Hammer;
- Metal square;
- Electric jigsaw or hacksaw for metal and saw with small teeth;
- Screwdriver or screwdriver;
- Scissors for metal, awl, pliers, knife cutter, plumb;
- Level 60 cm, chalk, rope and a carpenter’s pencil.
Preparation and layout
This is an important point before starting work. The configuration at the end of the work will completely depend on the correct markup.

So:
- To install the siding crate, there is no need to clean the walls from the previous finish (plaster, paint, etc.), however, climbers, tree branches that will interfere with the work should be removed.
- It is necessary to get rid of drainpipes, front lights, you need to remove the wind boards and shutters, remove the bar between the foundation and the wall, remove the external window sill, trim strips around windows and doors, gutters and corner boards.
- In the event that there is mold and rot on the old facade, then it should be removed and the walls treated with an antiseptic. The remaining boards and panels should be nailed.
Then, using a plumb line or level, you need to measure the evenness of the old walls, and, in addition, the verticality of the level doorways and window frames. All distortions are eliminated, if possible; - We determine the beginning of the fastening. We need a straight line along the bottom of the structure. To do this, put a mark and then transfer it to other walls. To do this, apply the hydraulic level. With its help, this work can be done most correctly;
- Now we take a kapron thread and simply beat off the line, connecting all marks.
Frame installation
If it is impossible to fasten the siding directly to the facade material due to the curvature of its surface or decay, then install the lathing from a metal profile.

Attention: To carry out work, it is necessary to mount sustainable forests, since it will be difficult to carry out work from the stairs. However, if two people work, then it is possible to finish the siding using two stairs.
Immediately determine the height of the frame. If you will do mineral wool insulation. Then consider its height a couple of mm more from the thickness of the insulation. It cannot be deformed by panels.
When performing this work, the following rules should be followed:
- First, the frame is strapped around the perimeter of the plane. We cut the profile to the desired size and fasten with dowels.
Only for this it is necessary to use the dowels not from the sets, they will not provide the necessary stiffness. But it is necessary to purchase separately plastic and to it self-tapping screws a couple of mm more from the hole section; - After that we need to fix the transverse elements, but they should be on the same plane with the strapping. We resolve this issue as follows. We pull the line along the diagonals and fix the slats. Height adjustment can be done using gaskets;
Caution: Correctly determine the fastening of the cross rails. After all, siding cannot connect on weight. This is done on a rigid frame. Therefore, when applying markup, keep this in mind.
- Be sure to install metal profiles at the corners and around the perimeters of door and window openings;

- Between the vertical parts there should be no more than 1.5 meters.
- For mounting the battens, a galvanized rack profile suitable for CD-60 drywall is suitable. With direct suspensions, it is fixed to the wall in an upright position, this can be checked using the building level or plumb;
- You can arrange a crate of wooden slats or beams. But, taking into account the tendency of a tree to rot due to humidity in the atmosphere, it must be treated with special protective equipment. This will complicate the work, so it is better to use metal profiles.
We carry out warming
After installing the frame, it is necessary to make insulation and the first thing is to fix the waterproofing:
- We cut the film to the desired size. At the same time, we fix it correctly, it should not lie end to end, it is necessary to make an overlap of the order of five mm;
- After that we put a heater. It is attached with plastic building fungi. Per square meter at least six pieces. First we make a hole with a perforator and after that we insert the fungus;
- If you conduct foam insulation, then you need to put it tightly and after installation, walk along the joints with construction foam;
- If you do insulation with mineral wool. Then it must be laid tightly, but not warped. Otherwise, it loses its properties.
Fasten siding
Having finished the installation of the crate and, if required, laying the insulation, we proceed to the process itself cladding siding.
So:
- First you need to fix the siding corner in the corners of the building. Where necessary, fasten the docking profile H and strap J.
- Then, along the perimeter of the basement of the building at a distance of no more than 5 cm from the ground, a launch pad is installed.

- Then you need to insert the first main siding panel into the upper groove of the start panel. In this case, do not pull the panel up too much, pull it until a special click occurs, which means a good docking with the start panel.
- Thus, one after the other from the bottom to the top, we fix the other sadding panels, which we adjust so that they do not fit into the corners tightly, there should be a gap of 5-10 mm on both sides.
Attention: The entire installation is performed to prevent deformation of the panels when they expand or contract under the influence of low and high ambient temperatures. To do this, during the installation of the panel, the screw is not screwed onto the crate or the nail is not completely hammered at a distance of 1-1.5 mm to tight engagement, and the screw is screwed exactly in the center of the fastening point at a right angle. Also, do not make a tight junction between the panels when fastening in the corner profile.
- Siding should be fixed with screws only in the holes that are provided there. And in the middle. Also do not make the connection hard. First screw the self-tapping screw all the way and release it one turn. This will save you during the expansion of the material;

Such fastening gives siding panels “freedom”, which is provided by all manufacturers of this material.
Before starting work, you should look at the photos and videos on this topic and completely draw up a diagram of the work and then proceed. The most important thing is not to forget that proper markup is the key to success.