How to putty walls correctly for painting - a detailed description of the process

Do not putty the walls during repairs only if you decide to wall them with decorative wall panels or tiles. Other types of finishes require preliminary finishing leveling, even if the base is made of plasterboard, glass-magnesium sheets and other sheet materials.
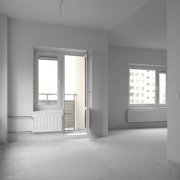
It is especially carefully prepared for painting, since this type of decorative finish is able to show all the flaws allowed during leveling. Therefore, the question of how to putty the walls for painting is far from idle.
The content of the article
Milestones in full detail
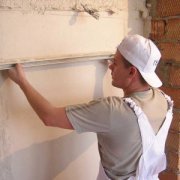
If this work was as simple as mopping, for example, then no one would have thought about finding good decorators. But the process itself, and the preparation for it are associated with significant physical effort, and require certain knowledge.
Therefore, even if the main repair is done with your own hands, masters are usually invited for “wet” work.

This is the best option if you do not have enough experience. Putty - the material is not the cheapest, it requires quite a lot, and it will be a shame if the price paid for it disappears due to your incompetence and “curvature”.
But you should not give up, if you have no other choice but to putty the walls on your own. We will try to describe this process in as much detail as possible so that you do not have any difficulties when choosing materials and determining the sequence of work. A better understanding of the technology of applying putty will help the video in this article.
Preparing the walls for putty
The preparatory work algorithm depends on the state of your walls.
Carefully examine their surface:
- If the base is uneven, prior to puttying it is leveled with plaster;
- If there is some kind of old coating on it, which does not hold well, crumbles (plaster, paint, varnish, etc.), it will have to be removed;
- If there are cracks on the surface, they must be puttied separately, before processing the entire area.

A separate story is walls lined with drywall or other sheet materials. Make sure that no self-tapping screw protrudes beyond the plane of the surface, running a clean spatula over the hats. Screw the protruding hardware deeper with a screwdriver or a screwdriver.
The next required measure, the implementation of which is required by the instructions, is a primer on the surface (seeDrywall primer - why is it needed) It is produced in any case, regardless of the material and strength of the base, but the primer is selected in accordance with these factors.
The task of the primer is to strengthen the crumbling surfaces, protect them from moisture absorption, dedust, improve adhesion with the putty applied.
Tip. The quality of subsequent work depends on the correct choice of primer. Carefully read the information on the appointment of the compositions on the package, take into account not only the material of the walls, but also in what climatic conditions they will be used.
The primer is applied with a brush or roller, the use of a spray gun is also acceptable.
If plastered or concrete walls are primed immediately as a whole, then with plasterboard they do otherwise.First, only the joints between the sheets are processed, and after they are sealed, the entire surface is already. But more on that later.
You can proceed directly to puttying after the primer has completely dried.
Choose putty
Conditionally putties are divided into two types:
- Starting - coarse-grained, intended for the initial alignment of surfaces with small defects - cracks, depressions, etc.
- Finishing - fine-grained, designed for final leveling and smoothing the walls.
When deciding how to putty the walls for painting, keep in mind that this is done in at least two layers. Therefore, the first layer can be the start, the second - the finish. The exception is again the walls made of drywall: after sealing the seams, it is enough to putty them once with the finishing composition.
Note. Each layer after drying is primed again.
There are two types of putty on sale: ready-to-use and dry mix, requiring dilution with water:
- Finished compounds are delivered in plastic buckets of different volumes. They have an optimal consistency, do not require time for preparation, are easy to apply, but are more expensive than dry mixes.
- Dry putties are sold in paper bags. To prepare the working solution, they require a special tool - a construction mixer or drill with a special nozzle. Manually mixing the putty until smooth is very difficult.

Consider this information when choosing a leveling mixture. As for the tool, its set is small: you only need a few spatulas of different widths and a building grater with a sanding mesh or fine-grained sandpaper.
Wall alignment
If you use a dry mixture, apply it immediately after preparation, since the shelf life of the working solution is no more than an hour. Therefore, you need to knead it as much as you manage to spend during this time.
The technology of puttying walls for painting is simple, but requires great accuracy and attention. We begin, however, with a description of the termination of joints (for GCR or LSU).
So:
- After the primer dries (seeTypes of construction primers and their scope) applied to the places of contact of adjacent sheets, the seams are smeared with putty using a wide spatula;

- While the solution is fresh, a serpentine tape is glued to it along the entire seam. It is pressed into the putty with a narrow spatula and smoothed so that the solution protrudes through the mesh cells;
- After that, a layer of putty is also applied to the seam, which should completely hide the sickle and even out the groove between the sheets created by the factory edges.
Simultaneously with the joints, the self-tapping hats recessed into the drywall are also putty. This is done literally in one motion with a spatula.

Wait for the seams to dry and sand them with a grater. Then smooth the entire surface of the walls. And again, wait 3-4 hours (or how much is recommended by the manufacturer of the primer) before starting the main work.
In general, this is a long business just because of the need to withstand the technological break between all stages: primer, putty layers (seePutty decorative as a finish of the walls) But you can not neglect it - the quality will suffer.
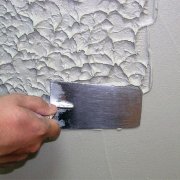
Directly putty is made as follows:
- With a small spatula, a small amount of solution is collected from the container and is transferred to the wide working spatula with a sliding movement, evenly distributed over it;
- It is brought to the wall at an angle of 20-30 degrees and is carried out on the surface with uniform pressure on the diagonal;

- The next movement is in the cross direction;
- Having consumed the entire portion of the putty from the spatula, dial the next one and continue the work so that the solution overlaps the already laid area. To do this, lead a spatula towards this site, and not from it;
- Try to make the layer not thick, not more than 2-4 mm, and not to leave grooves on the surface from the edges of the spatula - straighten them immediately;
- Pay particular attention to corners. To make them smooth and straight, use a special angled spatula or, before starting work, fix corner plaster profiles in them;

- Wait for this layer to dry and eliminate visible blemishes by grinding;
- Prime the surface again and apply a finishing leveling layer of putty, the thickness of which should not exceed 1-2 mm. To do this, make the solution a little more liquid than the first time;
Note. Smooth walls made of sheet materials are enough to putty once after sealing joints - immediately clean.
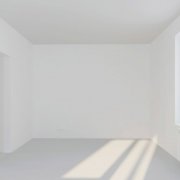
- The final stage is backlit grinding. Grind the walls, directing a beam of light at a slight angle to the area to be treated. It will help to identify the slightest defects that may not be visible on the putty, but will appear after staining.
Before painting, it is advisable to prime the surface again so that the paint does not soak into the base and adheres well to it.
Conclusion
Now you know how to putty the walls for painting yourself, but in theory. To perform this work efficiently, without marriage, it would be nice to look at the work of specialists and practice on an inconspicuous section of the wall. Sure - you will succeed, success in your repair!