How to putty walls under the wallpaper yourself

With the advent of modern flexible fillers, aligning walls and ceilings has become much easier. Nevertheless, the prices for these works by construction companies and hired teams remain high.
Therefore, many would like to know how to putty the walls under the wallpaper with their own hands, so as not to remain “without pants” after the repair is completed. If you have made such a decision, this article will help you understand the issue.
The content of the article
What to cook for repair
Since you decided to do everything yourself, then you will have to acquire the material and necessary tools yourself.
Choose a tool
Probably everyone knows that the walls are putty with spatulas. But not anyhow what, namely putty. They differ from plaster in that their working blade is thinner and more flexible, which allows more precise control of pressure on the tool and a layer of putty of the required thickness.
In addition, the blade should have rounded edges so that they do not leave streaks on the surface being trimmed, and it should be perfectly even and smooth. The slightest roughness is preferably removed with a fine-grained sandpaper (seeHow to grind walls after putty and how to do it right).
As a rule, expensive professional spatulas made using laser cutting do not need such refinement. If you are not going to become a finisher, purchase a tool whose price suits you, but choose it carefully.
Tip. Keep the putty knife away from other tools so as not to damage their working surface. After work, be sure to wash it and wipe it with a soft cloth.
You will also need a grater with clamps (wire jointer) to sand the walls and bring their surface to perfect smoothness. It is better not to use the skin for this purpose, since the lumps of putty adhered to it will leave scratches.

Choose putty
The most important question is which putty putty the walls under the wallpaper. Most often, dry gypsum-cement mixtures are used for this, which are diluted with water to the desired consistency.
Tip. Pay attention to the marking: the LR and KR indexes indicate use in dry living quarters, and the putty with the VH index can be used in wet ones.
Among these mixtures, the most popular are:
- Vetonit is the cheapest material with the lowest consumption. It lays well, perfectly fills the troughs, but very much dusts and wipes, so it is not used for painting;

- Knauf (Uniflot, Fugenfüller) - quite expensive, but high-quality mixes suitable for finishing plastered and drywall walls both for wallpaper and for painting;
- Eunice Kron - Putty high whiteness for heated dry rooms. Not recommended for beginners, as it is quite difficult to iron and has a high consumption.
If you first decided to deal with such a difficult matter, you are not confident in your abilities, then choose a ready-made polymer-based putty. It is sold in plastic buckets of different volumes, is more expensive, but has increased strength, optimal viscosity, is easy to apply and sand.
The main thing is not to leave it open for a long time, since it will be more difficult to properly putty the walls under the wallpaper with the mixture that has already begun to set.
In addition to putty, buy a deep penetration primer (seePrimer before puttying walls - is it needed) and be sure to prime the walls before leveling. This will ensure good adhesion of the putty to the surface and its uniform drying due to the primer film, which limits the absorption of moisture from the mixture into the base.
Putty Stages
Before you putty the walls under the wallpaper, you need to study and prepare the base. To begin with, the old coating is removed from it - wallpaper, paint or crumbling putty, after which the walls are primed and dried.
Surface and tool preparation
Carefully inspect the walls for defects and bumps. Knock down overhangs and bumps with a hard plaster or spatula, and mark the depressions with chalk or pencil, circling them along the contour. If there are deep cracks or unfinished seams at the joints of the plates, putty them first.
Tip. The easiest way to detect irregularities is with the help of a long rule that is applied to the wall, and in between they are illuminated with a flashlight.

Prepare a container for kneading putty. It, like the mixer (a special nozzle on the drill), must be clean, without pieces of dried putty adhering to the walls. Even the smallest hard particles can prevent you from smoothing the surface.
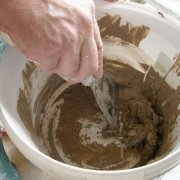
How to prepare a solution
If you want to work with putty it was easy, treat responsibly to its preparation. Of course, if you use a dry mixture, the finished one needs only mixing before use.
The instruction is as follows:
- Pour about 1/3 of its volume into a clean bucket;
- Start pouring the dry mixture from the bag into the center with a jet. When a dry top appears above the surface of the water, stop and wait a few seconds for it to soak in water and sink;
- Lower the mixer into the bucket, turn on the drill at medium speed and mix thoroughly the mixture for 1-1.5 minutes;
- Leave her alone for one minute, then stir again. The solution is ready to work.
It should turn out to be of normal density, reminiscent of the consistency of greasy village sour cream. The solution should not drain, but slowly slide off the spatula. But even if it turned out not to be thick enough, you can no longer add water to it.

Note. Always read the manufacturer's instructions before mixing to determine the serving. It depends on the shelf life of the finished mixture, which can be no more than half an hour. Make as much solution as you can use during this time.
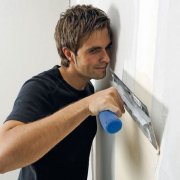
How to putty
Now, finally, you can move on to the story of how to properly putty walls under the wallpaper. We’ll warn you right away: even if they are even, and only need to be brought to the ideal, you will need at least two layers between which drying and priming are performed.
In general, the number of layers depends both on the initial state of the surface and on the craftsmanship and experience of the plasterer. Therefore, in order not to waste your time and excess material, first practice on the walls in the pantry or bathroom, where the ideal smoothness of the surface is not so important.
One layer is enough only when plastering the drywall walls, and then the joints between the sheets are first repaired.
Work sequence:
- First, level the terrain by overwriting individual holes and holes that you previously circled. To do this, type the solution on a medium or wide spatula (depending on the size of the defect), and apply it on the wall with a sweeping motion crosswise.
The mixture should fill the notch flush with the wall surface. If there are no obvious defects, you can skip this step.

Tip. Do not be afraid, act freely.Do not put much pressure on the spatula and drive it slowly - the putty has the ability to slightly liquefy from mechanical stress, so it will lie down as it should.
- Each layer of putty must be dried before applying the next. To prevent it from cracking and warping, this is done in a natural way - without using directed heat fluxes from heaters or fan heaters. You should also avoid drafts and direct exposure to sunlight. Drying time is usually 10-12 hours.
- After drying, the surface is ground to remove sag and random drops of mortar. It is best to do this about a day after the putty is applied, when it has gained sufficient strength.

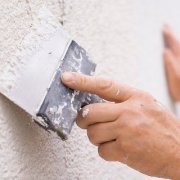
- The main layer under the wallpaper is applied with a spatula at least 30-40 cm wide. With the same cross movements and with an overlap on the already treated area. The main thing in this matter is to adapt to keep the spatula at an angle of 20-30 degrees to the surface and act with the same pressure.
In this case, the layer is obtained with an optimal thickness of 2-4 mm, and the putty does not leave tubercles and torn edges.

- After drying and grinding, the surface is again checked for evenness with a rule and a flashlight. And the next layer eliminates minor flaws.
If you watch the video in this article, you’ll better understand the technology. Pay particular attention to the putty of the corners. It is unlikely that the first time you can get them clean, so you can go for a little trick, leaving them with a little more solution than necessary, and after drying, remove the excess by grinding.
Another tricky way is to use an ordinary pastry bag or an empty silicone tube. When puttying the walls, the corners are not filled with mortar, they remain empty.
And after drying, a putty “squeeze” is squeezed out of the bag in one motion from bottom to top, which is immediately leveled with an angular spatula, the working surfaces of which rest on already aligned walls.

Do not despair, if not everything turns out right away. You can do any number of approaches to the wall until you are satisfied with its quality.
Conclusion
In general terms, you now imagine how to properly putty the walls under the wallpaper. Make it a little easier than for painting (seeHow to putty walls correctly for painting - a detailed description of the process) - a perfectly smooth surface is not required, small scratches and minor defects are allowed, which will be hidden by the coating.
And even if you have to spend a little more material on this than a specialist would need, you will still save on his services plus gain invaluable experience that will be useful to you more than once.