How are bulk paintings on the wall made of putty

DIY putty paintings are unusual and interesting. They constantly cause pride in the master, and the audience delight. It will not be difficult for a creative person to make a panel of putty with his own hands.
For this you need to have free time, simple tools, and most importantly desire. And the article will tell the nuances of the work.
The content of the article
Features of the work
Handwork is prestige and sophistication, but the process of decorating walls is quite time-consuming, requires accuracy and special attention. However, the original design of the wall, the unique design obtained as a result of the work, is worth the time spent on it.
When performing operations, various techniques and tools are used. Their choice depends on the type of pattern, its volume and the materials used.

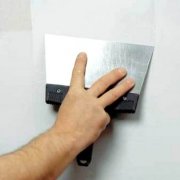
Tip: The novice master should not immediately take on the creation of a picture of great complexity. It is better to choose a simple drawing, in which the elements can be done with a spatula and even with your hands. This will allow you to quickly master the design technique of puttying a three-dimensional drawing. Hands on the wall can perform various shapes and shapes.
In addition to hands, for work you will need:
- Putty solution.
- Quality spatulas, with different sizes and shapes. One solution is applied to the wall, and the second putty is laid on the main tool, and smeared residues are collected.
- Primer.
- Brush
- The pencils.
Putty should choose hardening slowly. This will allow flaws or inaccuracies that arose during operation to be corrected before the solution solidifies.
You can use:
- Ready solution.
- Dry mixwhich is more preferable for the home master. The advantages of the mixture:
- upon termination of work, the dry composition can be stored for a long time without losing its properties;
- putties can be kneaded a small amount and immediately use it.
Tip: When choosing materials for rooms with high humidity: kitchen, bathroom, you should purchase solutions that protect the walls from mold.
How to prepare the base for applying the picture
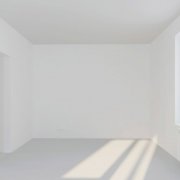
As for any type of coating, before starting the creative process, it is necessary to prepare the surface where it is planned to place paintings from putty.
In this case, the wall should be:
- Flat.
- Qualitatively plastered (see Wall plaster technology: how to do it right).
- Primed.
Putty should be applied only to a well-dried primer.
Further:
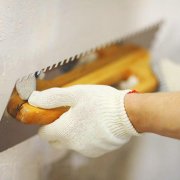
- Puttying begins with the preparation of the base - applying a layer of the composition to the wall.
- When choosing a dry mixture, first of all, a solution is prepared (see How to breed putty).
- A small capacity is purchased. The width of the spatula should extend freely into it.
- Powder for putty is poured in small portions into the container.
- Water is added.
- The composition is thoroughly mixed until a dough-like homogeneous mixture is formed, which should be quite thick, which will allow the solution not to drain while working with tools.
- With a wide spatula, the mixture is applied to the wall with a layer thickness not exceeding 1.5 millimeters.
- A sketch of the image is applied to the wall only after it dries. It can be:
- stalk with leaves;
- small flowers;
- beautiful butterflies;
- simple ornament.
- The sketch of the picture on the wall can be applied with a pencil or the finished image can be transferred through a carbon copy.
How to create a spatula with a stalk on the wall
The instruction for obtaining stems on the wall surface using a spatula suggests using two versions of the work technique.

According to the first technology, the sequence is as follows:
- A line is drawn.
- A spatula is placed near it.
- A smooth movement of the tool is carried out along its length.
- In this case, the spatula must be pressed away from you at a certain angle. This will allow the solution to drain into the places outlined by a pencil and fit along the length of the stem in the form of a roller.
- The resulting excess solution is removed with a free spatula. Typically, excess remains relative to the spatula from the opposite side.
- Surfaces are left to dry.
- Following the same technology, work continues on the rest of the surface.
According to the second option, which is not difficult:
- A tool with a solution is applied parallel to the surface, with the outlined outline of the future stem, but the spatula is sent not along the existing line, but perpendicular to it.
- Excess solution is removed with a free tool, as in the first version.
- With the help of a second spatula, a stalk is formed, moving it along the pencil image.
In the same way, flower petals are created. After applying all the decorative elements, the painting remains to dry, and then it is painted with paints.
Tip: If you want to pre-fill your hand, you should use sheets of drywall, on which you can hone the technique, and then proceed to drawing a picture on the surface of the wall.
How to draw a picture with a syringe
Putty drawings on the walls can be done using a syringe. This method allows you to simply repeat the existing boundaries and all the outlines of the future picture, as in the photo, leaving the hands of the master clean.

Syringe imaging technology offers:
- Remove the piston from the syringe.
- Fill the cavity with the solution.
- Return the piston to its place.
- Putty is gradually squeezed out of the syringethat runs along the drawn line.
- After encircling the outline of the image with putty, the remaining smaller fragments are drawn.
- The panel is left to dry.
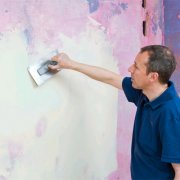
- Water based paint is dilutedin which various coloring pigments are added
- The solution is applied with a foam sponge to the picture.
- After drying the background, small fragments are drawn thin brushes, which will maintain the accuracy of the applied lines.
How to make a three-dimensional picture on the wall using a stencil
On the wall, a three-dimensional drawing can be done using a stencil. It can be purchased ready-made or made independently, then the price of work will be much lower.

In this case:
- The selected pattern is transferred onto thick cardboard.
- A stencil is cut out.
- The product is fixed with a masking tape on the wall.
- With a spatula, all the slots are carefully filled with the prepared putty.
Tip: For patterns with stencils, you should choose a gypsum composition.
- After the putty has dried, but not yet too hard, the stencil is carefully removed.
- A small spatula fills the voids in the pattern.
- The relief is sprayed with water and a drawing is modeled with a small brush, the lines are trimmed.
- The pattern should dry completely.
- The surface is processed with sandpaper and a scraper - all defects are removed.
- The drawing is treated with a primer varnish, which will give it greater strength.
- The entire wall and image are coated with acrylic paint in two layers.
- The pattern is drawn with a thin brush or oil marker.
A panel on the wall is a great idea for decorating a room.If you didn’t succeed in drawing a picture, don’t give up. You can read the video tutorials in this article.


Everywhere of course its pros and cons. The complexity of performing almost any technique for applying volumetric paintings on the wall precisely from putty is great. However, if there is a desire and a little bit of ability, then there are few barriers. The same stencils can be found on the Internet, printed and used. Just the spectacular effect of such bas-reliefs is really colossal.