How is finishing putty walls

Finishing puttying the walls is an important point for both internal and external decoration. After all, the appearance of the plane will depend on this. It is on this subject that we will talk today.
All work can be done with your own hands, because the price of this work is quite high, but you can reduce it. Below you will find instructions on the rules for selecting the material and the stages of its application.
The content of the article
Work Execution Rules
Finishing putty of walls and ceilings is done in a certain sequence:
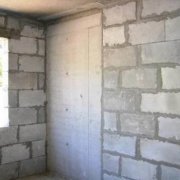
- Initially prepare all the walls that will be putty. Preparatory work includes, first of all, the removal of the old cracked layer.
- At the next stage, rough walls are made, they are reinforced, leveled (see Alignment of walls with plaster according to all the rules), putty.
- At the end, the wall surfaces are painted, wallpaper or use another final finishing method.
Attention: Often during finishing work an important stage is missed - rough finishing, which invariably affects the final result. Unfortunately, all the shortcomings appear after the completion of the finishing work, and something can no longer be corrected.
- Putty surfaces makes walls smooth, removes unwanted bumps, cracks or indentations.
- Primer is also required., this enhances the adhesion of surfaces.
Finishing finishing materials are better placed on high-quality plastered walls. Aligning the walls is more aesthetic, and putty - technical.
And everyone decides the question: to align the walls or not. The answer often depends not only on desire, but also on the ability to invest additional finances, as well as on the result that I would like to get.
Types of putty used
The choice of finishing materials, including dry mixes for puttying walls indoors, is huge (see Types of putty: we will understand everything) In order to make the right choice, one must know their features, advantages and disadvantages (their own financial capabilities are also taken into account).
| Type of mixture | Advantages | disadvantages |
| Gypsum putty |
| |
| Cement |
| |
| Polymer |
|
Various puttying methods
Prior to the final finishing with a high-quality repair, wall surfaces must be putty. There are several ways to putty.
For each of them different types of putty are used. For various purposes, use different types of finishing materials. Work begins with starting putty and leveling the walls.
Starting wall putty
For this type of work, cement putties (plasters) with various additives are used mainly.

Attention: The main purpose of the starting putty is to align the walls, while it is necessary to repair unnecessary holes and cracks.
So:
- The application layer is primarily determined. You just need to pull the forest diagonally and it will immediately become clear how much putty should be put on the level.
- The layer of such putty should not exceed 3 cm. If it is necessary to create a thicker layer, the solution is applied several times, multilayer application of the solution is used.
- It is important to note that you can not apply the next layer of finishing material until the previous one dries properly. In order for the initial layer of putty to be made efficiently, it is necessary to buy a special painting net for work. Its use improves traction on the surface. The walls become much smoother, and most importantly, the appearance of unwanted cracks is unlikely in the future.
- For high-quality adhesion of surfaces to the plane, a construction mesh is attached.
Use of beacons for puttying
When puttying with beacons, the same materials are used as for starting finishing. This method is widely used when leveling coatings on which unnecessary holes need to be repaired.

- Previously, lighthouses are set before work. Usually they are made from various slats (wood, gypsum, metal). Lighthouses are installed both horizontally and in vertical planes, it is mandatory to use a level.
- The resulting space (limited by slats) is filled with putty. Using this technique, the wall is perfectly flat.
Attention: It must be remembered that the beacons must be in the same plane. The alignment line is determined by the extreme.
Finishing putty
The final stage is the finishing. Another name for this method is gerbil.

- It is placed on a previously prepared surface (starting or lighthouse putty), its goal is perfect smoothness, evenness of the wall. As a result of such surface treatment, they are obtained not only without cracks, but even without pores. This solution is always applied thinly enough, it repeats the plane created by the lighthouse (or launch) processing.
- It is very important to note: the finishing putty is used only to give smoothness, and in no case for leveling. Putty layer in this case - only 1 cm.
Cracked surface treatment
If necessary, "patch up" certain parts of the surface using a finishing putty. When buying materials for this type of work, satengips will be the best choice, although other gypsum mixtures can be purchased.

- Before the putty begins, the cracks themselves need to be expanded and deepened. To do this, several times pass along the crack with something sharp (knife, screwdriver, spatula corner). This is necessary for better adhesion of the material to the surface.
- Then fill the crack with a solution and allow to dry. It must be remembered that gypsum is not flexible enough, but dries quickly, within only ten to fifteen minutes. Satengips has a more elastic texture, but has a longer drying time.
Work Execution Rules
When performing work, everything must be done in a certain sequence. Each stage is important has a merger on the final result.
Necessary materials and tools
When performing putty operations, special tools are needed:
- Spatulas of different sizes (large - 25-30 centimeters, small - 10-15 centimeters)
- Spatula for aligning corners and slopes (angular),
- Electric drill, - rollers and brushes,
- Different types of sandpaper,
- A bucket or other container with a volume of 15 to 25 liters.
Due to the wide range of finishing mixtures, it is difficult to navigate. On the shelves are expensive and cheap putties, there are dry mixes and there are ready-made, pre-made in industrial conditions. The most budgetary option is dry mixes, nowadays they are usually quite high-quality and can save quite significant amounts (especially with large volumes of work).
Coarse-dispersed mixtures are taken for the starting layers, and for the final coating - sandless finishing putty. There are also universal finishing mixtures, but for a high-class result, it is better to try to use specialized building materials.
Attention: It is important to always remember that dry putties are characterized by poor moisture resistance, they soften again in rooms with high humidity. In order to avoid undesirable consequences, it is necessary to immediately purchase materials with increased moisture resistance.
Primer
The primer is used to ensure that the finishing materials (including putty) are better held (see Primer before puttying walls - is it needed).
Primer solutions come in varying degrees of penetration:
- High penetrating properties are needed for highly porous surfaces with a loose structure;
- Universal is required for medium-pore walls;
- High adhesion rates for sufficiently smoothed low-porous walls.
Attention: It is better to purchase special primers that are intended for certain types of walls, this will provide a stronger and more reliable adhesion of the materials used for finishing with the treated surface.
It should be recalled that for wet rooms use special waterproofing solutions, they should be applied in several layers.
The main stages of work when puttying the walls
All work will be performed in the following sequence:
- First of all, using a roller, the wall is treated with a primer. Various joints, corners and other uncomfortable places are primed with a brush. It is necessary to wait for the treated surface to dry.
- If necessary, the walls are aligned with starting putty. It is necessary again to wait for drying and then the surface should be primed a second time.
- Before using dry mixtures, they must be prepared: a little water is poured into a special container, then the mixture itself is poured. Mixing is carried out initially with a spatula, and then with a drill (with a mixer).
- The liquid is added in small portions. The consistency of the solution determines its readiness for work. The prepared putty is quite elastic and sticks to the tool (spatula) a little. If the finished mixture is thick, lumpy, then you should add water. And if the prepared solution drains from the tool without sticking at all, then add the mixture from the bag, as this says that it is not thick enough.
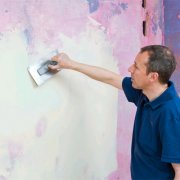
- The next process is starting putty. A wide spatula is chosen from the tools. The finished solution is poured onto the surface of the wall, trying to do it evenly. The spatula is held at a certain angle and putty putty is applied with rather sharp movements.
- At the same time, they try to apply portions with a small overlap, after that it is easier to work, as a result there will be less unevenness. Starting putty is diluted in small parts for quick application, otherwise dry particles appear in the solution, which can lower the quality of work. But the strips that remain from the spatula will equalize in the subsequent stages of work.
- Angular and small spatulas are used to form corners and slopes.A small spatula is applied to a non-thick layer of mortar over the entire height, and then leveled using an angled spatula. The solution is allowed to dry for at least a day.
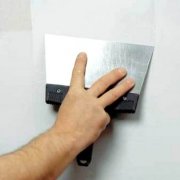
- Finishing is started only after the starting layer is completely dry. When working, small and large spatulas are used: with a small tool, portions of the solution are applied to the large one. Then the finishing material with an even thin layer (thickness from 1.5 to 2 millimeters) is applied to the treated wall surface.
Attention: The cost of finishing putty on the walls will be higher about the starting. It is applied in a thin layer. Ultimately, you should get a perfectly smooth surface.
- It is important to wait until all layers have dried. The topcoat layer dries for about twelve hours. After complete drying, the wall surface is ready for the final finishing stage. Again, finishing putty is applied, which is applied with a very thin layer. We wait for complete drying and proceed to grinding.
- To do this, use sandpaper, as well as a special device in order to hold it. It must be remembered that each dried coat is recommended to be additionally treated with a primer.
- How much the finishing putty on the walls dries is what we are waiting for. For gypsum compounds, this will be several hours. For cement more than a day. It all depends on the application layer.
Preparing walls for painting is different from preparing for wallpapering. The difference is in the quality of the final grinding.
- And if for wallpaper an absolutely smooth surface is not needed (since the wallpaper itself will cover some roughness), then for painting absolute smoothness is fundamentally important (the importance increases when applying enamel). This determines the choice of sandpaper for the final grinding of the surface.
- When grinding under wallpaper, sandpaper with a larger grain (P80-P120) is used, and in preparation for painting, paper with more fine grain (P120-P150) is needed.
Finishing putty on the walls is quite painstaking, especially if the coating is done for painting. On the video in this article, you can find out additional useful information and by looking at the photo make a work plan. The most important thing is to apply quality material and not rush.