How to plaster a wall correctly

How to plaster the walls with your own hands will be considered in detail. This work is done on large planes and it is quite important to maintain the surface in one axis.
To do the work you need to follow a certain sequence, then you will not have any problems. Below you will find complete instructions on the rules for performing this work.
The content of the article
Leveling wall surfaces with beacons
How to plaster walls the video will show you the principles and rules for applying plaster. Lighthouses (see Plaster beacons: how to choose) will help to achieve a flat surface, without any errors. The fact is that they serve as limiters, with the help of which it is possible to avoid a number of shortcomings.
How to choose the right mixture for plaster
Today, in the market of building materials, the leading position is occupied by plasters based on cement and gypsum. Most buyers prefer gypsum-based mixes for interior surfaces.
Its main advantages are:
- It does not leave cracks even when applying thick layers.
- Gypsum-based mixtures are not subject to shrinkage, unlike those on cement.
- The main advantages of gypsum are its ductility.
- Due to its low weight, ceilings can be plastered.
- The ability to maintain heat and sound insulation properties.
- It is possible to level walls without reinforcing cloth.
- The most popular are mixtures: Knauf - Rothband (see Stucco Knauf - the choice of professionals), Volma is a system, and many others.
Caution: Gypsum compositions have a significant drawback, they do not tolerate high humidity and quickly become unusable.
If you do not have a heated room, or the plane is on the street, then the best option would be a cement composition. It can be perfectly done with your own hands and then the price will not be high.
It has many advantages:
- This composition is perfect for use in rooms with high humidity, for example, in the bathroom (see Stucco for the bathroom: which one to choose);
- It is not difficult and fast to make.. Almost anyone can do this;
- The plane will withstand mechanical stress. If there are damages, they are quite easy to repair and not costly.
So you will need to choose the composition according to the indicators of his stay. Above are the selection criteria. Also, additional information can be obtained on the video in this article.
What are beacon profiles
The stucco beacon is a thin profile that has a perforated hole. During the plastering of walls or other surfaces, they play the main role of a limiter.

- In the process, all excess mixture remains on their surface. All you need to do is remove the excess with a spatula. The standard size is considered to be a length of 250-300 cm and a depth of 8 mm.
- The rule is the kind of aluminum rail that has a sharp edge. With its help, work is carried out on the screed and the process of plastering the walls. It helps to check the surface for evenness.
- You can even the surface without the aid of beacon profiles. Instead, artificially exposed plaster beacons are used.The main difference from metal, after completion of work they do not need to twist and grease the received holes. As a result of this, the time of the workflow is saved.
Necessary equipment for wall plastering:
- Plaster mix;
- Beacon profiles 8 mm;
- Hammer with a nozzle for uniform mixing of various solutions;
- Phillips screwdriver; Level;
- Scissors for cutting metal;
- Rule 2.5 m. It is necessary in order to correctly install the beacons;
- Buckets for mortar and water;
- Small hammer;
- Mandatory presence of acrylic primer; Spatula 20 cm long;
- Primer for the proper processing of walls and surfaces;
- Wide brushes for drawing;
- Roller;
- Iron tape measure for accurate measurement;
- Gloves.
Read also Wall plastering tool: what you need to work.
The most important thing on this list is the presence of a punch with a nozzle for uniformly mixing the plaster mixture. The remaining items have a fairly low price.
Basic rules for plastering surfaces
Now we’ll directly understand how to plaster walls on lighthouses. Before starting work, prepare all the necessary tools.
Before the process of applying plaster to the walls, there is another difficult stage of preparation - this is the installation of the correct position of the beacons. There are quite a few different techniques for this, but if there is a laser level, then this process will be much faster.
The process of installing beacons correctly:
- Firstly, all the walls are carefully inspected. Having a level on hand will significantly speed up the entire stage. Applying it to the wall, various deviations become noticeable. Using the rule, we begin to apply it at different angles, thereby finding all the bumps. We note the noted flaws.
- After that, markings should be applied for the installation of beacons. For example, there is a room with a wall length of 5 meters, and a height of 3 meters, also in the room there is a door 100 * 206 cm.
- Next, we begin to deviate from each corner of 30 cm. After that, we draw a vertical line in order to establish a beacon on each side.
A distance of about 150 cm should be left between them. This makes it easier to carry out work processes with it. First, draw a line on the right, because the door is on this side. Then we retreat 1.5 m and begin to draw another line. - The remaining distance of 2.5 m is divided by sex, and draw a line through 115 cm.
We again return to the first extreme lines. Lighthouses should be slightly smaller than the rule. As a rule, the length reaches 2 m, so we’ll make the size of the lighthouses 1 m. - We retreat from the beginning of the wall by 16 cm along the drawn lines, then we begin to drill holes at the received points. After that, you need to drive in the dowel with a self-tapping screw, then they will hold tight enough. We pull the rope horizontally between the two corners.
Then stepping up from the 246 cm screws, we pull another cord. We get two cords taut in parallel. It is necessary to make notes in the place where the intersection of the threads with the marking lines is obtained. We drill holes in the marks obtained, and drive in the dowel without screws. - We have holes located in two rows, which will go strictly along the line. We twist the corner screws, and the dowels will still be needed.
When the dowels are installed, you need to make sure that the caps do not protrude much beyond the cord area. The beacon profile should be free to move without any problems. The cord will help to properly adjust the entire process.
When the upper and central self-tapping screws are fixed tightly in the wall, we proceed to install the lower ones. At the end of the work, about 10 pieces are obtained.
Beacon Installation Procedure
Before applying the mortar, the walls are treated with a special primer. As a result, grip improves, dust is removed.
Attention: Brick walls have the ability to absorb moisture, so they are abundantly primed.
So:
- If the wall surface is ideally smooth, then Concrete Contact should be used, and if there are absorbent and porous surfaces, we use a primer with deep penetration.
- When the walls are dry, you can do the work of marking the lighthouses. It is necessary to add 2 upper further 4 extreme lighthouses. For example, the wall at your top is littered with 3 cm, in this case the distance will be 3.6 cm (0.6 beacon +1.6 bump + 0.4 margin).
- When your screws are screwed in, you will need to put a sharp edge of the rule to the caps while looking at how much the bottom screw cap needs to be tightened. The resulting markup is vertical.
- These actions should be done with other lighthouses located in the corner. The laser level or a simple plumb will significantly accelerate this process. This stage is the most time-consuming in the process of plastering the wall. For proper work, special attention is required.
- After the installation is completed, the beacons should not protrude, therefore, to be sure of this, on the caps of the screws, pull the cord strictly diagonally. To check, you need to put a part of the lighthouse, and it should fit under it without any obstacles. Also, you need to pull the second cord diagonally. If you make sure that everything is fine, then you can align the plane with angular self-tapping screws.
- On the upper borders of the caps you need to pull the cord. A lighthouse profile will move freely under them. The central self-tapping screws should be aligned in the same way that they touch it with their hats a little.
Do the same with the bottom. In this plane, there are 8 lighthouses.
Fasten the lighthouses
They should be shortened a little. To fix the beacons, it is necessary to prepare the plaster mortar in advance.

- Plaster powder is poured into a bucket with a small amount of water. Using a hammer drill, thoroughly mix the resulting consistency. The base of the beacon must be fixed with a small amount of solution.
- The finished mixture will look like a curd base. If it is too liquid, you need to fill the powder until the mass thickens. In this case, the plaster will not fall from the spatula.
- Next, plaster mixture is applied upward on the head of the self-tapping screw. After that, using the rule, the beacons are pressed, but not quite deeply. The work process is quite time-consuming, so it is best to carry it out together.
Attention: To check the correct position of the beacon, you must use the rules and profile for this. In case of irregularities, its position should be corrected. After that, you can pull out the previously installed screws.
The rule must be cleaned of excess mixture, so after drying it will make it much more difficult.
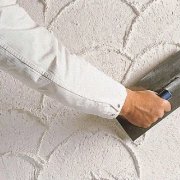
The process of applying finished plaster to the walls
After the time-consuming work of installing beacons, we proceed to the next step:

- The first step is to properly prepare the solution. Water is poured into the bucket at the rate of 1/4 of its volume. The dry powder is added gradually, while after each serving, mix thoroughly with a perforator.
- If during the work it is planned to apply a thick layer, then the solution must be kneaded with a thicker consistency. The cooking rules are printed on the back of the pack. If the surface of the wall constantly absorbs water, it is abundantly moistened before the working process. For this, a conventional spray gun is suitable. The wall is broken into small sections and moistened with water. The liquid is applied in small portions. If this rule is neglected, then the deposited layers after complete drying begin to crack. Experienced professionals throw a small amount of the mixture onto the surface before leveling. After that, they begin to level with a spatula or rule. The entire surface of the wall is equal from the bottom.Layers should not leave joints. They must be tight.
- If there are bubbles, then all the work needs to be redone because in these areas the mixture does not go well to the wall. Upon completion of the work, the entire plastered surface is inspected, and metal beacons are pulled out. The holes are covered with a mixture.
- When the entire surface is completely dry, it is checked for the presence of tubercles and protruding lines from the spatula. In order to get rid of them, use the sharp edge of the spatula or sandpaper. Sometimes the walls can have differences, so that everything is smooth, the plaster must be applied in two layers. The first day after the work, the walls should dry. Then a primer is applied, then after drying it proceed to the next layer.
- If there is no extra time for leveling with a solution, then you can use sheets of drywall.
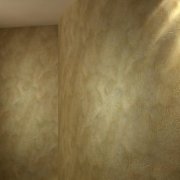
Final workflow
After the work done correctly, they proceed to the final process of work - this is mashing:
- The wall is leveled while on the surface of the spatula the excess solution will not cease to remain.
- Particular attention should be paid to wall plastering under tiles.. It should reach 9 mm. After finishing, grouting is mandatory, which will provide an ideal wall surface. With the help of these difficult manipulations, almost everyone will be able to plaster the walls on their own. The main thing in this matter is to comply with the sequence of the above rules.
How to plaster a wall The video will show you the details in some details of the job. It is important to take your time and do everything according to technology. Take a look at the photo and you can start work e.