How is wall plastering with cement mortar

Cement mortar for wall plastering is used most often. It tolerates temperature extremes and high humidity. Therefore, it is recommended to apply to the decoration of external surfaces.
Today we will tell how plastering is done with cement mortar, you can also watch a video in this article and a photo where you will see the most crucial moments of the work.
The content of the article
The preparatory stage for plastering the wall
Even if a wall has just been built, it, like the old wall, requires a preparatory process to prepare its surface for plastering. When preparing the surface of the wall for plastering, it is very important to remember that the whole point of the preparatory stage is that the plaster layer must hold firmly. This is the main task of these events.
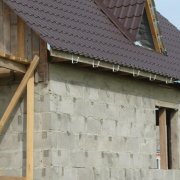
| Surface preparation of ordinary brick | Only the erected masonry made of ordinary brick does not need global preparatory measures, however, attention should be paid to the degree of its moisture.
|
| Facing a brick wall | To prepare the wall of facing bricks will have to work hard. Facing brick it is very difficult to plaster, more precisely - it does not lend itself to plastering. But there may be a situation when you need to cover such a wall with tiles. First you need to plaster it. But there are no hopeless situations.
|
| Concrete wall preparation | The surface of concrete blocks does not hold well on the cement mixture cast over it. She gradually slides down. Therefore, it is advisable to apply the following methods:
|
| Preparation of cinder block wall | The surface made of cinder blocks can only be moistened well and proceed to plastering. This is enough to securely attach the plaster layer to the surface. |
| Saw shell surface preparation | The preparation of such a wall is carried out in the same way as the preparation of a cinder block surface - the surface must be properly moistened. |
| Preparation of a wooden surface | To prepare a wooden surface for plastering, first it is treated with a primer layer, then the reinforcing mesh is installed. |
| Drywall surface preparation | It happens that there is a need plaster drywall walls. Only a primer is suitable for them. |
| Events for walls made of dissimilar materials | In some houses, you can see walls that are built from dissimilar building materials. Here you can find booth, and brick blocks, and limestone. Some differences reach 20 centimeters. To begin with, such a wall needs to be leveled with a solution of cement and sand. Before leveling, the wall is primed and the reinforcing mesh is mounted. |
| Preparing previously plastered walls | A long and laborious exercise is the process of preparing surfaces that were previously plastered. The thing is that before performing the preparatory stage, you must first get rid of the previous layer of plaster (see How to remove old plaster from walls without problems) This can be done with a puncher or an ax.
|
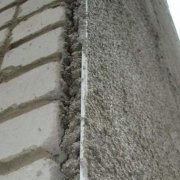
Installation of mesh for reinforcement
To make the plaster more elastic and durable, a stucco or reinforcing mesh is installed on the surface to be treated. It eliminates the formation of cracks that may occur during drying of the layer and shrinkage, and increases the level of mechanical strength of the plaster layer. Usually the cell size is 2 * 2 cm.
So:
- High quality plaster mesh must be coated with an anti-corrosion compound. To fix the reinforcing mesh, metal dowels in a checkerboard pattern are driven into the wall surface. Then scissors for cutting metal cut off a piece of the necessary parameters from the mesh.
- Installation of the grid is carried out from the bottom up. Due to its elasticity, the reinforcing mesh fits well on the dowels hammered into the wall and fit snugly against the wall surface. Using a knitting wire, the mesh is attached to the dowels. The winding of the wire is performed over the mesh from one dowel to the next, repeating the contours of the Latin letter Z.
- You can use pieces of lighthouses. For this, two workers straighten the prepared reinforcing mesh on the surface of the wall, and a third person fixes it with a dowel - nails, on which pieces of lighthouses are put on.
- If you need to make the docking of two parts of the grid, then you should do the inlet of its edges on each other. This will help to achieve the integrity of the treated surface and provide its protection against mechanical damage.
We install beacons
First, we will determine what it is - a beacon for plastering with cement mortar. It's no secret that the lighthouse is a landmark. When performing plastering works, various hard points on the wall surface, which are set using the building level, can be used as a guide.
Lighthouses can be made of wood, nails and thrown on the surface of the wall and dried tubercles from the same cement mixture. However, the best beacons are obtained from perforated metal profiles (see Plaster beacons: how to choose).
They can vary in thickness, which directly depends on the thickness of the plaster layer. Keep in mind that the thicker the lighthouse - the harder it is.
There are two ways to install beacons on a wall surface:
- On the surface to be machined vertically, tubercles of tile glue are sprayedmortar and a mixture of sand and cement. Perforated beacons are glued to them, which are aligned with a level. If you do not have a level of the required length available, then you can attach a rule to the lighthouse, and already a level is attached to the rule.
- On the surface of the wall, strictly vertically using a punch, drill holeswhose diameter should be at least 10 millimeters. Then inside the holes hammers of wood are driven. It is better that they be in the shape of a cone, for the convenience of screwing lighthouse profiles to them.
- Using the thread, you need to set the level of the row formed by the flaps. Then they are equalized either with a hammer, or using a hacksaw for metal. Then the lighthouses are screwed onto the balconies with screws. The distances between the flaps are filled with a cement - sand mixture. This method is advisable to use in the presence of significant differences and irregularities on the wall surface.
Note: The distance between the lighthouse profiles should be about 10 centimeters longer than the length of the rule that will be used for plastering.
When using the first method, you need to wait for them to dry completely and only then start plastering.
Wall surface plastering
Plastering the walls with cement mortar with your own hands is done in compliance with certain rules and technology. Below is an instruction for each step.
Solution preparation
After completing the preparatory stage and strengthening the beacons, you can prepare a cement mortar for plastering the walls. The more cement, the stronger the composition. It can be perfectly done with your own hands and the price is not high.

So:
- The brand of cement affects the proportions in which sand is mixed with cement. Cement grade 400 means that you need to take 4 buckets of sand, grade 500 means that you need 5 buckets of cement.
- In some cases, you have to use old cement, then for cement grade 400 you can apply a proportion of one to three.
- To mix the components of the solution, it is advisable to use a concrete mixer. For plastering small areas, a trough or bathtub will be enough.
- The consistency of the cement slurry is optimal if the mixture is not held on the trowel while it is tilted vertically, but is held uphill.
Caution: The solution must be homogeneous. For kneading, it is better to use a construction mixer or drill with a nozzle.
Sometimes the composition of the cement-lime mortar for plaster is chosen, especially it is suitable for interior decoration. Such a composition will have better sound insulation. For cooking, you just need to add slaked lime to the cement composition and mix the composition.
After coating, the cement plaster can be etched with a neutralizing solution, then the plaster will be less susceptible to infection by the fungus. The consumption of cement mortar per 1 m2 of plaster will depend directly on the thickness of the coating layer.
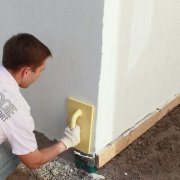
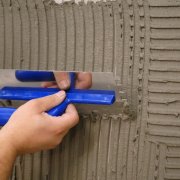
Pouring mortar onto a wall surface
The solution on the surface of the wall is sprayed with a trowel or bucket. It all depends on individual preferences.
- Throw the solution from the bottom up. Directly in front of the wall surface, the trowels need to be turned to it at an angle of 45 degrees and fed up. This protects the mortar from flying around.
- The solution is poured until it reaches the same level with the beacons. Throw the solution in small sections, for example, 50 centimeters, and then begin to work as a rule.
Rule work
The rule applied to the beacons is slowly led along the cement mixture, starting from the bottom of the cultivated area and to its very top. At the same time, you need to move the rule, making movements in different directions; first one way, then the other.
Continue until the surface of the entire treated area is leveled. Then, using a trowel or a bucket, another small area is poured and so on, until the entire surface of the wall is finished.
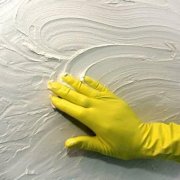
Grout grout
After the cement mortar has completely dried, which can be checked by simply pressing a finger on the treated surface (not even a small trace should remain on the wall), they begin to grout the surface.

So:
- To complete this work, you will need a half-trowel or trowel. Making movements in a circle, the surface of the wall is polished to a smooth state. Existing traces of corrosion are covered with a solution and wiped.
- You can grout the next day, you just need to moisten the plaster.
- In order to avoid cracks on the surface of the plaster, it is impossible for it to dry quickly. You need to moisten the surface of the wall from time to time. If there is such a desire, then it can be done so that there will be no cracks at all on the plaster layer. This will require additional grouting.
Caution: After grouting, shells may form on the plane. In this case, it is necessary to putty them and grout in a new way.
So you can do this work completely independently. Take your time and do everything thoughtfully. Then the coating will serve you for many years.