Interior wall plaster of aerated concrete: decorative finish

Properly plastered walls - the key to quality home construction. How should it be interior wall plaster of aerated concrete many want to know. The article will tell you all the nuances and sequence of decorative wall plastering.
The content of the article
Aerated concrete as a building material
Aerated concrete blocks are most often used in the construction of low-rise buildings.

Their main characteristics are presented in the table:
| Benefits | disadvantages |
|
|
In the manufacture of aerated concrete blocks, aluminum powder is added to the solution, acting as a blowing agent. This creates an open cellular structure, which increases the vapor permeability of the blocks. Such characteristics must be taken into account when aerated concrete plastering is carried out inside the house or outside.
Plastering aerated concrete should begin on the inside of the building, and then its facade. This is due to the fact that the water used in the “wet work” will go out through the blocks and the existing ventilation.
Water vapor at a negative ambient temperature will condense inside the walls of the house and at the border of the blocks with the exterior finish (seeExterior finish of aerated concrete house - responsible business) When freezing, moisture will lead to the inevitable cracking of the plaster layer, and then its peeling.
Tip: Plastering walls of aerated concrete is necessary first inside the building.
Types of plaster
Interior decorative plaster for aerated concrete walls can be:
- Vapor permeable. It includes mixtures made on a gypsum basis. The best option is a plaster mixture of Aegis TM35, which includes lime.

The mixture has a minimum weight, sufficiently high adhesive properties, good strength of the hardened coating layer.
- Vapor barrier. It is characterized by the presence of a large number of polymer impurities. It includes: plastic decorative internal plaster and the usual cement-sand mixture without additives.
The best option than to plaster the gas block inside is the usual inexpensive gypsum mixture used in conjunction with a vapor barrier primer.
Tip: To reduce the vapor permeability of the plaster layer with a thickness of 10 millimeters, the walls should be primed at least three times.

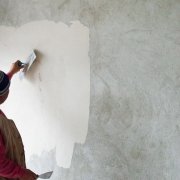
Plastering tools
The service life of the coating itself depends on the quality of the preparatory work. For this, first of all, the right tool is purchased (seeWall plastering tool: what you need to work) Its main types are presented in the photo.

To plaster the walls with your own hands you will need:
- A stucco hammer with a kyle or a small hatchet.With their help, protruding parts on the wall are chipped, notches are made that increase the adhesion area of the stucco mixture to the surface.
- Maklovitsa. It is a large brush used to cover the walls with a deep penetration primer, fastening the surface layer to the wall and increasing its adhesion.
- Plumb line. Serves for hanging verticality and determining the flatness of a plastered wall. Plumb lines help to build a "spider", allowing you to install beacons for applying plaster on a given plane.
- Building level.
- The square. Its difference from the joinery in size and the presence of a retractable rail.
- Strong kapron threads - for the manufacture of "spider".
- Puncher, hacksaw, chisel, nippers, scissors for metal.
In order for the interior finish of the plastered walls to be of better quality, such basic tools for applying plaster as:
- Bucket, the volume of which is up to 1 liter. With its help, it is quite convenient to spray a solution of any consistency on the surface to be plastered; it is good for them to measure the required amount of ingredients used to prepare the plaster mix in small quantities.
- Plaster shovel. With this tool, a solution is poured into those places where it is not enough.
- Falcon. It is a rectangle of wood or metal with dimensions of 40 x 40 centimeters with a handle perpendicular to the main plane. The tool brings a small amount of solution to fix small flaws.

- The rule. This is a flat wooden or aluminum rail, for leveling, scattered over the beacons of the solution, for the connection of existing internal angles. The length of the rule is from 0.5 to 3 meters. During operation, the instrument is installed at two adjacent beacons at two ends, and then stretched along them, removing excess solution. At the same time, additional portions are added to places with an insufficient amount of solution, providing an even layer on the surface.

- A half. This is a polished wooden rail with a length of 40 to 80 centimeters and a width of up to 15 centimeters, with a handle. The tool is used to smooth the plastered surface after losing a solution of water, but not yet frozen.

- Steel iron. It is a polished metal plate with a handle and serves to perform an operation called "ironing".
In addition to these basic hand tools, plastering is also used for plastering large areas. In this case, the whole process from preparing the mixture to spraying it is done by the machine under high pressure. All other plaster leveling work is done manually.

The advantage of this method when applying a plaster composition is that the coating is driven into the wall under pressure, providing a strong bond to the wall.
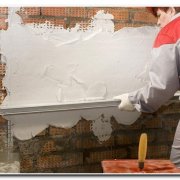
Wall preparation
To get high-quality plastering of walls inside the house, you need to perform some preparatory operations:
- A visual inspection of the walls for defects after laying blocks.
- Close up with repair mortar, left cracks. To do this, it is better to use special glue.

- The surface is leveled.
- After drying, the walls are covered with a hard plastic brush to remove dust and dried fragments of the solution.
- The surface is primed with a deep penetration composition. To do this, use rollers, brushes, conventional garden sprayers or compressor units.

- After drying, the next coat of primer is applied.
- Tiled glue is diluted to the consistency of thick sour cream, which is indicated by the instruction for its operation.
- Preparing a painting plaster grid according to the height of the room.
- Glue is poured onto the wall from the bottom to the ceiling with a strip slightly larger than the width of the reinforcing mesh, with a layer thickness of about 5 millimeters.
- A strip of fiberglass mesh is glued, starting from the top, to the wall and slightly fixed by taking it into the solution to the very bottom, for reliability.

- With a notched trowel from the ceiling, the mesh is pressed into the adhesive layer with effort so that the material completely drowns in the solution. In this case, excess glue is squeezed out.
- At first, the directions of the spatula can be chaotic, gradually changing to horizontal grooves along the entire wall. This will provide excellent wall reinforcement.
- Along the edge of the wall section, you can leave a flat strip of glue to overlap the next fiberglass cloth. The overlap width must be at least 100 millimeters.
- As a result, the entire wall is covered in such a way, on which the glue layer has horizontal grooves. This provides an excellent connection of any plaster with high coating strength.

Further the wall is covered decorative plaster.
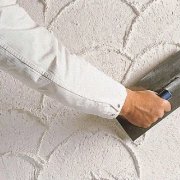
Application of textured and structural plaster
Textured decorative plaster internal can be:
- Lamb. It consists of stone grains of various sizes. After application to the mineral base, the surface acquires a roughness and uniform granularity.

- Fur coat. After applying to the surface, a roughness is obtained in the form of a small “hairiness”, the main component of this mixture is cement.

- Bark beetle. This is a composite decorative plaster for internal surfaces with a filler of small stones. After application, a furrowed texture is formed on the surface, resembling corroded wood in appearance (seePlaster textured bark beetle: characteristic features of the material).

Further, the application process is as follows:
- Decorative plaster is applied in several layers.
- A small portion of the mixture is filled with a spatula and evenly distributed over the trowel.
- The tool is attached to the surface at an angle of approximately 30 ° and the composition is applied to the wall.

Tip. You can not start work immediately on a very large area. It is worth experimenting in a small area, otherwise the plaster will dry out and the result will not be satisfactory.
- Textured plaster is a very malleable material that can take any form if necessary. You can use a traditional paint roller or a regular sponge.
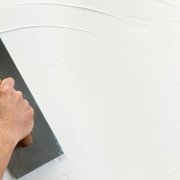
- The surface of the wall is treated with a spatula.

- The necessary pattern is formed along the wall.

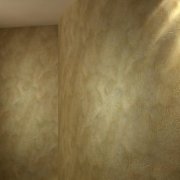
Applying Venetian Plaster
It is quite difficult to apply such a coating yourself. It’s worth previewing the video in this article.

Applying a layer of plaster is performed in the following sequence:
- A thin coating layer is applied to the surface, trying to create a specific pattern.
- The layer should dry for about an hour.
- The dried surface is lightly ground with a large spatula to get rid of small defects.
- Invited for leveling coverage.
- A second coat is applied in the same manner as the first.
- The spatula is applied to the last layer of decorative coating, which should be translucent and thin enough to give it great depth.
- Work is postponed for 30 minutes to dry the material.
- The wall is smoothed with a spatula.
So apply Venetian plaster in a dry room.

Internal stucco with cement and sand differs from the Venetian one by simpler application. It is enough to prepare the necessary tool, follow several rules on the technology of applying the solution to the surface.And after completing work, rinse all tools without leaving traces of solution on it. Decorative plaster on the walls of aerated concrete blocks creates an original and beautiful coating.