Cladding cladding of facades yourself

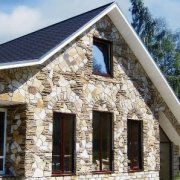
Facade clinker tiles attract many owners of their real estate. Also, cladding facades with clinker tiles for insulation will save heat, and this is not unimportant in our time.
Today we will consider how cladding tiles are used to clad the facade of the house and what is needed for this. In the video you will see the cladding process and this will help you do everything right. Also, the photo will show the individual stages of work.
The content of the article
The benefits of clinker tiles
Today brick brick tiles are quite popular and they deserve it.
So:
- Clinker facing facade tile It serves longer than other materials for facing. She is not afraid of humidity, frost, heat and frequent temperature changes.
- Tiles are made according to a special technological process, due to which the material becomes refractory. This provides her with durability, practicality and safety.
- Laying clinker tiles - the process is not complicated. It just needs to be glued to the wall surface using a special solution. And to hide the seams and for a long time to preserve the coating in a holistic state, you can use high-quality grout, which happens in different colors.
- Clinker tiles look quite aesthetically pleasing, it does not require any complicated and expensive maintenance.
- All work can be done with your own hands and this will reduce the cost of decoration, then the price will be lower.
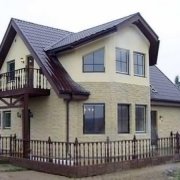
- Facing the facade with clinker tiles is quite an effective option, it perfectly tolerates temperature extremes and high humidity. Therefore, it is durable. She does not require much care.
From the above it follows that this material is in demand and has many advantages that make it relevant today.
The disadvantages of clinker tiles include the following characteristics of the material:
- Fragility, since clinker tiles are ceramics, and it does not tolerate impacts.
- Price. Compared with standard ceramic tiles, the cost of clinker is many times higher. This fact is affected by the complexity and duration of production technology, as well as the high level of material quality.
Attention: The disadvantages include the fact that you can’t attach it to any mixture. Most often, the manufacturer offers his own and sells along with the material.
Clinker tile installation: the nuances of self-assembly
Facing the facade of the house clinker is done in several stages.
They look as follows:
| Surface preparation | The adhesion of surfaces depends on this stage. As a result, the durability of the finish. If you do something wrong, the coating will not last long. |
| Markup | At this stage, it is necessary to make the correct distribution of the material on the plane. If you start to put the first row incorrectly, then the rest of the order will have an irregular geometric shape. Therefore, take the markup carefully enough. |
| Cladding | At this stage, you need to properly prepare the solution and make the lining. For kneading, it is best to use a drill with a nozzle. Then the mixture will be homogeneous, which will provide elasticity and filling the seams. |
Also now instructions on the rules of cladding are offered ..
Rules for finishing
Clinker tile finishing is quite simple, if certain conditions are met, and there are not many of them:
- First you need to properly prepare the base.Typically, clinker tiles are installed on plaster or concrete.
But in any case, the surface of the base should be absolutely smooth, clean from dirt and dust. In addition, she needs quality facade primer. - If your surface is already ready, it must be covered with a primer. This will enhance the adhesion of surfaces.
Caution: You must first check the level of application of the tile. That is, we will then know the layer that we will succeed. If it exceeds one and a half cm. Then to the surface it is necessary to fix the building mesh. Otherwise, the tile will not last long.

- To fix the mesh, holes are made in the masonry using a perforator. After that, you need to put the cuttings there. Do not forget that you need to put a washer on the hat, it will not let the net slip.
- Then you need to choose the right adhesive material. When choosing, focus on where you intend to use clinker tiles.
If it is designed for indoor use, then you can use ordinary tile adhesive. If it is about facade clinker, then you will need glue of a higher quality, which can withstand low temperatures and can not absorb moisture.
If you like the well-known brand Ceresit, then choose a dry mix CM117 or CM17, since this glue is best suited for installing clinker tiles mounted in aggressive outdoor conditions. - Now the first line is being drawn, followed by the subsequent ordering. It is best applied using a hydraulic level, this option will make it perfectly smooth.
- In the future, you will need knowledge of the technological process for aligning seams. It also affects the type of tile used.
If the tile is standard, which is laid with the intersection of the seams crosswise, then, like when installing tiles, crosses are used to align the seams. If we are talking about brick tiles under a brick, then in order to level it well, you should use a round rod, the diameter of which is 6-8 mm.
This tile is laid in a row along the entire length of the wall. Before starting the installation of the next row, a rod is placed on top of the previous one, which ensures evenness of the seam. - It is also important to know the method of sealing joints between tiles. There are two ways to close the joints: the first is the usual one used during the installation of tiles, the second method is much more interesting, it is used when installing clinker tiles under a brick, we will tell you more about it.
- In general, you may not need to close up the seams if you correctly lay the rod, which ensures uniformity of the seams. When installing the rod, it is necessary to densely fill the distance between the rod and the wall with glue.
Then after the glue dries (not completely), remove the round rod, you will get an absolutely even perfect seam. In the case when a colored seam is required, the space between the tiles is filled with special grout.

- Consider the styling features. There are not so many of them, however, you can not lose sight of them, since this can lead to the falling off of the tile.
Before you spread the tile with glue, it is imperative to wet it with water and apply a primer to the reverse side of it. - The solution is applied evenly over the entire plane. To do this, use a spatula.
- After that, the tile is applied to the surface and slightly pressing, we make rotational movements alternately in different directions. Then the tile will sit evenly.

Caution: The solution will protrude at the seams. It should be removed immediately. Otherwise, it will soak into the surface and you just ruin it.
Cladding the facades of houses with a clinker is not a simple and time-consuming process. But having done it according to all the rules, you will get a beautiful and durable finish.