How to beautifully finish a plasterboard arch

The final step in the manufacture of drywall arches is its decoration. Any finishing materials are applied to drywall.
This is a variety of wallpapers, and decorative plaster, and artificial and natural stone. The use of each finishing material has its own characteristics.
The content of the article
Types of finishes
Finishing the archway with wallpaper

So:
- The simplest material for finishing an archway is a wallpaper. At cost wallpaper decoration significantly lower than other materials.
The advantages of wallpaper decoration include the unlimited variety of colors and patterns, which allows you to fit them into any interior. - The main disadvantage of wallpaper decoration is its fragility. Over time, yellowness appears on them, they lose their original freshness.
- It is very difficult to repair minor damage. Individual pieces will always differ from the main canvas.
Wallpaper is afraid of moisture. With high humidity, they quickly become worthless and disappear.
Wallpapering

If you had to glue wallpaper on the walls, then you can easily cope with wallpapering in an arched opening:
- Immediately before starting work, it is necessary to carefully prepare the glue. Using a special nozzle on the drill, glue is stirred until the lumps are completely eliminated.
- The first strip is glued vertically next to the arch so that it is possible to bend the edge of the strip onto an arch 2 to 2.5 centimeters wide. The second strip is glued next to the first so that it enters the arched opening also at 2 - 2.5 centimeters.
- The following strips are also glued with an allowance of 2.5 cm. Then, cut out the corners in the allowances with scissors so that there are no wrinkles, and adhere to the arch, carefully smoothing with a brush.
- In the same way we paste the wallpaper on the other side of the arch.
- At the last stage, it is necessary to paste over the arch. To do this, cut the strip exactly along the width of the arch, and the length should be longer so that it is possible to combine the picture if necessary.
- It is necessary to start gluing the strip from the top of the arch and gradually going down, carefully smoothing the strip from top to bottom and to the edges.
Finally, wipe the strips with a dry cloth to prevent bubbles from appearing.
Decorative plaster

Another, quite popular, method of decorating arched openings is the application of decorative plaster. Unlike conventional plaster, decorative creates a textured texture.
- The advantages of this method include the rather simple application of plaster, which allows you to do this operation yourself. At the same time, significant funds are saved.
This material can last quite a long time and in the end turns out to be more economical than frequent replacement of wallpaper.
- The disadvantage is the difficulty in restoring plaster or repairing individual parts. A new site will be allocated. Due to the relief structure, difficulties arise in cleaning the surface.

To apply decorative plaster you will need such tools:
- ironer;
- plastering trowel;
- two spatulas with a width of 30 and 10 cm;
- grater;
- corner spatula;
- embossed rollers or finished dies;
For plastering, it is best to use ready-made mixtures of slow drying. This is necessary so that you have time to put a relief pattern on raw plaster.
Apply the mixture on the entire surface of the arch with the thickness specified in the instructions on the packaging of the mixture. In any case, under the pattern there should be a layer of plaster with a thickness of at least 1.5 mm.

So:
- After applying the plaster, it is necessary to give it a relief structure. This is done with embossed rollers or with the help of ready-made dies.
The roller can be rolled vertically or change direction. This creates a variety of drawings. - It should be noted that the use of rollers reduces the consumption of material and reduces the time to perform this work in comparison with the finished dies.

- After drying, a primer is applied to the relief structure and left to dry for up to 20 hours. After that, paint is applied.
- In order to emphasize the relief of the pattern, a darker paint is first applied with a long-nap roller.
- After drying, a second layer of lighter paint is applied with a short pile or rubber roller so that only the tops of the relief structure are painted.
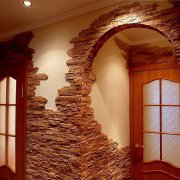
Decorative rock
The most expensive, but also the most effective method arch finishes is a decorative stone.
Finishing an archway with stone has many advantages:
- the stone is not subject to corrosion, fungal bacteria and rot;
- environmentally friendly material;
- You can choose the structure and color of a brick or tile, choose a modern style or antique;
To finish the arch with your own hands, prepare the following materials and tools:
- a rock;
- primer;
- glue "liquid nails";
- mixture for sealing joints;
- pickaxe;
- pliers;
- level;
- construction knife;
- pencil;
- roller;
- hacksaw;
- putty knife;
- sand paper.
For an arch made of drywall, it is necessary to choose a lightweight stone, since a heavy stone can deform the arch. For the rounded part of the arch, you need to choose a narrow stone.
Clean the arch surface from dust. If the surface is smooth, then a notch should be made on it for better adhesion of the material to the surface.
After that, the arch must be primed and left to dry for 20 hours. For the solution, we use ready-made dry mixes, stirring them as described in the instructions on the package.

So:
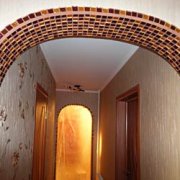
- We lay the first stone at the junction of the arch and the wall. Be sure to set the stone using the level.
- The second row must also be laid at the junction of the wall and the arch, but the stone should protrude beyond the joint to the thickness of the tile. Due to this, the angle will be overlapped and therefore will gain greater strength.
Thus, the stones are stacked until the arch is curved. - To pass the rounded part of the arch, apply another tile to the rounding and draw a pencil along the arc. After that, we trim the stone according to the pencil mark.
To make cropping easier, first draw a few times along the pencil mark with a cutter. Then it is easy to break off with pliers.
We grind all irregularities with sandpaper. - A very responsible and time-consuming step of gluing tiles to the inner, rounded part of the arch. In the same way, each stone is trimmed and adjusted along the arc of the arch and glued with an overlap.
- After finishing, the masonry is kept for 2 days until the solution sets well.
- The seams are closed with a solution prepared from a special dry mixture with a rubber spatula, trying not to put too much pressure on the stone.
If you wish, you can paint the decorative masonry in accordance with the surrounding interior.
Plasterboard ceiling decoration in the corridor

Ceiling decoration In any case, the corridor with drywall should be carried out if suspended ceilings are arranged in other rooms.
To finish the gypsum plasterboard ceiling in the corridor, you will need such tools and materials:
- stairs;
- roulette;
- screwdriver;
- hammer drill;
- pencil;
- construction knife;
- sandpaper;
- putty knife;
- plane;
- level;
- roulette;
- square;
- hacksaw;
- ceiling and guide profiles;
- U-shaped suspension;
- fasteners (dowels, screws);
- a sufficient amount of drywall 9.5 mm thick.

Immediately determine the indent from the ceiling. If you build in spotlights, then the indent should be 10 cm, if chandeliers, then 5 cm.
After that we create a horizontal level. To do this, measure the height from the floor to each corner and find the smallest.
We retreat in this corner from the ceiling 5 cm and mark the horizontal along the entire perimeter with the help of a level and a building cord. On these lines, at a distance of 50 cm, drill holes for the dowel-nail and fasten the guide profile.
So:
- On short sides, we make notches at a distance of 60 cm and set longitudinal profiles on them. They are installed using U-shaped strips.
To impart structural rigidity, we install transverse bridges between the longitudinal profiles. - The frame is ready and you can attach drywall sheets to it. Before fastening, the sheets are cut into the required dimensions.
This is easy to do with a construction knife. They make an incision, and then the bottom layer simply breaks off.
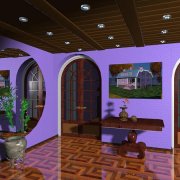
Square arch finish
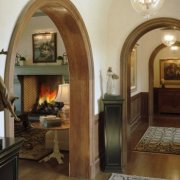
Rectangular interior arches made of natural materials create a sense of antiquity and coziness, simplicity and comfort.
To your taste and in accordance with your capabilities, it is possible to order an arched set of MDF (can be painted or not painted). Lined with oak veneer or mahogany veneer.

You can also order an arch made of solid oak.
You can make the order according to your sizes. The standard kit includes all the details and components that will help you install the arch easily and quickly.
To decorate the arched opening you will be offered various decor elements: these are cornices, squares and banquets. Estimated kit price from $ 190 US.