Porcelain stoneware: practical and stylish

Porcelain tile has appeared relatively recently in our lives. It was created as an inexpensive alternative to natural granite, the price of which is quite high, and was intended for facing facades.
As technology improved and new designs developed, this material has long gone beyond simulating the granite and marble textures. Today, porcelain stoneware has become a common occurrence: facing floors, walls, stairs, stoves.
In the course of the article, we will talk about various types of granite, technology for laying flooring, and also consider several options for its design.
The content of the article
We carry out facing of a floor
To clad the floor, you first need to buy tiles. In any store you will be presented with many options, including decorative ones, with which you can make panels on the floor.
For those who do not know: a panel is a mosaic image concentrated in a certain part of the surface.

We purchase tiles
Manufacturers, and in their person trading companies, as a rule, offer the attention of the buyer various design options, and decors for them. In addition to everything, such an instruction is attached to the kit, with which you can lay out the panel with your own hands.
If no frills are required for your floor, you will need to determine only the size and texture of the facing elements.
So:
- Porcelain tile is available in a wide variety of sizes, but only in two configurations: square and rectangular. The most popular porcelain stoneware for flooring is tile with dimensions 20x20; 30x30; 40x40 and 50x50 cm.
- In general, there are smaller tiles 5x5 cm and large 1.2x1.8m. Usually, the choice of size of porcelain stoneware depends on the intended design, where different shapes and colors can be combined.

- There are several types of porcelain stoneware, differing in the method of surface treatment. The classic version, as we have said, imitates the texture of granite.
The simulation is so accurate that it’s sometimes impossible to determine where natural stoneand where is the porcelain tile. - Thus, granite cladding of floors is losing its relevance, and now even in solid administrative buildings they save the budget and make porcelain stoneware flooring. As the saying goes, if there is no difference, why pay more?

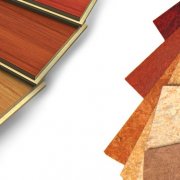
- Then a tile appeared that imitated the natural pattern of marble, and consumer interest in this material increased significantly. Looking at the photo from above, you might think that marble has been veneered in this interior.
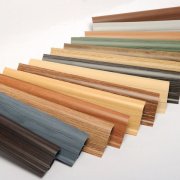
And this is just a polished porcelain tile with marble texture! - In order to attract buyers' attention to porcelain stoneware, as a material that can be used in the design of premises, other types of imitations were developed. The texture of wood is always of particular interest to people.
- Here is his drawing and became the subject of attention for manufacturing enterprises. Currently, there are not only square tiles with wood texture.
Porcelain tile also simulates the configuration of wooden flooring. And this has already given a new round of popularity for this material.

- After all, it is clear that the durability of such a floor is incomparable with the service life of a wooden coating.In our example, a variant of tiles imitating a parquet board is presented, but there are also analogs of panel and piece parquet.
Parquet, especially art, is incredibly beautiful, no words. - But a tree is a tree: over the years, it is drying up, begins to make sounds when moving on the floor, requires looping and antiseptic protection. Tile is devoid of all these shortcomings.
It is enough to lay out the floor once, and you will not have to return to this question again. Provided, of course, that everything is done correctly.

- The surface of porcelain stoneware imitating the skin looks just as magnificent. In our next example, you can see an example of such a floor covering.
It can be attributed to the relief surface. And there is also a glazed, polished, matte, waxed (satin) tile. - When lining large areas, mainly rectified porcelain stoneware is used. Such a tile is calibrated to the millimeter in size, and its edges are processed with a diamond tool, so that they have a flat and smooth surface.
This treatment eliminates the need to seal joints between the cladding elements.

- There is another type of porcelain tile called rustic. It has a non-slip surface, and is used in places with high humidity.
Rustic porcelain tiles trim terraces, platforms near the descent into the pool, stairs (see.Finishing stairs: we choose for ourselves) and entrances. This type of tile has a high resistance to abrasion, and, as a consequence, the longest service life.
According to the physical and mechanical properties, porcelain tile for the floor is divided into 5 classes, each of which corresponds to the expected load on its surface during operation. There is also technical tile, which is laid in industrial premises: it is thicker than the usual options for residential and office buildings.
Getting Started
So, the tile is bought, you can get to work. And there is no difference: the installation of porcelain stoneware or marble flooring will be carried out.
For all types of tiles, including stone, the installation technology is the same, with the exception of cutting:
- If the amount of work is small, porcelain tiles, as well as ceramic, can be cut using a conventional glass cutter. Otherwise, you will need a tile cutter. More will be needed: level, notched trowel, rubber trowel and hammer.
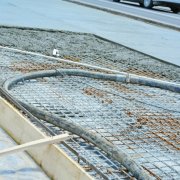
- The work begins, as always, with preparation, and its stages will depend on the state of the floor. If you are doing the repair, the first task will be: to free the surface from the old coating, carefully cleaning the base.
- Further actions will depend on the room in which the cladding is made. If this bathroom, the base surface must first be treated with a waterproofing compound.
In any other room, the base of the floor is primed with concrete contact.

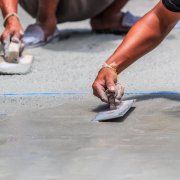
- In order to lay the tiles, we need to have a flat surface, and for this a cement screed is performed. In any case, if the floor will be faced with granite on the glue.
To level the floor, it is best to take a dry, self-leveling mixture. Diluted with water to the desired consistency, it simply spills onto the floor and is evenly distributed over its area. - The composition of this mixture contains plasticizers, which allow it to independently and evenly level the surface, filling the smallest recesses. Such a screed makes the base of the floor perfectly even, and you can see it in the photo above.
After drying, the leveling layer is also primed. - Further, flooring is carried out with ceramic granite tiles.There are many options for laying tiles, but the most popular is the method of “butt-to-butt”.
When using this method, often take a tile of two colors, and stack it in a checkerboard pattern. If the pattern is applied to the tile, it, in this case, easily joins.

- A more complex way of laying is the “flip” option - at the same time, a shift is made in each row. In more complex versions, tiles of different sizes are used to perform a specific pattern or panel.
Various laying methods can be combined, for example: arranging rows of tiles parallel to the walls, and diagonally on the floor. - The success of a beautiful coating lies in the correct arrangement of the tiles, and it must be carefully considered. Make a preliminary marking by dividing the room with a dyeing thread at a right angle into four parts: this will determine the center of the floor. Door trim and baseboards must be removed.
- Best of all, if you spread the tile across the width of the room, focusing on the drawn lines. The tiles may need to be slightly shifted to avoid unnecessary cutting. When cladding elements are trimmed against the walls, it does not always look beautiful, and often striking.
- If the room has such structural elements as a bay window, a column (seeColumn decoration: doing it right), a fireplace or zoning partition, you need to try so that the tiles around them are located symmetrically. Laying tiles start from a right angle formed by the intersection of the marking lines.

- Glues for mounting tiles are also sold dry and mixed with water in the ratio indicated on the package. The finished glue is applied to the tile using a notched trowel, then it is firmly pressed to the base.
Move along the marking line that will guide you. - Many types of tiles require strict observance of the thickness of the seam, so separators are inserted between them - plastic crosses. Moving from the center of the room to the walls, first revet only one half of the floor, and then grasp the second.
- During laying, check each row with a level; if necessary, a thicker layer of glue can be applied. But if you did the alignment that we talked about above, you probably will not have to do this.
- But tile installation is carried out in another way: by laying it on a cement-adhesive mortar. It can be made independently by mixing one part of M400 cement with three parts of sifted sand.
Top up water as necessary, until a light test is formed. - For 10 liters of such a solution, add 0.5 kg of tile glue or PVA. Specialists using this mixture at the same time level the floor. This method is especially relevant when you need to raise the floor mark higher.
- To cover the space of the floor, which is not covered by whole tiles, they will have to be cut. If you use a tile cutter for this purpose, you can set the size on it - and all the tiles will be cut the same way. You can watch the video to see how the wizards do it.
- After the decorative flooring is completed, only grout remains. Grouts are also sold dry, and are mixed with water in small portions, just before the start of jointing.
Use a rubber spatula to grout so that it fills the gaps as much as possible.

- Excess solution must be removed immediately, without waiting for it to solidify. Then the surface of the tile and seam is polished with a dry cloth.
After finishing work, give the glue time to gain strength, and only then proceed with the installation of skirting boards.
Contrary to popular belief that tiled floors are only good for bathrooms and lobbies, the examples we give can convince you otherwise.Today, porcelain stoneware flooring can decorate absolutely any room, including the living room.
And if you want to focus on it in interior design, take all responsibility to the choice of tiles and the process of its installation.