Plasterboard ceiling: what can be finished

Today, the decoration of plasterboard ceilings, walls and other elements of the interior with plasterboard is very popular. This is primarily due to the fact that gypsum board is quite easy to use and inexpensive to purchase material, which, when used skillfully, as a result can exceed all your expectations.
The content of the article
Advantage of the materials themselves
At the same time, the ease of processing of drywall implies that almost any decorative material can be used to finish it, allowing you to realize the most unexpected and bold ideas of designers. Well, do not forget that to do all this is quite possible with minimal cost and without the participation of specialists.
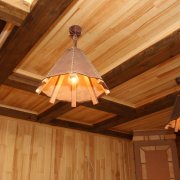
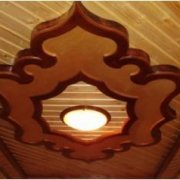
For reference. Drying the ceiling with plasterboard gives you the opportunity to create absolutely any shape and size of the ceiling in the room.
It can be a multi-level structure with curved surfaces.
Of course, installing such a project is much more difficult, but the result is amazing.
Installation instructions GKL on the ceiling and further finishing work

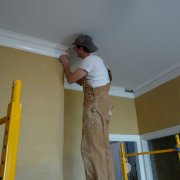
Usually plasterboard ceilings carried out in order to completely hide unsightly, uneven ceilings, but first of all it is necessary to pay attention to the condition of the old ceiling. In order to prepare it, it is best to try to wash off the old whitewash (although this is not necessary), disassemble and remove the chandelier from the ceiling, remove the eaves.
It will also be necessary to remove (but not completely) the remnants of other finishing materials, with the help of which the ceiling was finished from plasterboard. It can be ceiling tiles or wallpapers.
You can leave paint, as well as whitewash, but only if it does not peel off. Otherwise, it will need to be cleaned to concrete.
Large cracks (if they appear) must be filled with putty, cement mortar, or foam.
Tip. Do not forget that the ceiling should be treated with an antifungal agent that will prevent the formation of mold in the house. This is especially true for those premises where similar phenomena were previously observed.
When the ceiling is ready to begin installing a new coating, it will be possible to perform marking, which will allow you to correctly calculate the materials for the frame under GLK. To do this, we need a building level, a plumb line and a marker.
So:
- To begin with, you need to measure the height of the room in all its corners to find the lowest point on the ceiling. To postpone a segment from the lowest point, the height of which will correspond to the remoteness of the new coating from the old.
This size is usually no more than 15 cm. It is necessary to choose one or another indent depending on whether you plan to organize the installation of recessed lighting or not. - Make a mark on the wall, and from it then move along the entire perimeter of the room, constantly checking evenness with the help of the building level. It is along these lines that the frame under the drywall should be installed.
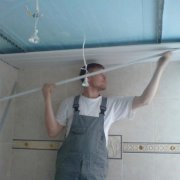
- Details of the frame for the gypsum board ceiling, the decoration of which will be carried out later, can be presented both in the form of wooden bars and battens, and in the form of special profiles that are made of galvanized steel.
- For the metal frame, 2 types of profile are needed: UD – profile, the so-called initial, which is installed along the walls according to the line that was drawn at the initial stage. A CD profile should be suspended from the ceiling and around the edges based on the starting profile.
Drywall sheets are attached to the bottom of the main profile. - GKL is fastened with self-tapping screws, and depending on what dimensions of the part you need, drywall is cut out. For this you can use a conventional hacksaw.
Tip. It is better to cut GCR not alone, but with a partner, since it is difficult to keep the weight of large sheets of drywall, and it can break.
After the frame is sheathed, it is necessary to putty the ceiling and finish the finish.
How to finish the ceiling from drywall

Finishing work is designed not only to decorate drywall, but also to protect it from a variety of mechanical or chemical influences. Therefore, before you start decorating drywall with your own hands, you need to decide how to finish the ceiling and carry out several activities aimed at protecting him.
This is easy enough to do, but it's better to watch an additional training video.
So:
- Firstly, this is done with a spatula and putty. She needs to fill in the joints formed during the installation of the gypsum plasterboard.
Remove excess material so that the seams remain completely invisible. - Then proceed to fixing the drywall primer. If all the screws were tightened well and did not protrude above the surface of the hl, then this operation should not take much time.
At least you have to linger on processing various dents or cracks.
Tip. Before that, after the putty has dried, grind the putty surface with sandpaper or sandpaper. This is necessary so that the seams are not visible under other finishing materials.
Coloring - Simple Finish

Today, the most popular and common option with which to finish the plasterboard ceiling is its painting. By choosing this type of decoration, you can experiment with almost all colors and their shades.
So:
- Painting, this is a simple gypsum plasterboard ceiling finish and can be done with latex or acrylic paints (water-dispersible). In this process, you need to know and take into account some of the features that appear when applying glossy and matte colors.
Matt colors are suggested for use on surfaces that have not previously been plastered or plastered. But for this you will have to paint the ceiling in several layers. - Before using glossy paint, the surface must be carefully and thoroughly treated with putty and plaster so that no deviations and defects are visible. Regardless of the type of paint, drywall must always be pre-treated with a primer.
If the selected type of paint was made on a water basis, then before painting it will turn out to be superfluous to cover the ceiling of drywall sheets with a very thin layer of putty.
The most common method used to complete the decoration of the ceiling involves painting it with acrylic paints for internal use. Due to the special consistency, these paints allow you to design any pattern or pattern on the ceiling of drywall.
It is even possible to reproduce something like photo wallpapers on it.
Plasterboard ceiling: wallpaper finish

Also plasterboard ceilings can be pasted over with wallpaper: both ordinary, paper, and non-woven wallpaper for painting. For wallpaper decoration you just need to determine the amount of material and purchase special wallpapers and glue for them.
Due to the fact that GCR is covered with paper on the outside, the gluing process will pass very quickly. The only thing that can cause difficulties is the “delivery” of the wallpaper sheet to the ceiling.
In this case, it is unlikely to be able to cope alone.
Tip. In order for the wallpaper to stick evenly and neatly, you will need, in addition to the usual roller, a rubber one. The first you apply glue to the ceiling (not the wallpaper!), And the second you smooth the wallpaper sheet on the surface of the gypsum board.
If you are looking for something that will decorate the ceiling, and paints or wallpapers do not inspire confidence, then try decorative plaster as an option for consideration. Thanks to this, an interesting, unusual effect will be achieved, but at the same time, you can also apply it yourself.
Decorative plaster in the decoration of the plasterboard ceiling

The finish of plasterboard walls and ceilings made in accordance with all the rules allows not only to transform the appearance of the room, but also significantly save on materials (the price of plaster is not very high) and the wages of employees.
The main reason that plastering the gypsum ceiling is recommended is that the gypsum board does not have much resistance to moisture (especially when it comes to its cheap varieties). Specialists advise using plaster only when the curvature of the surface or minor dents in the material is very noticeable.
If the surface is curved, then applying plaster is not recommended. In this situation, the plaster will not only not fix the surface, but, on the contrary, it will additionally deform it, because the load will be quite large.
When working with decorative plaster, the following 3 important rules must be followed:
- Plaster can be used only on condition that the ceiling is sheathed with moisture-proof drywall;
- Before applying plaster, the surface of the drywall should be primed;
- In any case, the plaster must be applied in several thin layers.
Stages of applying decorative plaster to GKL
It all starts with the preparation of the drywall surface, which consists in removing dirt and dust from the decorated ceiling. It is more convenient to remove dust from drywall with a vacuum cleaner.
Various surface irregularities should be sealed with putty. For this, you can use dry mixes that are diluted with water immediately before use.
Leveling with a base layer of plaster is carried out only after the putty layer is completely dry. The key step in preparing the drywall surface for plaster is considered to be the primer.
Its value is due to the fact that, using special means of deep penetration into drywall, strength is increased and the ability of drywall to connect with other materials, in particular, gypsum and plaster, is significantly improved.
Tip. Experts recommend using a primer consisting of acrylates, which usually contain soil with 100% hydroisol.
It compares favorably with vapor permeability. When treating a surface with this type of primer, it is absorbed into the processed material even to a depth of 10 cm.
For priming, tools such as brushes and a roller are used; primers can also be applied by spraying. Upon completion of these works, you can proceed to the final stage of work - to the finishing.
To do this, you need textured plaster, several types of spatulas and a special roller.