Foam baths: interior decoration - do it yourself

Foam blocks in construction began to be used for a very long time. All this is due to the technical characteristics of such a material.
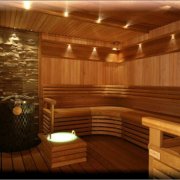
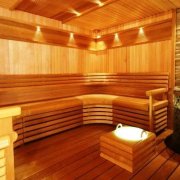
It is heat resistant and very well suited for the construction of the bath. The interior decoration of the foam block bath can be done with any modern finishing materials.
The photo shows an example of finished work.
The content of the article
The choice of finishing material
The modern construction market offers a wide selection for decoration, including a bathhouse.
To date, the following materials can be used to decorate the bath from foam blocks:
- Plastic.
- Siding.
- Wooden lining (see.Finishing the bath lining: do it right).
- Ceramic tiles and more.
Plastic in the decoration of the foam block bath

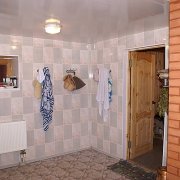
Previously, plastic trimmings could only be found on the ceiling of the kitchen area or in the bathroom (seePlastic Bathroom Finishes: Installation Features) That is, in those rooms where there is high humidity.
Now this type of finishing material has become quite popular. Finishing the bath from the blocks with plastic is very practical and durable, but the installation is done in the washroom.
The advantages of plastic:
- Plastic at the moment has several types. It can be presented in the form of plastic lining or whole wall panels.
The colors of this material are very diverse, as are its sizes. - Moisture-resistant plastic, relatively durable. But, it is very easy to damage it with any sharp object.
Mounting such a finishing material is quite simple and you can do it yourself. - Do not forget that the price of plastic is affordable, which makes the material even more popular to use. Plastic is used not only for interior decoration, but also for exterior.
It is not exposed to weather or climate events. - The only thing you need to pay special attention to is that some types of cheaper plastic are able to fade under direct sunlight. But if you use it indoors, then this will not happen.
Plastic mounting process
Plastic is attached, both wall and plastic lining is very easy. To do this, a crate is made on the wall surface.
To install the plastic you will need:
- Wooden boards and whetstones.
- Wood screws.
- Level.
- Jigsaw.
- Construction stapler.
- Plastic.
- Sealant.
Initially, a crate is constructed from wooden boards and bars. This process is carried out directly on the surface.
Some may consider that the crate can be made separately from the surface and only then fixed to it.
Tip. This is not worth doing, since the process as a result will take much more time than making the crate immediately on the surface.
Installation:
- The design of the frame (lathing) has supporting and auxiliary guides. Between each other, the elements are fastened with screws and a screwdriver.
Bearing rails are mounted to the surface with dowels. They are able to largely ensure the strength of the entire structure. - Such a crate should be around the entire perimeter of the provided plastic trim. On it strips or sheets of such material are attached with a construction stapler.
- Between themselves, a plastic lining is connected with special locks that are available at the end of the material. As for sheet plastic, it can be mounted on the frame using a construction stapler or small diameter self-tapping screws.
Tip. To ensure greater durability and tightness of the finish, all joints of such a material should be treated with high quality with a special tool - sealant.
In this process, it is possible to carry out high-quality insulation of the walls of the building.
To do this, use:
- Polyurethane foam.
- Styrofoam.
- Solid mineral insulation.
- Mineral wool.
The insulation can be immediately inserted into the cells of the crate. Thus, not only the insulation material itself is saved, but also the time that can be spent on such a process separately from the finishing work.
Siding in the decoration of the foam block bath

Siding has long ceased to be used only for outdoor work. It is used as finishing material indoors.
It has almost the same technical characteristics as plastic. Only now its size and types are much less diverse.
Installation:
- Installation of siding is carried out similarly to the installation of plastic, which is mounted on a prefabricated wooden crate. The process is not long and everyone can cope with it.
- As for the insulation work, it is also best to carry out it simultaneously with the finishing work.
- The main advantage of siding is that it does not burn and does not lose its color under the influence of direct sunlight. Also, it does not absorb moisture and does not deform under physical stress.
It will not be necessary to level the surface for its installation beforehand.
Tip. Finishing materials such as siding and plastic can help level the surface on your own. It's all about the crate on which they are mounted.
But here it is worth considering that such a process of finishing work can slightly conceal the space, since the crate has its own height and in some cases it reaches 5-10 cm. But, it still depends on the roughness of the surface itself.
The foam blocks themselves have proportional shapes and a very flat surface. So the height of the crate will depend on the thickness of the selected wooden boards for the construction of the crate.
The video shows an example of the installation of such a finishing material from beginning to end.
Wooden lining in the decoration of the foam block bath

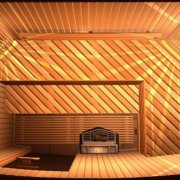
Baths made of foam blocks can be made with wooden lining. This material is very practical and durable.
It is very often used for steam room finishes. All this is due to the fact that the tree is an environmentally friendly material and when exposed to steam, it does not emit any harmful substances.
Tip. It is not recommended to use a wooden lining for finishing a steam room in a bathhouse, which is made of coniferous trees. They can, as a result of exposure to high temperatures, release oily substances and over time this will negatively affect the state of the finishing material.
Application and material characteristics:
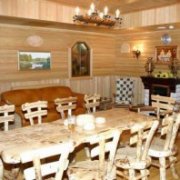
- You can also use a wooden lining in restroom decoration. She will give cosiness to the room.
Especially if it has a fireplace. - But, if you stop your choice on this finishing material, it is worth considering that it is very flammable, even despite the high-quality processing. Over time, its layers lose their properties.
- Also, wood paneling can very easily absorb moisture. For this reason, its surface must be varnished or similar.
Tip. If a wooden lining is used in a steam room, then such actions should not be carried out, since the varnish as a result of exposure to high temperature and steam can emit quite harmful substances for human health.
The process of installing wooden lining

Instructions for the installation of wooden lining does not exist. There are only certain rules and recommendations that are worth considering.
The process of installing a wooden lining is quite simple and anyone can cope with it.You do not need to have certain skills in this area.
To install this finishing material you will need:
- Wooden blocks and boards.
- Wood screws.
- Dowels.
- Screwdriver.
- Hammer drill.
- Level.
- Jigsaw or saw.
Installation:
- Initially, wooden bars and boards are fixed along the entire perimeter of the room, which is planned to be done with a wooden lining.. They are mounted in such a way as to form a kind of crate, the cells of which can be quite large.
- Wooden horizontal guides are mounted at the top of the room (under the ceiling), below (above the floor) and in the center of the wall. As for the vertical strips of wood, they may not be needed.
In this situation, everything will depend on the size of the finishing material.
Tip. To save time, it is possible to carry out insulation work together with the installation of a wooden lining.
- To do this, there must be a sufficient number of horizontal and vertical wooden rails on the surface. Insulation sheets are inserted into the cells that are formed as a result of their cross-mounting.
Tip. As an insulation material, it is best to use solid species.
For example, foam or polyurethane foam. It is not recommended to use mineral wool, as it will absorb moisture very well.
- Thus, not only the walls of the structure are insulated, but also its insulation, since such materials have excellent technical characteristics.
- A wooden lining is attached to a kind of frame quite simply. For this, a screwdriver and wood screws are used.
Even before the installation process of such a finishing material, it is necessary to remember at which height the guide bars are located. The main emphasis in the mount will be precisely on them. - Installation must begin from the front door to the room. To adjust the required size of a wooden lining, an electric jigsaw is used, which greatly saves time and effort.
If it is not, then you can use a conventional saw.
Tip. Finishing the room with a wooden lining should be carried out after the floor is finished.
Only then, in case of deformation, is it possible to replace any part of the finishing material. The same actions must be done when installing siding or plastic.
As you can see, the decoration of the foam block bath is no different from the decoration of any other structure.