DIY bath decoration: stages of finishing work

As a rule, a bathhouse has more than one functional room. It can be a steam room, a relaxation room, a corridor, a shower room with or without a pool.
The choice of finishing material will depend on the type of room. If for the construction of such a building it is necessary to seek the help of specialists, unless, of course, you do not have certain knowledge and skills in this area, then for a bath house finishing with your own hands will be very economical.
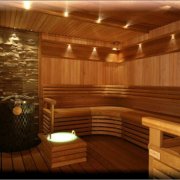
The photo shows examples of the diverse design of the rooms in the bathhouse.
The content of the article
Where to begin
Even at the construction stage of the bath, it is necessary to determine the number of rooms and their functions. Consider the finishing work in the bathhouse, which ideally has all the necessary facilities for a comfortable stay in it: a corridor, lounge room, steam room, shower room with or without a swimming pool and a bathroom.
Preparatory work
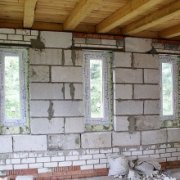
In order for the decoration of the bathhouse to be of high quality, it will be necessary to carry out the preparatory work correctly. But in this case, everything largely depends on the building material that was used to build the bath.
As a rule, for such a structure is used:
- Foam blocks.
- Aerated concrete.
- Brick.
- Shellfish.
- Wood (rounded or profiled beam).
Characteristics of materials:
- If you use materials that have perfectly even proportions for construction, you won’t have to level the surfaces. It will only be necessary to prepare the surface for decoration.
- Such materials include: brick, foam blocks, aerated concrete, profiled timber.
- If a cylindrical tree or a shell rock is used in construction, then surface leveling is mandatory.
- In some cases, they prefer to leave the tree in its pure form, since the finishing material can change the appearance of such a design.
- Most often, the tree is varnished, and all finishing work is carried out outside the building. They also have insulation and insulation work.
For preparatory work on the surface of the wall or ceiling, plasterboard and plaster can be used.
Using Drywall

Without the use of drywall, it is quite difficult today to imagine repair work in the room.
This material has excellent technical characteristics:
- Lasting.
- Reliable.
- Durable
- Easy to install.
It also has several types:
- Wall.
- Ceiling.
- Arched.
- They, in turn, are moisture resistant and fire resistant.
Tip. For the decoration of the bath room, it is necessary to opt for a moisture-proof drywall.
Installation:
- The material is mounted on a profile metal frame prefabricated on the surface.
- All joints of the sheets are plastered with high quality and after that, plaster is applied to the surface of the material, and then - paint or other finishing material.
The use of drywall is not only the implementation of high-quality surface preparation for decoration, but also in the process of insulating the room.
Using plaster

For many years, plaster has been used to decorate the room.
There are several types of it for this:
- Starting.
- The finish line.
- Decorative.
How is the material used:
- All three types can be used simultaneously. Such material is sold in dry bulk form (powder).
- In order to bring this powder to the consistency of thick sour cream, a certain amount is added to it and everything is thoroughly mixed with a construction mixer.
- To add the correct amount of liquid on the package there is an instruction according to which such actions are carried out.
To apply the start and finish plaster you will need:
- The plaster itself (old and finish).
- Capacity for a batch of solution.
- Construction mixer (drill with a special nozzle).
- Two spatulas (large and small).
- Level.
- Grid for plaster.
- Metal corners to align the corners of the room.
- Sandpaper (large and small).
Work Stages:
- Initially, a grid for applying plaster is attached to the wall. After that, layers of starting plaster are superimposed on it.
- There should be at least 3 layers. After the starting layer has completely dried, the entire surface is treated with large emery paper.
- Then, only the finishing plaster is applied to the starting surface.
Tip. These two types of plaster should not be used interchangeably. Each of them performs its functions.
The start-up hides visible defects on the wall surface, and the finish-line conceals those defects in the work that could have been formed as a result of applying the start-up layer.
- Finishing plaster is also applied in several layers. Prior to applying the subsequent previous must dry.
After this, the surface is treated with fine sand paper. - Decorative plaster is as easy to apply as the previous ones. Only the saturation of its color in most cases depends on the number of words applied.
- For this reason, the color scheme of decorative plaster is best clarified in the store before making a purchase.
Decorative plaster at the end of work is not processed with sandpaper. It can damage the surface and the entire appearance of the room will be damaged.
Stages of finishing the bath

Start off bath decoration necessary with the selection of the material itself. And he, in turn, depends on the surface of the walls and the functions of the room itself.
The corridor
Since the corridor is a rather small room, which will perform service functions to a greater extent, its walls should also be made with practical material.
Very often in such a room it is used on the walls:
- Decorative plaster.
- Plastic lining.
- Decorative rock.
- Wallpaper and so on.
For a ceiling it is applied:
- Suspended ceiling.
- Stretch ceiling.
- Plasterboard ceiling.
- Plastic ceiling.
- Plastered ceiling.
As for the flooring, the choice here is not so big. All this is due to the fact that there will always be a lot of various pollution in the corridor, especially in winter.
And that is why it will be more rational to use linoleum or ceramic tiles. These finishing materials are moisture resistant and do not absorb dirt.
They are cleaned very easily and simply.
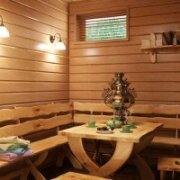
Lounge

In such a room will be where fantasies roam. Initially, it is necessary to determine the stylistic design of the room.
For wall decoration, almost the same finishing materials are used as on the walls of the corridor. But here a combination of decorative plaster and artificial stone is very common.
For reference. More practical and durable is the decoration of such a room with a plastic lining. And environmentally friendly - wooden. Such materials are attached almost identically.
To install a plastic lining you will need:
- Finishing material.
- Level.
- Wooden boards are small in size.
- Wood screws.
- Screwdriver.
- Dowels.
Preliminarily, on the surface, crates are made of wooden boards and whetstones. A plastic lining is already attached to it, but only after installing the starting strip, which will set the direction for all the material.
Tip. To ensure greater tightness of the structure, all joints of such a finishing material are treated with high quality sealant.
The ceiling coating can be any, but it is more efficient and more rational to use plaster or stretch fabric ceiling in such a room. Quite often, plastic is also found on the ceiling of the lounge.
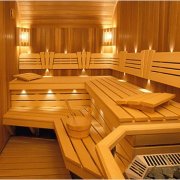
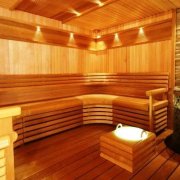
Steam room
Often steam room decoration DIY baths are performed using wood or decorative stone.
Material used in decoration:
- Wooden lining for such work should only be made of hardwood.
- Conifers can, under the influence, emit tarry substances that adversely affect the appearance of the structure.
- The only thing that will need to be considered when choosing such a finishing material is that its price is not too cheap. All this because of the environmental friendliness of the material.
Tip. It is not recommended to use lacquer-colorful products on the surface of a wooden lining. Under the influence of high temperature, they are able to release harmful substances to human health.
- Finishing a steam room with your own hands using decorative stone will not be a big deal. This material is moisture resistant and is not able to deform under the influence of high temperatures.
- It is mounted only on a flat surface using special glue or cement mortar. Since the material has a light weight, reinforcing work on the surface, in which a reinforcing mesh of wire is used, is not necessary.
Shower room

There are no contradictions and disputes. As a rule, only practical, moisture resistant and easily cleaned materials are used in such a room.
These are plastic and ceramic tiles. Plastic is often used to decorate the ceiling, and ceramic tiles to decorate walls and floors and it is mounted quite simply.
Tip. Installation of ceramic tiles is carried out only on a flat surface. If you do not carry out before this work on leveling the floor and walls, then the material will lay down poorly, which will spoil the appearance of the entire room.
To install the tile you will need:
- Concrete mortar or special glue.
- Spatula for applying the solution.
- Level.
- Cruciform lighthouses.
- Putty (decorative).
Installation:
- The tile mounting solution must be applied to the back of the material and to the surface itself. All actions are carried out strictly according to the level.
- Cross-shaped beacons are inserted between each tile, which ensure an even distance of each element of the ceramic tile on the surface.
- After the ceramic tile is already fixed to the surface, it must be allowed to infuse for 1-2 days. After that, the seams of the masonry of the finishing material are treated with decorative putty.
You can see how it is carried out sauna decoration DIY video. It shows a variety of nuances in the finishing work and gives the necessary recommendations.

It was during the decoration of the bathhouse that I discovered such wonderful material as decorative stone. With it, I very quickly and independently finished the walls of the bath. He looks winning, the inside of the bathhouse looks like a real stone. During the time we use the bath (this is about a year), all the pebbles are glued to the native glue, nothing crumbled. It turned out to be even resistant to excess moisture.