Garage Interior: The Right Options

For many car owners, the garage is not only a room for their storage and repair, but also a favorite place for free time. Finishing the garages inside is not so much aesthetic in nature as practical.
In the garage, first of all, it should be dry and warm, especially if there is a basement where vegetables and preservation are stored. In addition, high-quality flooring, and wall decoration inside the garage, greatly affect its value.
And this is a good reason to think about how to finish the garage inside.
The content of the article
Roof ceiling
Before we do wall and floor decoration, we pay special attention to the ceiling of the garage. It is from him that water often drips after a good rain.
In order to avoid this, and not to weaken the future finish, you need to take care of high-quality waterproofing.
So:
- This is especially true for those garages with a flat roof. And it is just like that in typical concrete and brick garages located in garage cooperatives.
- It is clear that if a person built a separate garage on the territory of his household, which has a pitched roof, waterproofing was also carried out in the process of roofing.
- On flat roofs, water can stagnate, which leads to the need for a fairly frequent replacement of rolled roofing materials used there. In order to avoid leaks into the garage, it is better to take additional measures.
And this can be done: both in the building under construction and in the exploited one.

- Using a waterproofing compound designed for joints, you process joints of floor slabs and their places of contact with walls, with a surface capture of 10-15 cm. Next, the joints are glued reinforcing fiberglass tape.
- After this, the entire surface of the ceiling should be treated with a universal penetrating primer. If necessary, the same composition can be used to process both the walls and the concrete base of the floor.
Such waterproofing is performed once, and it is enough for the entire life of any building, including the garage. - The composition can be ready to use, or dry, which must be diluted with water, as prescribed by the instructions. The cost of the dry composition is slightly lower, it is better to purchase it if you have to process both the walls of the garage and the basement - that is, a large area.
- Such waterproofing allows you to perform any decorative coating. If there is no need to insulate the ceiling, you can simply pane.
The simplest polystyrene tile is also suitable, but you can choose the more expensive option - ceramics.

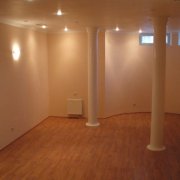
- In the photo above, not only the ceiling is lined with ceramic tiles, but also the walls and the floor. Concrete slabs have a fairly flat surface, so there will be no problem with the tile sticker.
With the same success, the ceiling can be simply plastered and painted.
In the event that the ceiling needs to be insulated, it is better to choose any frame method of decoration. Indeed, it is very convenient to mount a heater in the cells of the crate.
Usually in a garage, the ceiling and walls are equally sheathed. Therefore, how and what to finish inside the garage, we will describe in the next section of our article.
Wall decoration
Many owners of garages prefer to do only rough walls. Most often, this is plastering.
If you have the skills of such work, everything is much simpler. It remains only to purchase a dry plaster mix and the necessary tools.

Note! For the decoration of any unheated premises, including the garage, purchase cement-based plaster. Gypsum mixtures used in residential premises are not suitable for this purpose.
So:
- If you will be doing the plastering work for the first time, it’s better to watch the video first. A garage is the very object where you can practice before you begin, for example, to repair an apartment.
- Typically, the plaster is applied in two layers, each of which must completely dry before the subsequent priming or finishing. If you don’t want to paint the walls yet, you can give the walls a noble appearance using not ordinary plaster, but decorative.
Finishing the walls of the garage inside, can be done with facade plaster. Fillers for such solutions are crumbs from various types of stone: quartz, sandstone, granite, marble.
It is usually sold separately and is added only to the batch that is made for the finish layer.
Frame cladding
The order of this work for walls and ceilings will be the same, and she has only one selection criterion - the surfaces must be insulated. And it’s not at all necessary that the same material be selected for covering the ceiling and walls.

So:
- Waterproofing of surfaces has already been completed. We proceed with the installation of the frame with our own hands - the finish inside the garage will depend on its quality performance.
Whatever type of cladding you choose, for the frame you can use both a wooden beam and a metal profile. - The only thing is that the tree must be treated with an antiseptic composition before installation. It will protect the timber not only from decay, but also from the encroachment of rodents.
The disadvantage of a wooden crate is the fact that the beam is rarely even. - And if the wall, for example, is brick, then it is not easy to level the crate, you have to put wedges under each dowel. It is much easier to mount an aluminum profile.
On our site there are articles with step-by-step instructions for installing the crate. - The next stage of work will be laying a heater in the cavity of the frame. Thermal insulation material must be purchased in advance so that you know its width, and taking into account it, the crate is made.
- The distance between the bars should be a couple of centimeters less than this value. Then the insulation will fit tightly into the cell, further work will be easier to produce.
- For insulation of walls and ceiling, it is more convenient to use not rolled, but plate materials. Just do not need to use polystyrene - it is too combustible, and in the garage there is always a danger of fire. It is better to take penoizol, expanded polystyrene or fiberglass wool.

- On top of the insulation, it is necessary to stick a foil, or an ordinary plastic film. This layer of vapor barrier will not allow condensate to collect on the insulation.
And only after that you can proceed directly to the cladding.

- Finishing the garage inside with clapboard and wood-chip boards, differs from plastic panels in that they require additional decoration in the form of antiseptic processing and staining.

- In this regard, plastic is easier to use, but it is too fragile, and the panel can be accidentally broken. Therefore, many prefer to use aluminum siding panels in the interior decoration of garages.

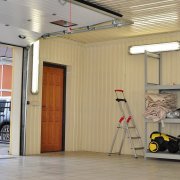
Not all people look at the finish of the garage only on the practical side. Some people think about design.
And here is a corresponding example: a ceramic tile panel is made on the front wall of the garage. We advise you to take an example!
Garage floor device
If your garage does not have a viewing hole, or a basement, the base floor will be compacted soil.In this case, the number one task is to make a concrete screed.

So:
- To begin with, the base should be aligned as horizontally as possible by adding fine gravel or sand to the right places. To do this, beacons are set on the level, and the cord is pulled.
If there is a need to raise the base slightly higher, the bed layer can be made thicker. - On top of the sand cushion, overlap the ruberoid with a slight grip on the wall. It will not allow moisture from the concrete solution to soak into the soil.
Further, a metal reinforcing mesh is laid on the base, which will give the structure additional strength. - M300 concrete can be purchased ready-made, or you can mix it yourself. For this, cement of the corresponding brand, crushed stone with a fraction of 8-9 mm and sand will be required.
Two parts of sand and three parts of crushed stone must be added to one part of cement. - Add water until such a consistency is obtained that the solution is conveniently stacked and tamped. Concrete is poured in strips between lighthouses, and it is advisable to do this continuously.
- The thickness of the concrete screed should be at least ten centimeters. After setting, the surface is thoroughly smoothed and left to set strength for 28 days.
Concreting work on the floor is usually combined with a blind area along the outer perimeter of the garage - it is needed to drain storm water from its walls. - Someone thinks that a concrete screed for the garage floor is enough. But keep in mind that this material absorbs moisture.
Inadvertently spilled oil will certainly leave a stain on the surface. There are several ways to give a concrete surface a noble appearance. - The simplest of them can be considered a screed of marble chips. The ingredients for this solution are sold separately: cement m400, fine grains, acrylic and polyurethane plasticizers.

- It is the plasticizer that makes the solution flexible and the surface of the screed smooth. How much it needs to be added to the solution will be indicated on the package. The ratio of the remaining components is as follows: three parts of the crumb and half of the water are added to one part of the cement.
- If you want to lay a tile on the floor, then a fairly even concrete base allows you to do this without any problems. First, you just need to treat it with a primer, which will not allow concrete to absorb moisture from the adhesive solution.

- Clinker tiles will be a great option for a garage floor, but it is quite expensive. Porcelain stoneware is practically inferior in strength to clinker, and its price is much lower.
- If you consider it necessary to insulate the garage floor and make a boardwalk - wooden logs are mounted on top of the concrete screed or slab. The space between them is filled with expanded clay or polystyrene granules.
- You can pour loose insulation with cement mortar and put on top of the reinforcing mesh. On such a heat-insulating layer, you can also lay tiles.
Most often, it is performed when there is a basement in the garage, the ceiling of which needs to be insulated.
As you can see, nothing is impossible, and finishing the garage inside with your own hands is completely within the power of everyone. And we, in turn, really hope that we could help you figure it out. We wish you success in achieving your goal!


Of course, the garage is finished with ceramic or wooden lining tiles - this is a luxury, it turns out perfectly, beautifully, comfortably. But on a budget it’s quite expensive and not everyone can afford it. The budget option in my opinion is chipboard finish. It seems like some kind of wood, but at a price it is very acceptable, and the view of the garage is completely different, much more interesting than bare painted stucco. Even if the walls are beaten with cheap plastic lining or panels, the garage takes on a completely different look, more accurate and well-groomed. Although I saw a garage, with simply plastered walls painted by one local artist - very spectacular !!!