House Finish: Proper Work

Although the block house for decoration has appeared recently, it has been used for a long time. This is essentially the same lining, only made in a modern style.
In this article, we will consider examples of finishing a block house, and tell you how to do it correctly. You will have the opportunity to see photos and videos on this topic and choose the right room design.
Instructions will be given to complete this work.
The content of the article
Why choose a block house
Before buying a material, you should familiarize yourself with this material and know what lies ahead. This is not to be disappointed in the aftermath.
So:
- First of all, you get completely zcologically clean material that will never harm your health;
- Wall decoration blockhouse booth also serve as thermal insulation. With rising energy prices, this is important;
- The installation process itself is not as dirty as plaster and you will hardly get any garbage;
- Blockhouse decoration does not take much time. Decorating the room can be done throughout the day and moreover with your own hands. You will save a lot of money on this;
- Proper execution of the work will ensure complete and high-quality ventilation under the panels, for this we will tell you how to decorate the room with a block house correctly;
- The price of decoration is not so high, almost anyone can afford it;
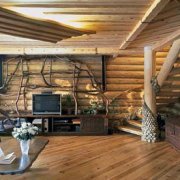
- Decorating the kitchen with a blockhouse, or any other room, will bring comfort to the building. You will make it original and unique;
Not everything is as good as it seems at first glance.
Decorating apartments with a blockhouse has its drawbacks, and significant:
- You will need constant surface care. And this is time and money. For example, you will not be able to paint, as in production, so the appearance will be worse over time;
- There will be gaps between the panels in the coating, and this is dust that will constantly accumulate;
- Such a finish is not the cheapest, so there will be costs.
Blockhouse decoration
Apartment decoration a blockhouse can be made entirely by one's own hands. There is nothing particularly complicated about this.
You do not need special equipment. It is only necessary to treat the issue quite carefully.

Base plane preparation
This is where we will begin. The durability of the entire structure will largely depend on this coating.
So:
- To begin with, we should completely clear the plane of the previous coating. To do this, use a brush for metal;
- We do inspect the surface. We are not particularly interested in bumps.
We look at the cracks and delamination of the plaster. If it is, then just take a chisel with a hammer and knock it down; - After this, the surface should be treated with an antiseptic, which is available on the market. To do this, use a brush or spray.
This is a must-do. Even if you did not have a fungus, it will be unpleasant if it begins to appear after the installation of the panels. After that it will be necessary to remove them. Therefore, it is worth carrying out the processing; - We are waiting for complete drying and apply a layer of primer. It is advisable to use deep penetration liquid;
- Now we need to mark up to install the frame. To do this, we need to know the roughness of the wall.
This is done using fishing line and level. We just pull the line diagonally and take measurements. After that, we put the risks in the locations of the frame.
Caution: Before putting the risks should be considered insulation. If you will fasten it, then the gap between the wall and the finish should be increased.
The insulation can not be deformed, then it loses its properties. Therefore, it is worth providing a gap of a couple cm.
Make the frame
The whole structure will be mounted on the frame. It has its own weight, and not very small. Therefore, the base must be fixed firmly and thoroughly.
Caution: Pay close attention to the geometry of the frame. The geometric shape of the entire coating depends on it. How do you get it. The panels will repeat the contour of the installation of the frame.
So:
- To install the frame, a metal profile or a wooden beam can be used. If you chose the second option, then it is worth processing the details with antiseptics.
It is in retail and will significantly extend the life of the entire structure. This should be done in advance, the material should be given more time to dry; - We cut the beam or profile to the desired size and then fix it. If the wall is wooden, then just a self-tapping screw is perfect.
If the surface is concrete or brick, then holes should be made using a hammer drill and after that make a connection to the dowels;
Attention: For fastening it is not necessary to use the expansion bolt shield and sets, they will not provide reliability of fastening. It is necessary to purchase separately plastic and self-tapping screws to it, which should be taken a couple mm less from the diameter of the hole. This will give a reliable and tough connection.
- We fix the profile along the perimeter. Do not install elements tight against the wall. Make a clearance of the order of one cm from the wall. This will save you from trouble during a temperature difference;
- We make markings on the fastening of the transverse profile. For this we use a plumb line. We need to make completely perpendicular lines.
We will carefully consider this. The rail should pass not only along the edge of the part, but also along its middle. We measure and make fastening; - After installing the harness, you should make a fastening and a transverse profile. It should be located in one plane.
To do this, we stretch the fishing line along the diagonals of the harness. On it we will do the fastening of the transverse profile; - We cut the parts to the desired size and make the connection as described above;
- We apply the second layer of the crate. Only it is made of thin rails. This will ensure proper ventilation;
Attention: There is a gap at the bottom, which will facilitate the movement of air inside the panels. Do not just leave it. It should be covered with a metal mesh, which will prevent the penetration of rodents.
- We make the fastening of the insulation. Before installing it, apply a layer of waterproofing.
Pre-cut to the desired size. Remember, do not fasten back to back.
Overlap. Use a construction stapler for mounting. After that, we make the installation of insulation. This is done using plastic fungi, the connection is made at least five points on one mat.
Wiring installation
After wall cladding You will need to install sockets and lights.
This requires some preparation:
- First you need to determine the place of connection to the network and install the junction box here. It should be said that there should be free access to it. This will be needed for troubleshooting. Fasten it;
Attention: If you want to use energy-saving lamps, then you should worry about a step-down transformer. It should be installed next to the junction box.
- We make cable fastening to the places of lamps and sockets. For connection, we use terminal blocks that provide a reliable and high-quality connection. Twisting should not be used. It is not reliable and dangerous;
- In the places where the fixtures are installed, their operation should be checked, for this it is worthwhile to connect them and make sure that the light distribution is correct.If everything suits, then turn off the power and do the work further.
Panel Mount
Now we directly do the paneling. This is the appearance of the finish and therefore take it seriously.
All work is done according to certain rules, which should be followed. First you need to bring the material to the place of work in advance and let it get used to the right temperature.
Mounting Methods
Immediately select a mounting method. There are three of them. Choose the one that suits you best.

So:
- The first embodiment of fasteners should include installation using a kleimer. This is a special plate that is coated with chrome, which makes it resistant to wet environments.
It gives a fairly reliable connection when joining a tenon groove. This plate is inserted into the groove of the panel, after which it is connected to the battens with the help of a self-tapping screw.
Work must be done correctly, otherwise gaps between the slats will form; - The next type can be called the implementation of the connection using a self-tapping screw or nail. This element is screwed or driven into a thorn panel
Caution: When performing this type of fastening, the spike may simply crack. Therefore, be sure to pre-drill the hole. And only after that make a connection.
- When fastened with a nail, it is simply driven into the spike at an angle of 45 *. This is of course risky. The spike may just crack.
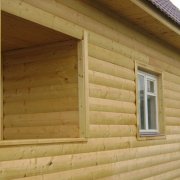
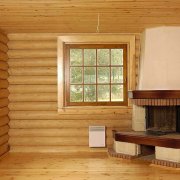
Therefore, it is worth drilling a hole as described above. With this type of installation, the head should be recessed a couple of mm. - The fastening of the panels is best started from the window of the room. Here, lighting is most favorably distributed and you will immediately see all the errors. This is done from its bottom;
- The first panel is always mounted with a spike to the top and the field of this is installed on it a second lamella. So the lining is done all over the plane.
Only after installing the panel should it be checked for proper placement using the building level. Remember that a deviation of one mm may result in a panel deviation of one cm. Therefore, carefully adjust each part;
Direct installation of panels

So:
- Remember, the connection of elements is done on a solid surface. Do not do it on weight;
- First, the panel should be attached and see if it is installed correctly. If something doesn’t suit her, she is customized.
After that, we mark the attachment points. Be sure to drill holes before installation with a drill of a smaller diameter. At the same time, do not forget to make an insult for the head of the self-tapping screw.
It should sink a couple of mm lower from the plane of the coating. After installation, it is closed with plastic plugs, or putty on wood is used, after which the surface is polished; - You will need to make holes in the process, this is done in the following way. First we try on the panel and set the point for making the hole.
After that, put the panel on a flat plane and make a hole using a drill with a crown. Which is purchased in advance and at a certain size.
Do not make a sharp pressure. Everything runs smoothly. Otherwise, the material will bite and you will damage the front part; - When docking in the corner parts, cuts are made to repeat the docking panel;

- Immediately think over the option of making a corner and window frames. It will not be so easy to do.
The easiest way is to cut the edge of the panel at an angle. So that after installation, both joined panels form a right angle; - Windows are a little easier; there are many panels in retail that hide the joint.
As you can see, this is not such a difficult job. You just need to carefully measure everything and properly fix it.
After installation, the joint with the ceiling is simply covered by a ceiling plinth. About this you can find a detailed article on our site.
Most importantly, do the right processing after installation. The plane is carefully sanded and then an antiseptic is applied and ultimately varnished or painted.