Finishing an indoor unit with a house: rules for performing work

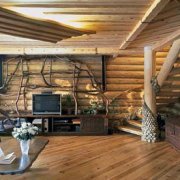
Finishing the block with the house inside is increasingly common in the arrangement of the premises. This finish option will set you apart from many.
But before starting work, you should familiarize yourself with this material closer and understand how much it will suit you. After that, you need to choose the right kind of wood and only then make a purchase.
This article will tell you which block house for interior decoration to choose and how to carry out the work correctly. Before buying, it’s worthwhile to see how the interior decoration is done with a block house video and decide on a design decision.
The content of the article
Advantages of using a house block for interior decoration
Inner house decoration It has a number of advantages, but there are also disadvantages that you should also familiarize yourself with before making a final decision on the finish.
So:
- Finishing the block with a house inside is completely safe for human health, the material is made entirely from a natural product that will not harm your health;
- You will also make high-quality heat and sound insulation during installation. And this is important. Moreover, the materials for this only complement the design;
- Not such a complicated installation, which you can quite do with your own hands. To do this, you will need a special tool, but only a set that is in almost any household;
- Not a large amount of garbage during the work, it is much less than with other types of cladding;
- Decorating the indoor unit with a house is quite quick and does not take much time;
- This decoration option contributes to the creation of a microclimate in the room. Under the panels there is ventilation, which ensures this process as correctly as possible;
- The price of the material is not so high, almost anyone can afford it;
- Facing can be done on any surface, and you will not be particularly interested in the curvature of the walls and the previous coating.
This material has its drawbacks that you should know before buying:
- You will have to constantly monitor home decoration, and it takes time;
- Between the panels there are gaps that will contribute to the accumulation of dust;
- Perhaps the most significant drawback is the useful area, which is decreasing. And this cannot be avoided.
Attention: When buying material, you should also consider the method of application of the room.
For living quarters, softwood can also be used. But just do not use them to finish the sauna.
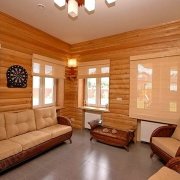
Paneling
After viewing a photo on this topic and choosing a species of wood, you can make a purchase and begin to perform work that is done according to certain rules and requires compliance with the technology. The appearance and durability of the structure will depend on this.
Surface preparation
For proper fastening, we need to properly prepare the surface:
- To begin with, everything should be removed from the walls. After that, take a brush for metal and remove all the old coating;
- Now we look what has peeled off from the previous plaster.
If there are deep cracks, they should also be crushed to a width of one cm. For this, we use a chisel and a hammer; - Now we need to treat the surface with antiseptics that are available on the market. Prefer deep penetration fluid. To do this, use a brush or spray;
Caution: Be sure to apply an antiseptic.Even if there is no fungus on the walls, this must be done.
If it develops after installation, problems may arise. Access to the surface will be limited.
Therefore, do it even for the sake of prevention.
- After processing it is necessary to apply a primer layer to the plane, which will strengthen the surface. To do this, use a brush or spray.
Installation of the crate
This is a rather crucial stage of work. The whole structure is attached to the frame and the slightest deviation will immediately be reflected on the surface.
The geometric shape may be broken. Therefore, take this work seriously.

Attention: For installation, two materials are used for the frame. This is a tree and a metal corner.
If you choose the first option, then you should carry out the processing of timber with antiseptics, which are available on the market. This will significantly extend the life of the entire structure.
So:
- To begin with, you should correctly markup. After all, if the fastening is not performed qualitatively, then the correct geometric shape of the structure will be violated.
To begin with, you should make a strapping around the perimeter of the plane and correctly outline the installation. To do this, it is best to apply a hydraulic level.
We mark the beginning of the fastening of the panels and then transfer the size to another part of the wall with a hydraulic level; - After that we connect the marks with the help of a nylon thread. Just beat off the installation line;
Attention: When choosing the mounting height of the strips, the height of the insulation, which should not be deformed by the lining, should be taken into account.
Otherwise, it loses its properties. So provide a gap of a couple of cm. And that will be enough.
- Now cut the slats to the desired size. To do this, use a saw.
It should only be remembered that the fastening can not be done tight against the wall. It is necessary to provide a gap of one cm.
This will help to avoid troubles during the expansion of the material; - We cut the bar and fix it. Self-tapping screws are sufficient for a wooden surface. For a wall of concrete or brick, you must first make a hole with a punch and connect to the dowels;
Caution: Do not use the wall plugs from the kits. We need a strong and reliable connection that they will not provide.
Buy separately plastic and self-tapping screws, which take a couple of mm more from the section of the hole in the pacifier. This will provide the required quality fasteners.
- In exactly the same way we do the binding of the entire plane around the perimeter of the room;
- Now we need to fix the transverse profile or beam. To do this, apply the step from the calculation of the panels, but not less than 50 cm.
Also note that joining panels cannot be done on weight. It should be performed on the frame.
Using this, we determine the mounting distance and apply the installation lines of the rails; - During operation, a plumb line is used. With its help, the work can be done qualitatively and correctly determine the perpendicular with respect to the floor. We draw lines;
- For correct installation in height, you should use the fishing line, which is stretched along the diagonals of the plane. We do height adjustment with the help of gaskets made of wood;
- We do the fastening as described above;
- After installing the battens, a layer of waterproofing should be applied. For this, various films are used.
They can be fixed before applying the crate, but this is suitable for a plane made of wood.
With a concrete surface, after attaching the frame, cut the film in size so that it overlaps the rails and then fix the material using a construction stapler; - After installing the frame, you can make installation and insulation. Sheets should be laid tightly, but not warped.
Wiring installation
Finishing inside the block house is carried out after installing wiring for outlets and lamps:
- First, find the connection point. Here it will be necessary to fix the junction box.
It should be freely available. This will be required during the repair work; - We fasten the box and after that we put marks on the installation of outlets. We make a cable supply there;

Caution: Use only terminal blocks to make the connection in the wiring. They will provide a reliable and high-quality connection.
Do not twist. It is not only not of high quality, but also not safe.
- We fasten the wire to the place of installation of the outlet and cut it off. At the same time, do not forget to release the cable so that it is enough for a free connection;
- During mounting, proceed as follows. First we attach the panel and after that we mark the place of installation of the outlet.
Remove the panel and lay on a flat surface. After that, we make a hole with a drill and a crown.
Just do not forget to select the crown but the diameter of the outlet.
Installing house block panels
The material should be brought to the installation site in a couple of days, it should get used to the room temperature and gain the desired humidity.
So:
- Wood finish We begin by installing the first panel, which is mounted only with the spike up. You can start mounting from the top or bottom.
It depends on your desire, only you need to leave gaps of five mm from the top and bottom, this will provide adequate ventilation.
For mounting, several options are used:
- Nails, this is the most economical, but also not the most durable fastening. Over time, it just goes awry;
- The most common option is galvanized screws;
- There is also a special mount for the block of houses, which is made in the form of brackets;
- Kleimers are also used.

Attention: When fastening with nails and self-tapping screws, never hammer or screw them into the surface. To begin, make a hole with a drill, only the diameter should be slightly less than the diameter of the fastener.
After that, make an outcrop in the surface. This is required to hide the cap. And only after that it is worth making a connection.
- Also, do not make a very tight connection between the panels themselves. It’s necessary to leave a couple of mm. This is also associated with the expansion of the material with a temperature difference;

You will have to do the docking of the corners.
This work is done in two ways:
- In the first embodiment, you should make a gash at an angle of 45 * and then you can do the docking without additional materials. Only above the right angle withstand;
- In the second option, you just fasten the corners to the joint and after the panels are fully installed, put the facing corner and hide this joint;
- After the panels are fully installed, the corners are lined. For this, a decorative corner is used, which will hide the joint and possible disadvantages of fastening.
This is how the installation of the house block is done. You can see the photo and get to work.
There is an instruction, now it remains only to make a final decision.