If you have chosen drywall - how to fix it to its wall

How to fix drywall on the wall and how this is done, we will consider below. After all, the wall is one, but the fastening can be done in two versions, and which one you choose then it will become clear what to fix the drywall to the wall. Also, you can see in the video in this article and photo how this work is done and do it yourself. Then the final price will not be high.
The content of the article
Drywall fixing rules
If you are wondering how to fix drywall to the wall, you can choose 1 of 2 existing options for fixing gypsum board. The first is designed for the construction of a frame structure from profiles (seeDo-it-yourself installation of a frame for drywall on a wall) to which the material will be further mounted. In the second method, you can cope with the task by attaching drywall sheets directly to the wall using an adhesive. But let's start in order.
Drywall Classification
Now it is customary to divide drywall by type.
At the moment, it is divided:
| GKL | This is a standard sheet used in the decoration of apartments and offices, where temperature and humidity are in the acceptable norm. The permissible humidity rate in such rooms should not exceed 70%. They look like simple gray sheets. |
| Hklo | Fireproof type of drywall. It has a high resistance to open flames. This effect is achieved thanks to the reinforcing components added to the material during manufacture. It is mainly used in industrial and industrial premises, attics. The sheet is gray, marked in red. |
| GKLV | Gypsum plasterboard moisture resistant. The manufacture of such sheets involves the addition of antifungal components and silicone granules to ignore high humidity. To increase moisture resistance, you need to protect the outside of the sheet with any waterproof coating: paint and primer, ceramic tiles, you can also apply waterproofing. It is used in rooms with high humidity: in bathrooms, in kitchens, in garages. In appearance, the GKLV sheet is green, marked with blue. |
| GKLVO | There are two parameters in such a drywall sheet: fire resistance and moisture resistance. It is used in interior decoration where there is high humidity and there are certain software requirements. Such material is green, marked in red. |
Attention: Which side to fix the drywall to the wall should be looked at the type of material. If there is a chamfer, then it should be on the upper plane. After all, it is intended for puttying.
We align the walls with drywall
Using drywall, almost any type of wall can be leveled. It is perfect for this task.
Due to the ease of cutting and ease of use, strength and a simple method of fastening, you can eliminate the unevenness of the wall or make new partitions, if necessary. Moreover, you can perform all the procedures yourself. It is only necessary to determine the method of installation of gypsum plasterboard and what the final result will be.
In practice, there are 2 ways to attach GCR to the wall:
- The construction of the frame structure and screwing to it GKL using self-tapping screws;
- gluing drywall to the wall.
There are cases when 2 methods are used simultaneously for a good joint of walls or in places where walls and ceiling meet.For independent work with drywall, the most convenient way will be a frame installation.
For the manufacture of which galvanized profiles for GCR are used, to which the sheets must be screwed. The main disadvantage of this technique is the thick resulting sheathing, which "steals" square meters from the room.
How to prepare a wall
It is necessary to carry out preparatory work. Before leveling the walls in the room, completely clean them from the old coating. Particular attention should be paid to old stucco mixtures, which are easily removed from the walls (seeHow to remove old plaster from walls without problems) Also, the removal of a decrepit coating will save centimeters, which will take up the frame and sheets of gypsum plaster.
Caution: Coating the walls with a primer is necessary, but not critical. The main thing is to apply an antiseptic to them. At the floor and on the ceiling near the wall, draw the border lines of the wall that you will be making.
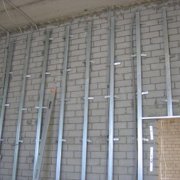
Frame installation
For high-quality installation of GKL, adhere to the required rules for the construction of the frame:

- When mounting the frame, use only a special profile designed for such structures. Moreover, you need to use profiles of various shapes. First, you need to assemble the so-called box, screwing the UD profile to the walls and ceiling. The profile should rest with its center on the surface. Fix it with dowels.
- In the assembled frame, install vertical overlaps from the cut pieces of the CD profile, which will create support for the gypsum wall. Moreover, they need to be fixed with a wide part outward, turning the edges to the wall. You need to connect the profile with self-tapping screws that are specially made for such profiles and easily make holes for themselves, twisting the frame together
- The first profile must be installed at any side wall. The rest are attached with a distance of 60 centimeters from the previous one. You need to measure the distance from the center of 1 profile to the middle of the other. It is impossible to measure from the edges. The distance is designed for a standard GKL width of 1200 mm and material fastening at the edges and in the center.
- For a more reliable design, perforated mounts (suspensions) are used. They have stiffening ribs in the middle and perforated at the ends. They need to be bent with a U-shaped middle part attached to the wall at each vertical profile. The fastening edges must be screwed directly to the profile. Observe the level during installation.
- If the height of the walls exceeds the length of the sheet (2500 mm), add GCR with pieces at the top or bottom of the structure. To do this, fasten jumpers on vertical profiles from the same CD profile.
GKL installation
On the frame made, you need to mount the drywall to the wall:
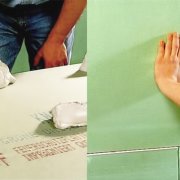
- Here you need to apply hot black self-tapping screws drywall-metal. The most convenient way to screw them in with a screwdriver. So you can easily drown the head of the screw in the level with the sheet.
- The distance between the screws should be from 10 to 15 centimeters in the center of the sheet and along its perimeter. To make the process simpler, often drywall sheets are marked with a line in the center on the outside.
- To fill in the spaces where the whole sheet does not fit, cut out the parts that fit the size. Here you can use a simple clerical or construction knife.
- This is done like this: cut the paper along the sheet and it will break without problems, forming a straight line. Then cut the paper on the opposite side.
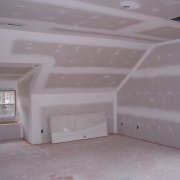
After this, only the application of the finishing plaster or coating will remain.
Finishing
There is a small strip at the edges of the drywall. It is located at the lower level of the GCR. This simplifies seam processing.
- For processing, a mesh is used. After it sticks, it is necessary to apply a starting putty on it, which equalizes the overall level of the sheets in the area of the recess.
- What treatment is carried out next will depend on the chosen cladding.If you are laying tiles or other opaque material, the joints smeared with a mixture will be enough (seeHow to putty drywall joints according to technology) If you decide to paint or use wallpaper, it is necessary to put a finishing putty on the walls constructed from drywall, and the layer should not exceed two millimeters.
- Then the surface must be sanded and primed. Before painting the walls, they should be made as even as possible, so the grinding procedure must be combined with layers of plaster, added if necessary.
We level the walls by gluing GKL
If you want not to waste space and not allocate a sufficiently tangible place for the frame, you can resort to the method of leveling the walls by gluing sheets to the wall.

To do this, you need to perfectly clean the wall and eliminate existing bumps, bumps and holes.
Having completed this work, you can safely begin the process:
- Before starting work, the wall is necessarily primed. Drywall sheets must first be cut to size for continuous operation throughout the wall. Here one thing needs to be taken into account: for better drying of the glue on which you will stick the sheets, make 50 mm gaps on the floor and ceiling.
- Drill holes for dowels around the entire perimeter of the wall. Screws need to be screwed so that they form a uniform plane. This is necessary so that the sheets are correctly placed, i.e. their surface was leveled, and they freely laid down all on one level.
- The adhesive mixture is made using specialized building mixtures. The glue should be a viscous consistency. Keep in mind that such a solution dries quickly, so prepare it right before application.
- Clean the dry side of the drywall of dust and dirt for better contact with the adhesive. Apply glue to the inner side of the sheet, making longitudinal lines and heaps of glue in the center and along its edges from the glue.
- The best option for the location of the glue with a distance of 25-30 centimeters from the previous pile. You should not achieve a uniform layer: this way you will increase the cost of the material and you will not be able to connect the GCR to the wall well.
Caution: When applying the sheet to the surface, press it firmly against the heads of the screws. If necessary, use a rubber percussion instrument - a mallet.
- To avoid breaking holes, attach a wooden support to the material and tap directly on it.
- After finishing laying the sheets on the wall, wait for the time required for the glue to dry. Usually it is indicated in the instructions supplied by the manufacturer with the adhesive. Only after final drying can further work be carried out.
- The seams near the sheets are sealed with a serpentine, and a starting putty is applied on it to remove a uniform level of adjacent sheets. As mentioned earlier, finishing putty on the entire surface is applied only if necessary.
Attention: Whatever method you use, you will get a flat and smooth wall, without putting into it the special costs and forces that are required when leveling the walls with plaster.
The technique with gluing sheets is suitable if it is necessary to make a partial repair of the wall with plasterboard or to bring out window slopes or arches. Arches can be made due to the structure of drywall: when it is slightly wet, it is able to take any desired shape.
How to fix drywall to the wall video will show you the individual stages of work. The instructions may vary depending on the type of wall, but the principle remains the same.