Tiled floor in a room with a cellar - part 2

Hello again! This material will be a thematic continuation of an article in which we touched on the topic of professional flooring. We began by examining in detail the preparation of the base, the correct layout of the tiles in space, the preparation of glue and other useful little things that any master needs to know.
Now we’ll talk about how to lay tiled floors, and how to bring them to their final state.
The content of the article
Styling process
We return to our object, and continue laying tiles in the corridor. At the end of the previous article, we showed several photos with the final result, and now let's go through the entire process in more detail.
Tile cutting

To begin with, we will analyze how to cut ceramic tiles correctly:
- An example is the external slope angle, which must be carefully circumvented;
- In order to install the tile in this place, it is necessary to make a “G” -shaped cut in it, and remove the excess part;
- First of all, you need to mark the places of cut on the tile, for which we use tape measure and a pencil.

- We measure the longitudinal distance from the end of the previous tile to the corner - in our case it is 8 cm;
- Now you need to perform small calculations: you always need to remember that between the tile and the wall there must be a gap of about 1 cm in size, which will compensate for the expansion of the material with temperature differences;
- This requirement is especially important for underfloor heating, since under such operating conditions, both tile and glue experience a large linear expansion;
- We also take into account the thickness of the seam: we had 2 mm crosses;
- The calculation is as follows: 8 + 1 - 0.2 = 8.8 cm. That is, we added the width of the gap, and reduced the result by the width of the seam. As a result, when laying, the gap size will be exactly 1 cm.
Advice! If possible, write down all the measurements on a piece of paper, or on the tile itself in the place of the cut, so as not to remeasure the forgotten values.

The second value is calculated a little differently, since when laying the tile is not shifted from the corner, but towards it:
- We put the tape measure to the edge of the landmark row, and we measure;
- We got exactly 10 cm;
- Now we perform the calculation: 10 - 1 - 0.2 = 8.8 cm. We explain - so that the tile does not rest against the wall, subtract the width of the gap and the seam. By a lucky coincidence, we got a strict square.

Now it remains to transfer all measurements to the tile:
- Place the tile in front of you as it will be installed in the future;
- Hook the tape measure over the edge of the tile, and pull out its canvas;
- Make a thin mark with a pencil on the side of the tile (the pencil should always be sharpened well);
- The edges of the tiles do not contain glaze, so all marks will be very clearly visible;
- Next, using a square or a second tile, you need to draw along the front surface of the line along which the tile will be cut.
Advice! Use tiles with chips and other defects for corner trimming, removing which you will save on material.

Yes, but what if there are no traces of lead on the glaze of your tile?
In this case, the markup can be done in three ways:
- The first is to use a marker. The disadvantage of this method is that the marker deteriorates very quickly, and literally after a dozen or two marks it stops drawing. In addition, if you use a machine with a supply of water for cooling, then the trace from the marker will be immediately washed off.
- The second way is to draw on the back of the tile. There are also two minuses: the lead is very quickly abraded, and also during cutting, it is very easy to climb over the edges on the front side of the tile, and thereby spoil it.
- The best way is the third. Glue a piece of masking tape on the surface of the tile, and calmly carry out drawings of any complexity.
Advice! Use masking tape in those cases where you need to drill a hole in the tile. He will not allow the drill to slide on the surface, thereby increasing the accuracy of drilling. If you have a core, then this is an even better option. But be careful not to split the tiles.

To cut the tiles, special machines or a high-speed grinder are used, with a circle for ceramics. This should be done in a nearby, well-ventilated area, and even better on the street.
So you will avoid getting unnecessary dust on the primed base, and save your lungs. If you do not have such an opportunity, then be sure to use respiratory protective equipment - for these purposes, an ordinary medical mask, the price of which is five rubles, is quite suitable.
Let's make a small digression, and say a few words about the remedies:
- Get used to doing all the work with gloves right away. If you are completely uncomfortable, then look for subtle options that do not constrain movements.
- Cut ceramics have sharp edges, which are very easy to damage the skin. Learn from someone else’s experience - once, at the beginning of his construction career, the author of the article took off half a finger because the tile burst in his hand when processing with a file. I had to suture and make an injection from tetanus.
- When cutting tiles or picking them with nippers, be sure to cover your eyes with glasses or a protective transparent mask.

You need to cut the tile strictly along the marked lines, without touching the excess at the point of their intersection. If you are not sure that you can cut accurately, it’s better not to finish a few millimeters, break out a fragment, and select the remaining surplus with pliers.
To reduce the formation of chips during cutting, you will need a special circle for ceramics, which is also suitable for porcelain. Such a circle has no holes for cooling. His sample is presented in the photo above.

Our tile is ready for installation, but before applying glue, be sure to attach it to the seat. It often happens that you inadvertently confuse the values, and you have to perform the cut again. Therefore, you do not need excess dirt.
If you find protruding parts on the wall, immediately knock them down. Brush the base, and proceed with styling.
Laying the floor in a plane and its alignment

Now, we apply glue - we stretch it so that it is convenient for us to reach the most inaccessible places. If you overdo it a little and understand that access has become limited, it is better to leave this site for later. Carefully collect glue from it with a small spatula, and return to it after the floor has dried.
The next tile is laid with an offset of half its length. To accurately set all the seams, it is best to use a laser level. The thread here is no longer suitable, since crosses will impede its tension.
If you don’t have a laser, use roulette, duplicating the values from the previous rows.

Further, in a staggered manner, we report the ranks, not forgetting to establish crosses. It happens that the tile has a different width.In this case, wedges can be used to adjust the width of the seam.

How is the styling process:
- Put the tile with the edge farthest from you to the already laid tile of the previous row;
- Check that she does not touch the tile on the side;
- Tilt the tile closer to the floor, and, not reaching 4 -6 cm, release your hands;
- Having fallen, the tile will press down the glue and adhere well to it;
- Now evaluate how the position of its corners and edges corresponds to neighboring tiles.
Ideally, it should be slightly higher. In this case, by gently patting the palm of the hand, or by light pressing, we adjust its position. If the tile dropped below the level, then pry it with a spatula, put it on the edge, and put a little glue in the required places. Lower the tile again and make sure it is in the right position.
When laying a square tile without a directional pattern, you can try to rotate it 90 °, and lay it without adding a solution. Due to the fact that the glue grooves will lie crosswise, the tile will slightly rise.

The most insidious moment is the case when the tile immediately rises flush with the plane. And the insidious thing is that if the glue is a bit lighter than normal, the tile is likely to sag in a minute. Be careful at these points and check back periodically.
In cases where you need to press the tile, but because of the unevenness of the floor, this can not be done, raise the tile and remove the excess solution. If you want to strictly observe the horizontal when laying the floor, then constantly check the building level, placing it in different directions.
Although in our humble opinion, care about the evenness of the floor should be at the stage of filling the room. In principle, this is all that you should know about the technology of working with tiles during installation.
Now you need to remember the basic rules for working with glue:
- How glue is applied, we described in a previous article, so skip this point.
- The basic rule is to apply as much glue as you manage to lay out the tiles during its drying.
- Each brand and manufacturer has its own characteristics, and there is no clear recipe. Therefore, as in the case of kneading, we orient ourselves visually.
- The freshly applied layer of the solution is covered with a thin film of water. At the moment when the tile comes into contact with the glue, due to surface tension, moisture draws it to itself, like a suction cup. The result is a great hitch.
- But what happens when the glue dries? Due to the fact that moisture begins to be absorbed into the base, and also evaporates upon contact with air, a dry film forms on the surface of the solution. If you put the tile on the glue in this condition, then it simply sags under its weight, without contact with the surface.
- If you notice that the surfaces of the glue furrows have become whitish, then you cannot put tiles further. But this does not mean that you ruined it. There is no need to re-apply the solution, because inside under the film it still retains its properties.
- To lay the tile, coat its back side with fresh glue. The layer should be very thin - under "zero". Next, lay the tile, which, due to a new portion of moisture, firmly grasp the main layer of glue.
Removing glue from the floor only makes sense when you see that it has lost too much moisture and become friable.

Before applying glue under a new row of tiles, check for the drying of the boundaries of the previous layer. If they are still fresh, and only slightly weathered, then you can apply a new portion on top.
If the solution is very dry, then collect the excess with a spatula, and send them into a bucket with fresh glue, where they again absorb water. Lightly mix the mass by hand, and start laying a new row.
Do not forget to remove the excess solution every time you leave the masonry unfinished.Do this especially carefully, otherwise, when you return to this area, the already dried glue will not allow the new tile to sit in place, and its cleaning will take more time and energy.
Other techniques and finishing the floor
All further work is pretty monotonous, but despite this, constant monitoring of the level of the tile will not let you get bored. Also, an additional entertainment for tilers is to perform trimming for pipes and other elements that need to be circumvented or ennobled.
Continued tile cutting and masonry
So, cutting again. Do not be surprised, since this procedure takes the most effort and time of the master. Let's start - or rather, continue with the simplest - direct cut.

Here is a manual tile cutter with a diamond roller. This tool greatly speeds up the work process, since there are most direct cuts of tiles on any object. It copes well with ceramics and cermets, and it also cuts clinker tiles well.
But in the case of laying granite, it is not your assistant, since this tile has a cast structure, and can break completely unpredictably, even despite the cut. The cutting of this material is best done on electric machines.
At our facility there was a tile 17.5 cm wide, which is why the number of clippings was enormous, but our machine coped with it with a bang.
Advice! When laying the finishing tile, do not forget about the organization of a technical clearance of 1 cm at the edges.

When laying large areas of the floor, constantly there is a need to move over already laid tiles. The easiest way to do this is as follows: skip the extreme tiles on one row, install a brick in this place, and roll a solid board to the hard floor.

If necessary, this design can be extended by the following link.

In order not to miss the evenness of the seams, it is recommended to lay a narrow tile insert with crosses installed, but without glue, in place of the missed tile. This technique is much better seen in the next photo.

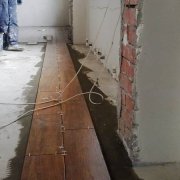
And why did we even lay the tiles in this manner? As you see, gone kitchen tiling of a different color, and on the territory of this room there was a cellar, the hatch for which we had to install and ennoble.

The complexity of this maneuver is that after the main floor area has dried, we need to reduce two separated planes towards each other. That is, without being safe, it is very easy to stray from the seams or not to guess with the height of the planes. Therefore, making such gaps, in addition to seams, monitor the heights of the protruding elements, checking the rule.

Installation of the hatch is not interesting to us, so we proceed immediately to its refinement. The used hatch is hidden, so it is located in a level with a floor screed.
Its cover is made of durable waterproof material GVLV. On which the manufacturer himself recommends installing tiles on glue “liquid nails”. If you need to perform similar work, be sure to make sure that the adhesive used is marked “for ceramic”, otherwise, such a coupling will not last long.
- First of all, you need to bring the tile to the hatchto have a clear reference point for measurements;
- Next, step by step we cover the hatch itselfwatching the seams of the main floor;
- Special attention should be paid to cutting edges.in order to achieve clear edges (it took half a day to cover the hatch in question, despite its small size);
- The trailing edges must be cut at an angle of 60 °, so that the hatch opens freely and does not cling to the floor. This work is only possible on the machine.

As you can see, it didn’t work out for us to observe the seams.A visible difference arose due to the fact that the direction of the masonry and the position of the hatch were slightly offset relative to each other.
The central tile with a hole for the hatch lock, we installed last, in order to have strict guidelines when taking measurements.

After the floor was completely reduced, we got the following result

Tile cleaning and grouting
At the end of the tiling, all that remains is to grout the joints. This process, despite its apparent simplicity, is also tedious and time-consuming.
To begin with, we need to remove the crosses, and clean all the seams of the protruding glue, which by this time has dried and turned into concrete.
Advice! If possible, try to clean the seams one day after installation. At this time, the glue is already strong enough to support the weight of an adult, but at the same time it is quite easy to process.

The easiest way to do this is with a conventional mounting knife. But you should not use a blade that is too thin in combination with it, since when pressed it can break off, bounce and injure you.

If your tile has a dark color, and is not afraid of scratches, then use a hard metal brush to speed up this process. After cleaning, you need to remove all dirt from the floor. To do this, you need a vacuum cleaner that removes dust even from the seams.

It is also possible to work with a broom, but after it the seams on the contrary are clogged with dust, so sweep it out with special care. Well, in the end, you need to wash the floor with a damp, dense sponge, which easily removes small traces of glue that have dried to the surface of the tile.

Now we take a rubber spatula in our hands, spread the grout, and systematically close each seam, row by row.
This is done as follows:
- Dilute about 500 g. grouts in clean containers;
- Stir the mixture thoroughly until a homogeneous mass is formed;
- Put a small amount of grout with a spatula and close the seam with transverse movements;
- Collect the excess mixture in a longitudinal motion and distribute it further.

Walk 2 to 3 square meters of floor space at once. Then set aside the spatula, as you need to have time to wash the seams, otherwise the grout will completely dry, and you can remove it only with sandpaper.
Squeeze the sponge well and rinse off all unnecessary grout in a circular motion. If failures are revealed somewhere, then immediately close them again, without delay. Next, go back to closing the seams.

Carefully monitor the condition of the mixture, as soon as you feel that it has become thicker and lose elasticity, add a little water to it. To do this, just dip the spatula into the bucket, remove it, and hold it over the grout, allowing the liquid to drain into the container. By mixing the grout manually, you can return to work.
Perhaps this concludes a very protracted educational program. We hope that we were able to intelligibly convey all the information, and laying tiles on the floor with our own hands has become less frightening for you. The video in this article will help you better understand the material. Read, watch, try, and you will succeed!
You can find the beginning of the article here:Tiles on the floor: lay efficiently and quickly - part 1