Tiles on the floor: lay efficiently and quickly - part 1

On the Internet, you can find many articles that tell about how to lay tiles on walls made of drywall or any other material, but there are practically no detailed profile articles devoted to flooring. It is not surprising, since demand forms supply, and most people think little about this topic and put walls on top of it.
But we decided to correct this situation, and tell our reader that tile on the floor is a multifaceted complex topic that requires understanding and adherence to technology.
The content of the article
Preparing the room for installation
So, let's get right off the bat. The article will not have soapy information about the direction in which to lay the tiles, how the floor tiles are laid on the wall, how to communicate with sellers and other nonsense.
All this loads unnecessary knowledge with the already fragile minds of amateur builders. Therefore, we will go step by step, on all the most important points that you will definitely encounter during the installation process.
Preparing the foundation
Before taking on the tile, it is necessary to make a complete floor preparation, namely:
- Make sure the base is even. Otherwise - either level the floor, or put up with the fact that the tile will not lie on the level, and with distortions at the seams. Some “masters”, out of ignorance or laziness, advise customers to lay tiles on a layer of glue, which is not allowed in all cases.
- The layer of standard tile adhesive should not exceed 1 - 1.2 cmotherwise, the strength of the masonry will suffer greatly over time. This is especially true for flooring, which is constantly experiencing mechanical stress. Only reinforced adhesives allow laying on a layer up to 2 cm thick.
- Also, the adhesive layer is always curved masonry. “But you can apply a tile alignment system” - these guys will tell you, but keep in mind that the game is not worth the candle. You will overpay for glue (consumption increases many times), well, SVP itself is not cheap, and for medium-budget repairs it is completely optional, although very convenient and practical. Where it is more correct to spend the same money on the bulk floor, and get a strong, even base with excellent adhesion as a result.

In our case, we got an object in a private house, where the tilers were “leveled”, which the owner carried out, and entrusted this matter to your humble servant with a companion, although initially we came putty ceilings and walls.
What did the customer dislike about the work of previous masters? They pointed out to him that the floor throughout the house, and this was as much as 80 m², had a level difference of up to 2 cm, and convinced him that refilling was required.
Note of the author! The total surface plane was almost flat, which in our opinion is much more important than a smooth level drop at a distance of 7 m.

So:
- As a result, having spent about 40 bags of bulk floor, the price of which in our city is about 360 rubles apiece (360 * 40 = 14400 rubles), we get a more or less even floor, but with frequent smooth drops in height up to 2 - 3 mm, which , as you understand for a bulk floor, a bad result.
- The reason for this oversight was the banal lack of the mixture, and the fact that the masters did not mix the solution well, as a result of which it spread poorly, and lumps formed over the entire floor area that they did not even bother to stretch.
- Well, you say, they said that the article will be without water, and then it began! But believe me, knowledge of these things will save you from poor work on the part of the performer, and save you from unnecessary problems when you do everything yourself.

When the alignment work is completed, the stage of cleaning the room begins:
- A damper tape remaining from the fill is cut off around the perimeter of the room. Along the way, check for bumps on the walls. It can be layering of putty, plaster or even dowels and nails.
- All of the above must be brought down, removed and cleaned. At this stage, this is easiest to do. Do not look at the fact that this may take several hours of your time. As a result, you will still win in speed, and you won’t have to be nervous when everyone is smeared with glue, you will try to find a tubercle that does not allow the tile to sit in place.
- Next, carefully scan the surface of the floor for bumps. In our case, we had to shoot down all the frozen lumps and improvised beacons from the tile, in the place of which voids formed (the owner disowned from re-alignment).
- After we sweep out all the garbage received. To clean the corners of a room, it is best to use a vacuum cleaner or brush such as a mackerel. There is no point in vacuuming the main space of the room, since due to constant movements and kneading of glue, new garbage is constantly applied. It’s enough to work well with a broom, and in the future, brush each new row with a brush immediately before laying.

Well, the final stage of preparation is the impregnation of the surface with a primer (seeTypes of construction primers and their scope) This treatment will regulate the absorption of moisture by the base, improve its adhesion and bind together dust particles.
Advice! Use formulations labeled “deep penetration” for these purposes, as they further strengthen the foundation itself. In damp rooms, use primers with antiseptic additives.
Floor marking
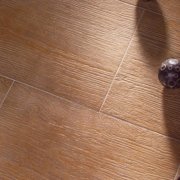
After the soil has dried up, you can start marking and laying out the tiles. This stage is also very important, because it allows you to determine how the tile will be located in space.

As you can see, looking at the photo, our main task was to align the longitudinal seam and orient it along the wall.
Before you is a corridor that runs through all the rooms of the house, and under the "arch" is connected to the tiles in the living room. As a result, a single-level two-color sheet is obtained, with a connection in the doorway. Unfortunately, no photos were taken when laying the hall, but the process is completely similar to what will be described later.
So what we do:
- We postpone some arbitrary distance from the landmark wall, but so that the mark goes beyond the slope of the doorway. This is done in two places: at the beginning and at the end of the imaginary seam line.
- We take the dyeing thread (lace) and beat off the line along the marks.
- Now, using a tape measure, measure the distance to the wall along the entire length, and compare the data obtained. If the masons and plasterers have done their job honestly, the difference will not exceed 1 cm. In this case, there will be no need to trim the extra row of tiles.
- In case of large differences, you will have to shift the row to the wall with trim so as not to miss an even seam. Also, in this case it is not necessary to navigate along the wall, since the wall section is most often invisible, and the seam will be constantly in sight.
- If you are laying square tiles, then you need to check adjacent walls. To do this, mark a point on the line (No. 1), at an arbitrary distance from the desired wall. Now let's recall the geometry course for grade 6: "The square of the hypotenuse is equal to the sum of the squares of the legs." It is this rule that we will use to calculate the right angle.

- We postpone along the line of 4 meters (point No. 2);
- At the first point, for convenience, hammer the dowel, and fasten the end of the thread;
- We pull the thread, and mark on it three meters;
- We select it and pull it again, but already from the received mark, and set aside 5 meters;
- We hammer the dowel according to mark No. 2 on the floor, and we tie the thread so that the last mark coincides with this point;
- Now pull the thread along the middle mark, forming a point number 3. As a result, in the corner number 1 you get exactly 90 °.
If your room does not allow you to postpone the indicated distances, due to its small size, or vice versa - it is too large and more accurate measurement is required, then decrease or increase the values in proportion to the specified formula.

Transfer all measurements to the floor, and remove the dowels with thread. Now you need to make a layout to determine the optimal location of the tile.
With the correct layout, you can not only achieve a more beautiful appearance of the room, but also possibly avoid unnecessary clippings, thereby preserving your strengths and means.
- Place the tile one after another along the lines from the wall or doorway (in our case, the opening was a guide, since it was necessary to join two types of tiles in it), and estimate how many whole tiles fit in a row.
- Immediately place crosses or SVPs at the seams so that the result is more accurate.
- Now you will clearly see how the seams and trim will be located, and you can make the right decision - where is the best place to start laying, and how to hide the trim.
- Repeat the entire procedure on an adjacent wall.

What did the layout give us in a particular case? After all the measurements, we slightly shifted the joint to the depth of the living room (1.5 cm) - so on the opposite wall we got rid of waste. The parts remaining from the cutting went to the start of the next row, which accelerated us quite a lot and saved several thousand rubles for the customer.
Advice! If after the layout you find that a narrow finishing insert is required, then try to center the row along the seam, and then in the center of the tile. Choose an option with smaller slices.
Laying tiles on the floor
Having finished with the markup, you can start laying the floor. Although not - we have not drawn the main line yet. Step back in a corner from the wall parallel to which the first row will go, 1 cm, and measure the distance from the mark to the line No. 1 - No. 2, which we drew earlier.
Go to the other end of the line and duplicate this distance. Using the received points, beat off the line, which will serve as a guide for the first row.
Cooking glue
Now you can knead the glue, and proceed with further work.

The choice of glue is not an easy task, since the windows are full of all kinds of labels, and each manufacturer excitedly screams about the excellent quality of its products. We used different adhesives, but opted for CP adhesives (excellent quality mixes).
Do not forget that each brand of glue has its own specifics. In this case, we needed an option that is suitable for laying tiles on warm floors. Also, if necessary, you can purchase frost-resistant, high-strength and other options - for example: white glue for laying mosaics (seeMosaic cladding - all the subtleties of installation and design).

To knead large volumes of glue, you will need a mixer nozzle, a puncher or similar specialized devices:
- To glue mix well, without the formation of lumps, you must first pour water into the container, and only then pour the dry mixture.
- Best for these purposes is a high bucket, the walls of which will not allow dirt to fly apart during kneading.
- The exact proportions of the components are indicated by the instruction on the glue bag, but it is difficult to use them, since they are indicated on the whole bag. Therefore, get used to immediately determine the density of the solution in the eye.
- Fill the fifth part of the bucket with water, and pour the mixture on top until a slide emerges above the liquid. After thoroughly mix everything with a mixer.
- To understand how glue is ready, simply lift the hammer, and observe how the mixture behaves.
- Ideally, it should slide smoothly from the mixer. So, if you have not guessed the first time, then add the desired component, and mix again - and so on until you reach the desired consistency.
- If it seems to you that the glue is not enough, then next time try increasing the amount of water. Do not be afraid that you will not have time to develop glue, since the solution retains its properties for several hours.
Leave the glue to soak in moisture for 5 minutes, and re-mix it. Everything, the solution is ready to work.
Start laying
Take a brush or a broom, and re-mark the place where the glue will be applied. After that, take a trowel or putty knife, and apply the mixture with a slide, being careful not to touch the marking line.

To distribute the adhesive on the surface, it is most convenient to use a notched trowel, which due to its shape makes it easy to control the thickness of the applied layer. But, if you decide to apply glue directly to the tile, then the tooth gear is best suited - it is convenient for her to collect glue from the bucket, without being distracted by changing the tool.
Advice! If your floor is level, then glue the glue on the base - this will save you a lot of time. But you need to get a little skill so as not to stain the front surface of the tile, and not to fill the seams with glue.
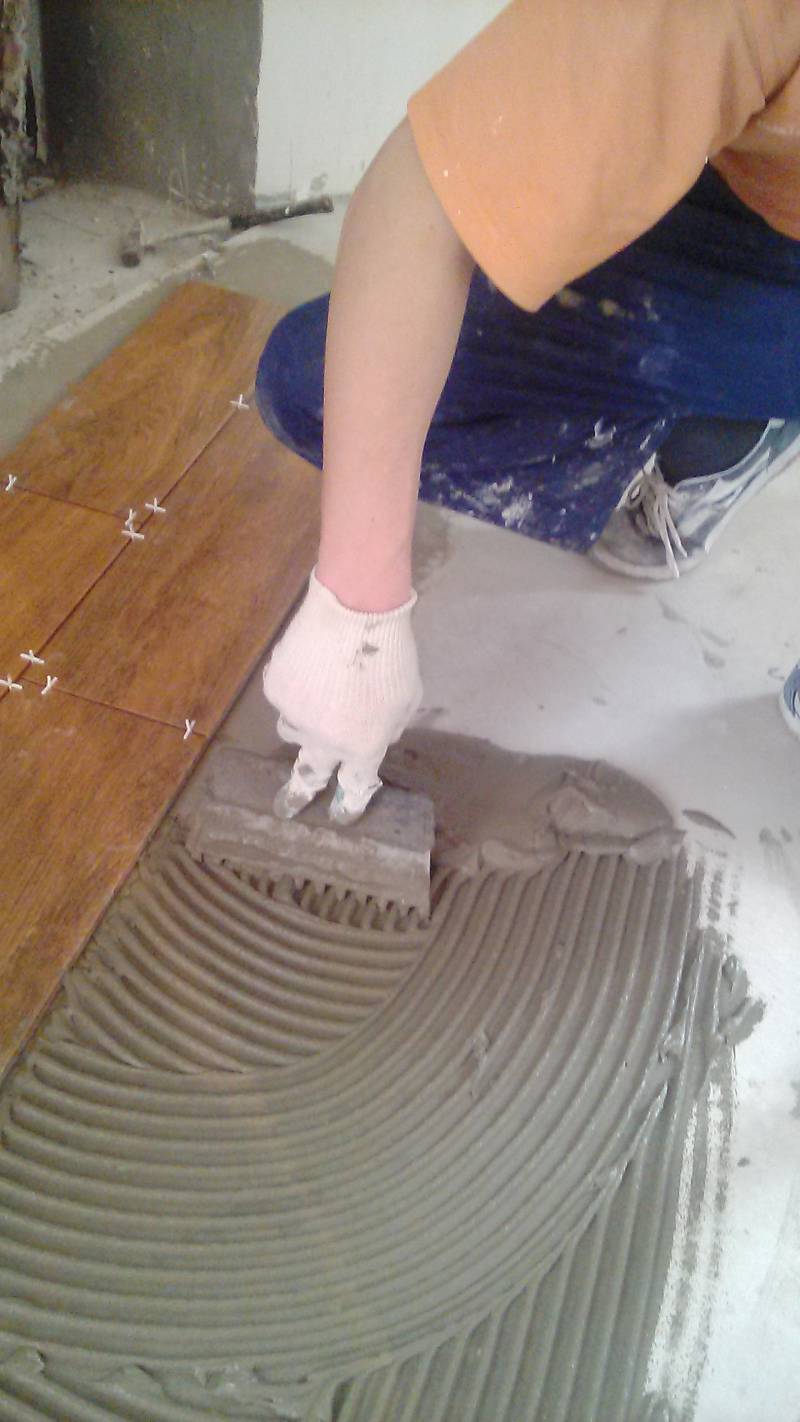
So:
- Take a putty knife in a comfortable hand;
- Put it on the edge of the pile perpendicular to the floor, and tilt it slightly toward you;
- With a slight pressure, stretch the glue;
- be careful, since from the edges of the spatula, at first, sagging will form. Stretch the mixture as evenly as possible longitudinally to the future row, being careful not to stain the already mentioned line.
- After, it is necessary to make an audit - make sure that there is glue on the end of the spatula blade. Set it parallel to the line at a “safe” distance. This is done with a sharp movement so that the glue from the spatula falls to the floor. Then stretch the solution again, but already across the original direction.
- In this manner, go through the entire site.
Excess glue can be moved back into the bucket, or gently left from the edge, after making sure that it does not interfere with tile laying.
Advice! If you touched the edges of the previous row, it is best to immediately wipe them with a dry sponge. Try to always leave the seams as clean as possible.
Now you can lay the tile over the layer, gently pressing it over the entire surface. In more detail, we will analyze this process in the next part of the article.

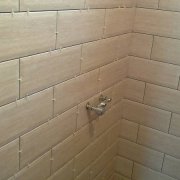
When we brought the tiles in two rooms, it was very important not to miss the planned seam. But to measure it in the same way did not work in view of the fact that the main line was erased - and it would be worth taking into account possible displacements.
Therefore, we had to quickly lay out the two central rows of tiles, and align them with a stretched kapron thread. To do this, we collected all the excess glue that protruded beyond the edges of the tile so that they did not interfere.
When you need to move an entire plane at once, you need to use a long rule or a metal rail. Fortunately, there were no strong shifts, and this did not amount to us, absolutely, any work.

After, already being guided by the adjusted central rows, we report the part remaining to the wall.
Since with this layout, we have a transverse seam with an offset of half the tile, we will need to install two crosses on each edge.To avoid distortions, use clean crosses and insert them all the way.

Looking ahead a little, let's say that you need to carefully monitor the level of tile joints. If you find differences, then do not be lazy to raise the laid tile and adjust its position due to glue.
Without the use of SVPs, such situations arise quite often. This is influenced by several factors: the uniformity of the adhesive layer, differences in floor heights and the evenness of the tile itself. The latter factor is found the more often, the cheaper the tile is used.
Also, be careful when using SVP, as by pulling up a failed tile without adhesive lining, you risk that the solution layer will thin out and the fastening will not be reliable. Therefore, always revise the adhesive.

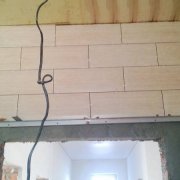
In the photo above, you can see a brief preliminary summary of our work. Next will be a tile of a different color, but you will learn about this and much more in the second, final part of the article.
Unfortunately, the video in this article does not apply to the described object, but it is also very informative, and tells in detail about how the tiles are laid on the floor, on the walls. Be sure to read it to present the process more clearly. That's all, see you in new articles!
Also read the continuation of the article. Tiled floor in a room with a cellar - part 2