How to prepare a wall for laying tiles (part 1): we cover the shower room with the master

We welcome our readers, regular and new arrivals. Recently published series of articles on various topics have become very popular.
More precisely, you liked the format of the presentation of the material, where the experienced master gradually performs the work, supplying the material with the appropriate pictures, from the very beginning to the end. Therefore, we continue our experiment, and give a new mini-cycle on the decoration of the shower room, with the organization of the pallet. The first article will be devoted to the question of how to prepare a wall for laying tiles. Go!
The content of the article
Where does the repair in the shower begin
The shower room differs from the bathroom in that the same notorious bathroom is not in it. The entire washing process comes from a watering can installed at a certain height. And if you were able to equip your room with an appropriate booth, then the only thing you cared about at the stage of its installation was the correct installation and the size of the room.
In cases where the place for water procedures is made capital, you will need to: install a gangway, organize a pallet, cover it with tiles or mosaics, observing the level for proper drainage of liquid, as well as take care of the waterproof walls and floors, as the water will be constantly with them to contact.
Preliminary preparation

Before we talk about how to lay tiles on walls, we will talk in some detail about all the work that needs to be done before this procedure.
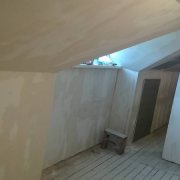
- And we begin with the fact that, having entered the room, visually and by palpation we will evaluate the quality of the surface on which we have to lay the notorious tile.
- In this case, your humble servant got a terribly plaster coating with many open voids and a layer of debris (frozen lumps of stucco mortar (seeHow to remove old plaster from walls without problems) falling from above to the bottom of the wall).
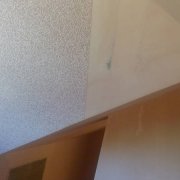
- Fortunately, the general plane of all surfaces (with the exception of the floor) turned out to be fairly flat, and set almost vertically.
Advice! Do not be lazy to eliminate all of these and many other wall flaws found during the inspection even before the start of tile laying. No matter how much time and effort it takes, in the end it will all pay off many times, and you will significantly gain in speed.
For work you will need the following tools:
- Hard putty knife - in the photo above you can see that we are using an old Soviet instrument that is not less than 30 years old (we knew how to do things in the Soviet Union);
- Rotary Hammer and Shovel Attachment - come in handy when you need to choose frozen growths in the corners of the room;
- Broom and scoop - to maintain cleanliness in the workplace.
Advice! The last item indicated is very important, since it will be easier and more comfortable for you to navigate in a clean room, and garbage will not be carried outside the room, which is especially important when repairing in a populated house.
All work is done point by point, as our short instruction states:
- Take a spatula in your hands, and begin to systematically go through the entire surface of the walls, trying to scrape off all the growths to zero. If something does not work out with a spatula, you can work a little with a hammer (pickaxe) or a punch.
- When using a power tool to clean the surface, be careful not to hammer out too much plaster.
- Then go through the corners of the room, and knock out all the protruding parts that inevitably form during the alignment of the wall, especially among low-skilled workers.

- Remove all damping tape around the perimeter of the floor, if you have one. This element is installed before leveling the floor, and contributes to the organization of the compensation gap for the linear temperature expansion of the material.

- Now we again take the spatula into our hands, and we process the freed edges, on which, when the screed comes in contact with the tape, sag will inevitably form. We must clean them.

- Pay special attention to cleaning the window slope, if any, in your room. The lower part of it accumulates a lot of debris during the plastering process, and all this must be removed now, so as not to dust the surface of the walls in the future.
After you finish cleaning the surfaces, take a sweeping brush or a regular broom, and dust off the walls. Carefully remove all debris from the floor, for which you can use a construction vacuum cleaner, if one is available.
Advice! Do not use household vacuum cleaners during repairs, as they are not designed to work with building dust. Otherwise, you risk that these devices may fail.
We got rid of the frozen growth on the walls, but what to do with open voids on the surface of the plaster?
If the holes are small (with a diameter of up to 5 centimeters), then you can leave the wall as is, closing up the voids in the process of laying the tiles. Large defects should be covered beforehand, using cement mortar, densely diluted tile glue or gypsum for this.
It is most convenient to use gypsum not in its pure form, but in the form of a plaster mixture, which will be much more convenient to work with, especially when placing pipes under the mixer. Buying a whole bag of plaster to cover several pits is impractical - use it if you have one.
Otherwise, use pure gypsum, observing the technology of its dilution. We will talk more about this a bit later.
Impregnation of walls
A clean, mineral, plastered wall is endowed with the ability to greatly absorb moisture. This is especially true for cement-concrete surfaces. This feature negatively affects the quality of the adhesion of the wall to the tile, since the tile adhesive, which lost moisture too quickly, loses its strength.
To adjust the absorption by the walls of moisture, special deep penetration primers are used for mineral substrates (see Primer walls and all for that matter).

The primers offered in stores today are of various types. We are interested in the following:
- As already mentioned - deep penetration for mineral substrates. Such soils penetrate deep into the structure of the material, strengthen it from the inside and bind peeling dust particles.
- Since we do repairs in a very humid room, we need a mixture that contains substances that fight against the formation of black mold. These options are marked on the label (with antibacterial additives).
- Part of the shower floor will need to be treated with quartz filler primer. In other words, it is called - concrete contact. This treatment gives a durable abrasive coating with excellent adhesive properties, which does not allow moisture to penetrate into the thickness of the concrete base.
Advice! It is possible to treat with concrete contact the entire surface of the floor, and not just a part of it, since water will be everywhere if you do not take care of the partition that separates the bathing area from the pre-bath.

By the way, the concrete contact used by us had a very small fraction of quartz, which is not so good for laying tiles. A much better option would be a similar product from the manufacturer "Titan", using which, you will be sure of the quality of processing. The price of this soil will be higher than that indicated previously, but not so much as to save on such an important stage of decoration.

Apply the soil either with a roller or brush with a brush. Concrete contact - only with a brush, due to the greater density.
- Pour a liquid primer into the tray (tray), and begin to apply it on the walls with a tool.
- If you work with a roller, then avoid sudden movements so as not to splatter everything around. Apply the composition with movements from the bottom up - so the drops will fly up, and not in your face.
- Do not spare the soil. In order for the surface to be well saturated, it must literally flow down it.
- Do not disregard the corners of the room. Walk through them separately with a brush.
Advice! If the walls become dry in a matter of minutes, then you will need to repeat the treatment. And so on until the soil layer remains on the surface for up to 10 minutes. Usually two to three layers are enough.
Before smearing the concrete contact, thoroughly mix its contents, as heavy particles of quartz sand settle on the bottom during storage. Use a piece of polypropylene pipe or a regular stick for this.
After soaking a brush in the mixture, and distribute the soil on the treated surface. Make sure that there is enough abrasive left on the already coated areas - do not stretch the composition over too large an area. Concrete contact requires longer drying than liquid soils, so feel free to leave the floor to dry at night, and go to rest, and in the morning we will continue our difficult task.
Pallet organization and tile laying types
We remind you that we do all the work with our own hands, and therefore we move strictly in stages. After the soil is completely dry, we proceed with the installation of the bathing place.
Pallet
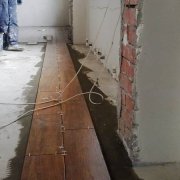
It's no secret that the bathing area in the shower room should be separated from the main floor by a side that prevents water from spreading throughout the room. The installation of this element must be performed before the start of tiling.

We laid it out of ordinary white silicate brick, and tiled glue was used as a solution.
But before you lay out the side, you need to determine its height. To do this, initially, you need to install a gangway (sewage in the shower). It can be of different types, and can take a different volume (its height can vary from 2 to 10 cm), depending on the method of supplying the sewer pipe and the design of the ladder itself.

The construction of the ladder, which was installed by our team, made it possible to cut off unnecessary sections to adjust the landing height. Thus, we were able to set it to a height of no more than two centimeters. The difference in the heights of the ladder and the main floor will subsequently be compensated by the bulk floor, to the device of which we will return after the mortar has dried on the bricks.
In our case, the bricks needed preliminary preparation, and not only for the reasons described above:
- The fact is that the tile intended for facing this element imitated a large mosaic with section sizes of 5 * 5 centimeters.
- This means that the height and width of the masonry should not exceed 10 cm. But the size of a standard brick is 9 * 12 centimeters in the end section.
- Therefore, we had to cut with a grinder about 3.5 centimeters, taking into account future layers of glue.
Advice! When laying the partition, pay close attention to filling the interlining joints, filling them with special care.This scrupulousness is needed to create a tightness that will not allow the bulk floor to leak through the cracks.
Clean off excess solution immediately so that they do not interfere with the lining in the future. After the mortar on the masonry is well strengthened (leave it to dry for at least a day), the already mentioned bulk floor is poured.
To do this, follow these steps:
- Inspect the floor surface for through holes, and coat them with glue or gypsum (this step could have been completed before applying the concrete contact);
- Next, close up the voids remaining from the damper tape. All these measures are necessary so that the liquid bulk floor does not leak down. Otherwise, on your surface, funnels and dips are guaranteed to appear.
- Let the mixture dry, after which you can safely pour the floor.
Attention! We consciously refuse the design of a floating screed (with compensation gaps), since we, first of all, are important for the tightness of this part of the room. In addition, a coating 1 to 1.5 cm thick and with an area of about two squares will not experience strong linear expansion.

As a mixture, we used a cement-based bulk floor from the Russian manufacturer Litoks. This product complies with all standards and recommendations, easily mixes and spreads, forming a perfectly even coating.
An important plus is also a quick drying time - walking on the floor is possible after two hours from the moment of pouring. For comparison, the gypsum floor from the manufacturer "Volma" does not always have time to harden even during the night. Tested on my own experience.
Although it is only up to you to decide which mixtures to use, we give only some recommendations, since we encounter repairs much more often than the average “homemade craftsman”. In any case, breed the bulk floor as required by the instructions specified by the manufacturer.
Now measure the thickness of the tile, which will lie on the screed, and add 5 mm to the obtained value on the glue layer. It is this height that you will need to leave at the lowest point of the floor - near the ladder. It is practically impossible to measure the exact height of the poured mixture, therefore, when casting, orient yourself “by eye”.

Do not forget to pre-align the sides of the ladder. To do this, use tape measure, focusing on one of the walls, in parallel with which you want to lay floor tiles.
The further procedure is simple to disgrace, and does not need detailed comments. Just enough:
- Carefully monitor the floor level;
- Knead not dissolved lumps of the mixture with a spatula, if any;
- Roll the floor with a needle roller, uniformly dispersing it over the area, and removing air bubbles from it.
After pouring, leave the floor to dry.
Put the tiles on the floor
While our floor dries, you can tile its remaining area (pre-zone). The laying of the shower area is a separate topic, which we will touch on in the next article.

There were no photographs of the lining of this room, so do not blame me, as we will attach material shot during the decoration of the second bathroom.
- To begin with, if you did not select the tile according to the size of the room, perform a preliminary layout. Lay it in two full rows in width and length of the room.
- Thus, you can determine the optimal location of the tile in space, saving yourself from unnecessary clippings, or making slices minimal. Layout types will be discussed in the next chapter.
- After the layout is selected, we mark the boundaries of the rows, and proceed to laying.

- Place glue on the floor in heaps of glue over the area that you are guaranteed to cover, until the glue winds.
- Next, using a spatula-comb, pull the glue on the floor. Do this by slightly tilting the spatula and pressing it to the floor with your index and middle fingers.

- If necessary, carry out a revision (re-drawing in the perpendicular direction), but make sure that the comb contains a layer of glue on itself, otherwise you simply thin the already applied layer.
- Now that the glue has been applied evenly, take the tile, lay it with one edge on the floor and release the second from a height of 5 - 10 centimeters. Having fallen, she adheres tightly to glue. Carefully inspect the position that the tile occupied and correct it if necessary.
- Use for these purposes the building level, the rule and your own eye. If the tile sank below the required level, then lift it, placing it on the edge, and place small bosses of the mixture in the right places. Release the tile again and re-align.
- The edges and surface of the tile stained with glue, it is better to immediately wipe with a dry sponge. So your work will look attractive even at the installation stage, and, moreover, you will ease the task of cleaning the surface after the mixture dries.
- In places where it is impossible to install the whole tile, it must be cut. Use for these purposes: a manual tile cutter, a grinder with a circle for ceramic tiles (it has smooth edges and does not contain cooling holes on the disk) or a special electric machine for cutting ceramics.
Another important point that you should pay attention to is the joint of the floor coverings in the shower and the corridor. We, and there and there was a tile, but of different shapes and thicknesses.

Your task is to make the seam between the coatings invisible and even.
Advice! This moment becomes irrelevant if you have a door with a threshold installed, or in this place different types of coverings come together (for example, tiles and laminate), since such a joint is always closed by a connecting threshold.
Lay out the tiles
On this, the practical part of this article can be considered exhausted. Let's talk a little about the layout, and we will start by looking at some types of laying tiles on the wall.

First of all, the type of laying is determined by the shape of the tile itself, which was laid by the manufacturer (see Production of ceramic tiles and its features) It can be absolutely any size, and have small inserts that create an original geometric pattern.
- So, square-shaped tiles are laid either in the classical style (seam in seam), or a rhombus, which in principle is the same, but with a difference in orientation relative to the room.
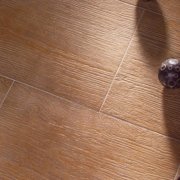
- Narrow rectangular tiles, and "asks" to place the seams in a run, simulating masonry or wooden flooring from a deck board. It was this option that we chose when facing the premises in question.
- You can also combine all kinds of options, but it would be better if all the tiles were from the same collection. This will save you from inconsistencies in tile sizes, although not always.
Non-standard options such as tiles and its layouts can create a unique interior both in the bathroom and in other rooms. Take a look at the following examples laying tiles on the walls.

You can even choose tiles designed for outdoor use.

You can successfully combine those or other materials. And for this you do not have to hire a separate master, or to study each topic yourself, because the methods of laying any tile (with the exception of heavy options) are no different. The same applies to the finished substrates - for example, the technology for laying tiles on a wall made of hcl is no different from facing a concrete surface.
In more detail, the technology of laying the facing tiles on the wall will be described in the next part of the cycle, which will be released any day (seeCeramic wall tile: we enclose the shower room - part 2) In the meantime, we recommend that you watch the video in this article, where the process of preparing the base for the tile is shown in action.