Ceramic wall tile: we enclose the shower room - part 2

Ceramic wall tile is the most popular material for finishing wet rooms, for many years now. As time goes on, materials and methods of their laying change, instead of the usual cement mortar, modern adhesive mixtures are used that provide reliable long-term fixation, systems for leveling the tiles are created, but the essence still remains unchanged. As a result, we have a beautiful, durable and waterproof surface.
The content of the article
Theory, calculations and markup
A few days ago, an article was published on our website on the preparation of the surface for laying tiles (seeHow to prepare a wall for laying tiles (part 1): we cover the shower room with the master) This material will be a thematic continuation in which we will analyze in detail all the nuances of the cladding process, talk about the correct layout of the tiles and bring to mind the pallet that we laid earlier.
Types and grades of tiles
Wall tile can be of almost any size and shape. This parameter is determined by the manufacturer at the production stage. But, despite this, all products of this type, including shaped products, are regulated at the interstate level.
If you want to thoroughly study this issue, we recommend that you familiarize yourself with the document “Ceramic tile for walls GOST 6141-91”, which was adopted in the USSR in 1990, and was reprinted in 2002. We will voice the main points that this document regulates.
- This GOST applies only to ceramic and shaped products intended for interior cladding of a room.
- All tiles and shaped products are divided into two grades: I and II. Each of them has specific, strictly regulated product requirements. Here you can find the limiting values of the deviation of the curvature of the tile surface, the allowable number of chips, color violation and much, much more.
- In addition to the above, the document establishes size requirements, as well as permissible deviations in percentage for some types of products.
In general, interested people are encouraged to read this information in more detail.

If when buying a tile you have doubts about its quality, then you can always ask the seller, provide you with a certificate of conformity issued by the relevant state authorities to the manufacturer.
Choosing a tile together
If you have not purchased a tile, then at this stage of finishing you need to do this. Arriving at the store, any person begins to experience a slight dizziness, as the choice presented today can confuse anyone.

Naturally, the more expensive ceramic collections look rich and elegant, but the price of these products often remains unbearable for many wallets. How to be, and how to save money when you don’t want to purchase low-key and inexpensive options?
Here are a couple of tips that can partially resolve this dilemma:
- As already mentioned, many tiles have two varieties, and grandfathers taught us that: "The third grade is not marriage"! The main disadvantage of the 2nd grade is its variance from the given tile size, which can be solved with a cunning approach to laying.
- To lay a perfectly even tile the first time, even an amateur can. It is much more difficult to work with material that has geometry disruptions (the absence of a right angle between the edges, plane deformation, and dimensional deviation).
- And if you purchased just such a product, then proceed as follows: sort the entire tile by size, arranging it in different stacks, and putting copies aside with chips along the edges and other visible defects; distribute the received packs on different walls; leave the most outstanding tiles to cover inconspicuous places (behind the toilet, bathtub, sink or on the slopes), there send the options with defects.
- Another trick is the way the tiles are laid out. So, laying with an offset easily compensates for not only the difference in size in width, but even the deviation of adjacent walls from the level.
Advice! If you wish, you can come up with many more ways that will make ceramics of the second grade more attractive. For example, leave larger tiles beneath trim edges.
Tile layout on the wall
No matter how you want to place the tile in your bathroom, you still have to do the layout to check how it fits into place. Ideally, the width of the walls should correspond to a row composed only of solid tiles, but this does not always happen.
- To begin, determine for yourself the type of tile laying. For example, if you have ceramic wall tiles, the dimensions of which are small, and the aspect ratio is about 1: 3, then the method we chose is perfect with offset seam.
- And vice versa, if the tile is close to square in shape and has a solid size, then it would be advisable to choose the classic layout method (seam to seam).
- We will describe a specific case, so we will focus on the first option.
- We have two rows, offset relative to each other by half the length of the tile. In our case, it is 20 centimeters.
- We measure the width of the walls, divide them in half and mark the centers.
- First things first, we check how the tile will rise, if it is centered. We look at how many whole tiles fit from the center to the edge of the wall, and measure the remaining distance - this is the data for the first row. We repeat the procedure, but already aligning the mark on the wall with the center of the tile, and repeat the measurement procedure.
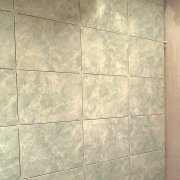
The photo below shows how the tile is placed with this installation.

The advantage of this layout is that even narrow taps can look harmonious on the wall.
On walls where inserts are too short, you can try moving the central seams to the adjacent wall, which remains in sight, and pasting already large fragments from the opposite edge, which is not so noticeable. Usually the first place is the wall opposite the entrance to the room, and the second is the opposite wall with a doorway.
Having determined the optimal position for the tile, you can proceed to the cladding.

Pay attention to the given diagram. It shows the order in which to wall the walls. The first wall is laid against the entrance to the room, as it is often the most noticeable. With the large size of the room, this aspect is not so important, and you can choose as you wish.
Next are the walls adjacent to the first, and finally, the wall with the entrance. This is done in order to visually hide the cutting seams in the corners of the room.
Laying wall tiles
On this we draw a line under the preparatory moments, and proceed to wall tiles. And we will start with glue.
Tile adhesive

If the theater begins with a hanger, then laying the supply chain - with a dilution of glue. Here is a detailed step-by-step instruction on how to do it correctly, without looking at the label, on which the whole recipe is designed for a whole bag, which is extremely inconvenient:
- Pour into a clean container (preferably a bucket with high sides, for example, remaining from water-based paint) of cold water, in the amount of a third of the total volume of the vessel.
- Unpack the bag with glue, and pour some of the mixture into a bucket. Determine the amount "by eye" - the glue should form a small dry slide above the surface of the water.
- Take a construction mixer or electric drill with a whisk, and mix the contents thoroughly.
- Estimate the degree of density of the resulting solution. To do this, raise the whisk above the bucket, and look at how glue flows from it. It should be viscous and elastic, gradually falling back into the bucket.
- If the solution turns out to be liquid, then just add a little glue and mix it again. With a thick mixture - add a little water a little, until you achieve the desired result.
- Leave the glue for a few minutes to brew.then repeat the stirring procedure.
Now the solution for laying the tiles is ready, and you can start work.

Surely many faced a problem when their favorite product, whether it was chocolate candy or putty, became worse over time, as the manufacturer began to save on the components that make up the product.
The same situation touched our favorite tile adhesive “CP”, which we recently touted in a similar article. In the photo above you can see very similar bags: one is made of polyethylene, and the second is made of paper.
Starting to work with the first option, we thought that the client brought us some kind of counterfeit. The glue clearly needed plasticizers, as it lost moisture very quickly, even being in a bucket, which made the work extremely uncomfortable. Such a solution may adversely affect the quality of the hitch.
Later it turned out that this product is not fake, it just has a lower price. As illiterate sellers like to say to their unlucky customers: "Everything is the same, just cheaper!" And most interestingly, people are always led to these primitive explanations, and the happy ones run home, and the master then suffers when working with low-quality products.
Advice! Be careful and don’t be naive - you know where free cheese is for free.

The second option, also became noticeably worse, although not as much as the previous one. Therefore, we will have to look for a new glue, and most likely it will be Ivsil or Ceresit mixtures, famous for their German quality.
Start of masonry
Where does smooth masonry begin? Correctly! From the starting row, set horizontally and vertically. Its tab 90% determines the evenness of the future wall plane.

To begin the installation of this masonry element, it is necessary to wind a metal profile on the wall from the drywall frame (27 * 28). We will start from the second row, and there are several objective reasons for this.
- Many do not understand why it is impossible to lay the cladding directly from the floor. Actually it is possible, but for this you will need a perfectly flat floor, set in level. So you can accurately calculate the height with which you need to start the first row.
- In our case, the floor not only has different levels throughout, but also a brick wall, which will have to be circumvented by figuratively cutting tiles, which takes a lot of time.
- But we need speed so that we can adjust the position of the entire series at the same time.
- The second reason is closely related to the first, and lies in the fact that the edges of floor tiles should hide under the wall. Having miscalculated with height, you may not be able to insert it there, or vice versa, you will get too big a gap.
- If the floor tile does not creep under the wall, then it will have to be cut in places.When working with porcelain stoneware, to do this carefully is extremely problematic, and you will see ugly seams in plain sight.
- It is much better to cut the entire bottom row of wall tiles by 2-3 centimeters, completely repeating the floor plane.
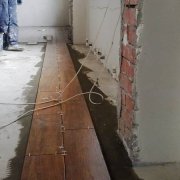
- By the way, we did not mention the pan in which the level will be set so that the water flows by gravity to the ladder, that is, around the perimeter inside it, along the edges, there will be different heights everywhere.
We think that the issue has been resolved and move on. Now you need to mark the horizontal in the room. Use the laser, or like us, water (hydro) level for this.
- Use these tools and a pencil to mark all corners of the room. You can do this at absolutely any height that is convenient for you.
- Estimate on one of the corners the border of the top edge of the starting row (for us, with a tile height of 15 cm, this was somewhere around 27 cm from the bottom point of the floor level), and also mark this point.
- Measure the distance from it to the previously planned level with a tape measure, and duplicate it in all the remaining corners of the room.
- Now tightly tighten the nylon thread on the wall to be laid between the marks, which will serve as a guide. If the wall has a length of more than 3-4 meters, then install in the center at the level of the dowel around which you wrap the thread once so that it does not sag.
- If the wall is modest in size, then you can do without a thread at all, using the rule instead, as in the photo above.
When withdrawing the first row, you can additionally make secure the usual building level, as we do.

This row needs to be set not only on the horizontal level, but also on the plane, for which we apply a long, even rule perpendicular to the tile. So that everything at once becomes smooth at once, monitor the thickness of the glue applied (provided that the wall has a plane without distortions, depressions and bumps).
To adjust the height of the tiles, use plastic wedges that are inserted between the profile and tile.
How to stick a tile
Since we do everything with our own hands, let's not leave aside the question of how to properly apply glue on tiles and walls.

Coarse cement plaster does not have adhesion sufficient for strong adhesion to glue. The fact is that it can contain many small irregularities that, in combination with inelastic glue (which we had), will not cling to each other over the entire area.
To fix this situation, before laying each row, it is necessary to coat the concrete base with a very thin layer of glue (for scoring). The same can be done with tiles (when applying a layer of glue to the walls), although this is not necessary - we resort to this technique only in cases where the glue on the wall is slightly weathered.
Glue can be applied in two ways: on the base and on the tile. Each of them has its own characteristics, which are worth voicing:
- The first - It is most convenient when laying tiles on the floor, but is often used by masters and when walling. It requires some skill so as not to stain glue all around.
- Also, you need to constantly monitor the state of already applied glue, preventing its weathering, otherwise the tile will simply crush the solution under itself, without contacting it. For "treatment", as already mentioned, you need to coat the back side of the tile with a thin layer of glue.
- Second - allows you to make a cleaner masonry, without risk of missing drying glue. This method takes a little longer. Suitable for both masters and beginners.
You can choose how to apply the glue yourself, but we use both the one and the other option, depending on the situation.

So, we apply glue on the edge of the tile with a large heap, and stretch it along the surface with a comb.It is most convenient to use a malk for these purposes, having ribbed faces on both sides.

The smooth edges of this tool are great for applying a thin layer of glue to the walls, and with a comb it is convenient to apply an even layer to the tile or finish base.
Next, remove the drooping drops of the solution along the edges of the tile, and attach it, slightly pressing it into the seat. Heat the tile evenly, trying to avoid distortions in the plane.
If, when installing the starting row, we were guided by the rule, then the following rows are checked with a short, level object, for example, the building level.

Install the first tile of the row, and attach the level to this place, as shown in the photo above. If necessary, adjust the position of the tile.
Advice! Do not do such things if the wall being laid is crooked. If you did not bother to level the walls in advance using rough materials, then now it will be completely inappropriate, since your tile will either not stand on a plane in one of the rows, or the adhesive layer will grow to an unacceptable value.

The position of the remaining tiles in the row is regulated by three points at which they adjoin the already laid tile. In the photo above, these points are marked with circles.
Crosses are inserted between the tiles - plastic spacers, which allow to maintain a clear size of tile joints. For walls, it is recommended to use a 2 mm wide option. Such a seam will not be too wide, and at the same time it will allow you to play a little with the position of the tile, eliminating the difference in its size.
Cut, cut and break
If tile laying did not require constant trimmings, then all the work would have flown without a hitch. But, unfortunately, tile cutting takes a lot of time and effort of the master, as it requires strict observance of the dimensions of the cut elements.

Many tools were invented for these purposes, but the most necessary of them when laying wall tiles is a manual roller tile cutter. He is number one on the list.
This tool allows you to quickly and accurately cut ceramic tiles. 90% of all pruning you will perform with it. But if you don’t have it, but don’t want to invest money, then you can replace it with inexpensive analogues, such as scrippers: special metal ones, with a winning rod; an ordinary drill or a nail is a dubious decision, but sometimes it can help out in a difficult situation.
In addition to the scriber, you need to purchase tongs with which you can break the tile along the drawn line.

And how do you like such a site, with a "big-eyed-nosed" neighbor? Such places take a lot of time, as they require high accuracy.
A similar cut can only be done with a power tool:
- Drill with a nozzle-crown of the right size;
- A small grinder with a circle on ceramics;
- Portable electric tile cutting machine.
To perform in-depth cuts with the last two tools, you need to make frequent cuts (every centimeter) of different depths in the marked area, and select the extra parts with pliers or, much more convenient, with "parrot" tongs.

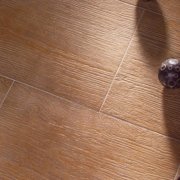
After trimming, we see the following picture.

Now it remains to smear the tile with cut glue, and install it in its place. Another important point is the hot water and cold water pipes suitable for the mixer.
Before cladding this element of the wall, they need to be set and well fixed:
- Measure the distance that the laid tile occupies with a layer of glue.
- The plastic edges of the fittings should be exposed at this value from the wall.
- To temporarily fix the pipes in the desired position, use pieces of tile and wedges, but first start by screwing the cam, and install the mixer on them - you can use the old one.
- This is done in order to prevent distortion of conclusions regarding each other. And if this is not done, in the future the connection will constantly flow, or it will become impossible to install the mixer at all.
- Now coat the pipes with gypsum so that they do not have any play after the mixture has dried.
Next, cut holes in the tile of the desired diameter and install the tile.

Ideally, the tile should be flush with the edge of the fitting. So, the mixer is guaranteed to screw into place, and the sanitary ware will close the edges of the hole and the pipe.
Finish the pallet lining

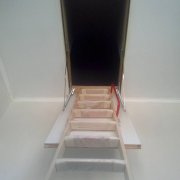
Well, and finally, we put the tile inside the pallet, and we start with the ladder:
- Lay out on this section of the floor, and mark the boundaries of the rows.
- Mark the position of the ladder on the tile, and carefully cut a groove under it.
- Lay this tile, making a slight slope from the wall to the ladder. To do this, coat the tile with glue comb, and in a higher place often throw small glue bosses.
- Next, lay the side tiles, giving an additional slope in different directions

Laying each individual tile, carefully check the level. We choose a groove in the second tile adjacent to the ladder, and we make a bias in the opposite direction. Further actions are similar to those described above.
As a result, you will get a small slope on all four sides, which is quite enough for the natural flow of water.
We finish the work
There is no point in describing further work in detail, so we just list it by points:
- We remove the metal profile from the walls, and lay out the bottom row, measuring each tile separately;
- We cover the side of the pallet, installing a plastic tiled corner on the outer corners, so as not to create traumatic areas in the room;

- We trim the slopes, also using the corners;
- We grout the room.

After all these actions, the shower room will take on the final look, which will “sparkle” in a new way.
Ceramic wall tiles are the best solution for bathrooms. We hope that we were able to help you master this difficult but exciting business. Try to do everything yourself, and we assure you that even if you don’t get the same masonry as a professional master, the result will bring you a lot of pleasure. And to help you, we will add a video in this article, where you can learn a lot more interesting things.