Facing walls with ceramic tiles: choose and make

Ceramic tile for wall cladding is used in many rooms. Facing walls with ceramic tiles is most often carried out in rooms with high humidity. Today we will tell you how to clad walls with ceramic tiles in the kitchen. We will also describe in the article how to do this correctly.
The content of the article
Advantages of using tiles
Ceramic materials for wall cladding has many advantages compared to other materials. Before buying, you should familiarize yourself with them and only after that make the final decision.
So:
- Clad the walls with ceramic tiles perfectly protects the walls from moisture;
- This material is made from environmentally friendly components and does not harm your health;
- Estimate ceramic wall cladding will not be high and will not scare you. Moreover, this work can be done with your own hands and therefore the price of the whole structure will be much cheaper;
- Facing the walls of the kitchen with ceramic tiles will practically not reduce the volume of the room. For example, unlike PVC panels;
- This material perfectly tolerates not only high humidity, but also temperature changes, so you can do the cladding in rooms without constant heating.
Completing of the work
Materials for facing walls with ceramic tiles should be fixed in a certain order and observing the technology. So let's look at this issue in more detail.
Material purchase
The consumption of ceramic tiles for wall cladding should be calculated in advance.
It is necessary to measure the walls and after that:
- The consumption of ceramic tiles for wall cladding will depend on the size of the tile. Therefore, it would be better to immediately select the multiplicity of elements;
- If you are facing the concrete wall with ceramic tiles, then the flow rate of the solution will be large. But if the brick wall is not even, then it is likely that it will be necessary to fix the steel mesh along the plane, then the flow rate increases greatly;
- There is a wall cladding ceramic tiles a seam in a seam, and there are also with the use of various patterns. Then immediately it is worth increasing the amount of waste;
- Finishing can be in any room, but just before buying, you should look at the instructions on what temperatures the tile tolerates and how much it will suit you.
Safety precautions for wall cladding with ceramic tiles should be fully implemented. After all, you have to use and power tools and at height.
Surface preparation
It should immediately be said that the wall lining with ceramic tiles on a cement mortar or on a dry mixture is done only on the prepared surface. Let's look at how the preparation of walls for facing with ceramic tiles is done.
We proceed as follows:
Attention: Immediately measure the deviations of the wall, for this we use a fishing line and pull it diagonally. If the deviation is more than two cm, then you must either plaster or align with drywall. If you apply the first option, then facing the walls with ceramic tiles, the flow rate of the solution will increase significantly. Therefore, consider this question at the initial stage.
- Remove the old coating from the wall. If it holds tight, then you can leave it, but only if not too large a layer is applied;
- If there are cracks in the wall, then gouging them. All plaster, which began to exfoliate, also breaks down;
- Now the surface should be coated with an antiseptic. The fact is that if the fungus starts to start (you may not notice this), then it will begin to manifest itself over time and you will need to remove the entire lining. So it’s better to do it right.
Laying tiles
Typically, ceramic tiles start work from the bottom of the wall surface, it is installed in horizontal rows.
There are such methods of tile installation:
| Type of laying | Characteristic |
 Stacking tiles | It provides that in each row all vertical seams are shifted, this is similar to installing a regular brick. It requires high-quality marking and it will be easier to mount here. |
 Installation of a seam in a seam | In which the tile is laid one above the other, moreover, quite accurately, as a result, smooth rows are obtained, both in horizontal and vertical direction. This option requires a quality fit of each element. Otherwise there will be no good appearance. |
 Installing ceramic tiles diagonally
| This method involves installing the material in a perpendicular manner with respect to the previous row of tiles. Here you need to correctly markup. If you have not laid tiles before, then this is not an option for you. It requires a certain skill. |
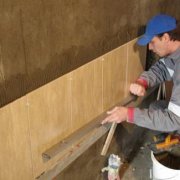
Attention: Before starting to install the tile, it should be lowered into a container filled with water for approximately 5-10 minutes. Regarding the surface of the wall where you intend to install the tile, you also need to wet it with water. Wetting will help to achieve the most durable fastening of the tile to the surface.
So:
- Usually, to carry out the control, it is first necessary to carefully suspend the surface. In order to start hanging, you should fix the vertical and horizontal pins, which will be monitored during tile installation.
- To determine the exact vertical border on the entire surface of the wall, you need to hammer the pins, then pull the cords from them and fix them to the floor. Directly with the help of such cords, the vertical direction of the seam is drawn, in addition, we can control the sides of the cladding contours.
- Of course, you should pull the cords in the horizontal direction. After completing the hanging process, it is necessary to mark the surface of the wall.
In this case, roulette will help us, thanks to which we mark out all the rows of tiles. Thus, we will determine the number of tiles required to install one row of tiles. - Before starting to finish the wall, it is necessary to plan the location of the tile on the surface of the wall in advance. If there are doors and windows, batteries and so on on the wall, we suggest that you familiarize yourself with some of the tile installation options that provide the smallest material cutting.
- To make markings, use a marking ruler whose length is one meter. Applying it to the wall, you will see how the tile will lie on its surface.
- When installing the ceramic tile, hold it a little, as it may begin to slide down the wall. After completing all the necessary preparatory work, we proceed to finish the wall.
- Apply tile adhesive first, press the tile against the wall surface. We apply glue in equal amounts, for this you need a spatula with teeth.
After completing the installation of tiles, proceed to overwrite the seams. All excess solution can be removed with a sponge.
Attention: After laying each row, it must be checked with a building level. Deviation of one mm. It can turn around on a plane of one meter, even a centimeter. Do everything as accurately as possible.
- As a rule, on all tiles there are two glazed edges, which allows you to properly arrange the edges and outer corners.However, despite this circumstance, the edges of the tiles are made out in other ways, for example, using plastic or wooden baguettes.
Wooden baguettes are pressed into the binder on the walls, the indentation of the plastic material is carried out before the tile has been installed.

- To check an already finished wall, use a rail or cord, which, as a result, should be pulled. In the case when we got smooth seams from all sides, it means that the tile was installed by us in the right way.
- When you are finished with this check, determine how smoothly the main styling is done. To carry out such a check, install special beacons.
Grouting
When carrying out work, it is necessary to properly look behind the seams:
- After laying a couple of meters, the mortar should be removed from the seam with a spatula angle. If he freezes, then this will not be possible;

- After facing the entire plane, we wait until it completely dries out;
- Knead the trowel and apply it at the seams with a rubber spatula;
- We erase the excess with a damp rag;
- We are waiting for complete drying. A light coating forms on the plane. It must be removed, but with a dry cloth.
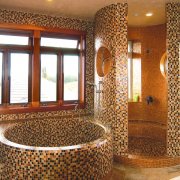
Tiles can be replaced with mosaic tiles (seeMosaic decoration - how to do it yourself), this material is especially suitable for walls of small sizes. Mosaic tiles can be of various sizes and shapes, both simple and complex.
Basically, the mosaic for sale comes in the form of sheets, where all its fragments are located in a fixed place, which, of course, is several times conducive to speeding up the installation process. This tile is laid using the same tile adhesive as the standard tile.
All this work is done completely by hand. Before starting work, you should look at the photos and videos and not miss anything.