How to glue ceramic tiles on the wall with your own hands
How to glue ceramic tiles on the wall? This question arises when you start repairing a bathroom or toilet. Ceramic tile is a reliable, centuries-tested option for wall and floor decoration, where there is high humidity.
It has absolute hygiene, is decorative, it has a fairly budget price, which has a wide range of costs. In addition, unlimited design choices. The article invites you to learn how to lay ceramic tiles on the wall correctly.
The content of the article
Features of laying ceramic tiles
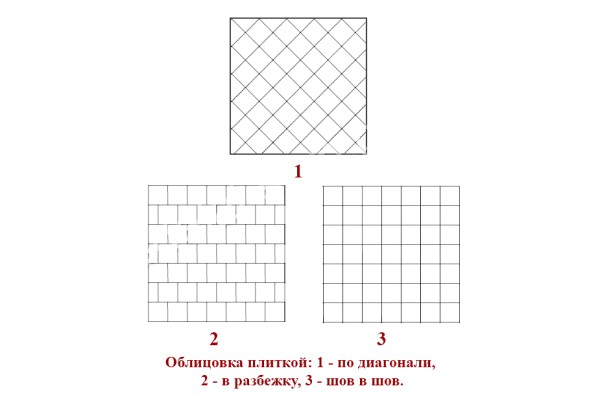
Despite the fact that the process of laying tiles is quite complicated, having a general idea of the process and desire, everything can be done with your own hands, which will save a lot of money. The diagram shows the methods of laying the material.
In the figure, the styling of the elements:
- 1 - diagonally.
- 2 - in a run-up.
- 3 - seam to seam.
Work should be performed in the following sequence:
- Surface inspectedto be laid on it tiles.
- Application of a special ready-mixed plaster or made independently on the basis of cement (see The optimal ratio of cement and sand for plaster).
- Primer is appliedto align the walls.
Tip: Wipe this layer only if applied to the remaining oil paint.
- When carrying out work on fairly even surfaces of concrete or brick walls, they can immediately be tiledwithout pre-plastering. In this case: the surface is thoroughly wetted with water to remove dust and dirt, which will prevent the mortar or special glue from firmly adhering to the wall, and stick to the tile. This can be done using a spray gun.
- Beautifully revetting a wall is possible only with a full tile, and trim parts should be used in invisible places, such as:
- angles;
- near window and doorways.
Preparatory work before gluing tiles
Before sticking ceramic tiles to the wall, you need to determine the scale of work:
- Will there be details on the entire surface of the wall.
- Sticker tiles in the form of panels. In this case, the lower part of the wall is tiled, and the upper is plastered (see Wall plaster technology: how to do it right).
Tip: Wall treatment should be carried out after the floor is completely ready so as not to miss the step of fixing the leveling slats.
Preparatory steps include:
- Tile preparation, determine the method of laying the first row.
- Measured room size, and the total number of tiles needed is calculated for laying out horizontal and vertical rows, taking into account the width of the butt joints and their number.
- If an integer number of elements in one row does not fit, can:
- reduce or increase the thickness of the seam;
- use previously trimmed tiles.
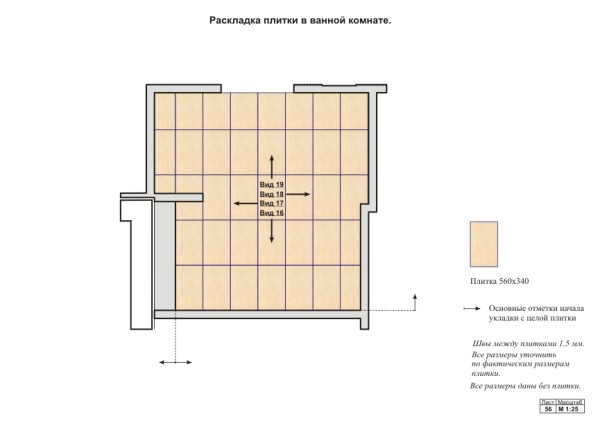
But at the same time, it is necessary to clearly calculate on which side the trim elements will be laid out so that they are less conspicuous. An approximate layout of the layout of tiles on the wall is shown below.
In the diagram:
- Tile dimensions 560x340 millimeters.
- The arrows indicate the main marks of the beginning of laying with the whole tile.
- The pitch between the elements is 1.5 millimeters.
Tip: Cut tiles directly to the entire wall only with a perfectly smooth finished wall, and all seams will be made strictly the same width. Otherwise, there is a risk that when laying rows the width and height of the wall will decrease or vice versa increase, which will lead to unplanned cutting of parts directly in the course of work.
Technology for sticking ceramic tiles to the wall (see Facing with ceramic tiles: work that everyone can handle) indicates that you need to start from below, from the floor level. If he is not ready, then special rules or slats are set along the walls, which serve as limiters for laying tiles from below.
How to use beacons and cord
Further, the technology for sticking ceramic tiles to walls suggests installing beacons on the wall surface. It can be tiles fixed at the ends of each wall intended for decoration, strictly according to the level of elements in the upper row.
When conducting these operations, you must consider:
- Tile thickness
- The width of the glue solution.
Then:
- The upper beacons are fixed.
- Two lower beacons are installed, located at the level of the first row, directly below the upper ones.
- Beacons are installed in whole tiles or parts thereof, but at the same time everything should turn out smoothly.
- A distance of 12 centimeters is postponed from each corner so that the pins can be hammered between them.
- The fastest way to install beacon tiles is on gypsum mortar. But at the same time difficulties may arise - after removing the part from the wall, it will be difficult to clean it from gypsum, which will require some effort.
- Pins are driven in from the edges of the beacons to pull the cord to control the horizontal laying of the tiles.
- The cord stretches over the upper part of the stacked bottom row so that it is not more than one millimeter from the tiles. This will make it possible to obtain a perfectly smooth, without errors, facing surface that is tiled.
Tip: It is necessary to control the location of the cord with a plumb line and level, and through each laid row of tiles, the flatness of the resulting wall is checked.
How to glue a tile
How to lay ceramic tiles on the walls?
For this:
- In the middle of the row, a mark is made from which gluing of the tile will begin.
- You need to move directly from the central part of the row in opposite directions, observing the uniformity of the seams.
- After reaching the lighthouses with tiles, the latter are removed, and a clean tile is put in this place.
- At the end of laying the first row, the pins and cord are removed.
- Marking of the second row is made, in the same sequence as the previous row. And so to the intended top.
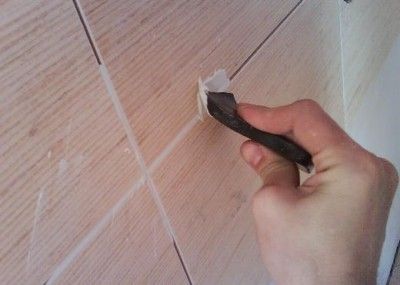
When laying the tiles diagonally, as in the photo:
- Seams are continuous lines perpendicular to each other.
- To the horizontal lines of the walls, ceiling and floor, they are placed at an angle of 45 °.
- Before laying ceramic tiles on the walls with such a complex pattern, it is necessary to carefully mark and calculate the entire area of the finished wall intended for cladding: the same number of halves should be placed along the horizontal and vertical lines.
- Four rows of tiles are laid around the entire perimeter, from which gluing of the tiles to the obtained corners will continue. To maintain the uniformity of gluing tiles can be stretched cords.
When putting it into a run, the instruction suggests:
- The walls are divided into two equal parts in width.
- Dry tiles are laid on them to determine their quantity.
- The tiles are laid out in the center of the tiles located in a row below or along the butt seam between them.
- The resulting wall will resemble a pattern obtained with standard brickwork, made in half a brick, which is used to bundle the rows.
Laying tile seam in seam is performed in the following sequence:
- With this method, laying out the first row is normally assumed.
- The second row is glued from the extreme tiles. Their placement should be precisely aligned with the corresponding details of the first row, serving as beacons.
- The entire second row is laid out along the lace, the evenness of the seams between the panels is carefully controlled.
- You can start laying tiles:
- from one of the corners, this will reduce the number of trimmings;
- from the center of the row, in this case, the lining will become more symmetrical.
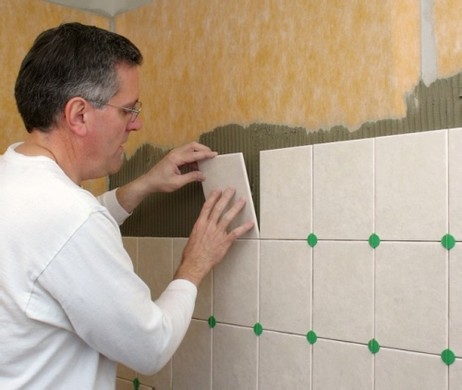
- The adhesive is applied to one of the corners of the rear surface of the tile, then it is pressed against the wall.
- After aligning all the tiles, they need to be pressed again, evenly, tapping with a rubber mallet or a wooden pickaxe.
- In the presence of excess solution, it will crawl out, it must be cleaned with a spatula.
- During the lining, crosses are installed between all the tiles, ensuring an even thickness of the seams.
- After some time, after the solution has set, the crosses are removed.
How ceramic tiles stick to a wooden base
The peculiarity of facing with ceramic tiles is that it is better not to glue the tiles directly on the tree, but to sheathe the wall with plywood sheet, which is less than natural wood is exposed to moisture. After covering the wood with plywood, you can start gluing the tiles.
This procedure is no different from laying tiles on other materials. The glue used is the same as for plywood, fiberboard or particleboard. Details on how to glue ceramic tiles to walls of any material can be seen in the video in this article.
