Facing with ceramic tiles: work that everyone can handle

Glue mounting tiles - this is the most reliable way to seal the surface of the walls, making them also beautiful. This type of wall decoration does not require any special skills and even allows you to do without assistants.
But starting to do it yourself, you need to remember that there are certain rules for facing ceramic tiles. If you want to get a high-quality durable coating, they must be observed.
The content of the article
Cognitive tile information
When it comes about the decoration of the exterior walls of the house, the remarkable properties of ceramic tiles are of particular value, because the service life of load-bearing structures with such a coating is significantly increased. Modern production of finishing materials is developing so rapidly that in a fairly short time there are new products, as well as traditional, but somewhat improved products.
- This trend was not ignored by ceramic coatings - materials known to all, retaining their popularity for many decades. In this chapter we will tell you everything. about facing ceramic tiles: the composition of the raw materials used in production, molding methods, coating options for the front surface. A video on this topic will also be presented to your attention.
Production methods
Building ceramics are made in three main ways:
- The first and main way - this is a semi-dry pressing from powder raw materials, the moisture content of which does not exceed 7%. Almost all facade tiles are produced in this way, it turns out to be as durable and frost-resistant as possible.
- The second way is injection. In it, as a raw material, a slip is used - an aqueous clay suspension having a moisture content of up to 33%. In this way, tiles for interior decoration are produced.
- Third Tile Production Method carried out by plastic molding of products from masses, the moisture content of which is in the range of 15-20%. It is used mainly for the manufacture of imitations of brick and stone.

Clay raw materials contain mineral additives in the form of quartz sand, feldspar, vermiculite, perlite, glass or slag. As a result of technological processing of raw materials: molding, drying and firing - single or double, different degrees of sintering, facing ceramic tiles acquire a variety of properties.
Accordingly, they also determine the purpose of the tile:
- In order to obtain products of higher quality, the technology for manufacturing building ceramics is constantly being improved. All stages of production are being modernized, from the processing of raw materials to the decoration of the finished tile. Many manufacturers have their own original formulations, which allow both to strengthen the strength and improve the quality of the front surface.
- Some introduce ground porcelain into the composition of raw materials, or rather, waste from its production. Others add enriched coal, while others use glass components. The sizes of ceramic tiles also vary, but within the standard set for these products.

- GOST 13996-93 governs the production of 15 sizes of facade tiles, the largest of which is 300 * 150 * 9 mm.In this case we are talking about tiles designed for adhesive mounting. Cladding with ceramics can also be carried out according to the system ventilated facadeswhere the panels are hung on the frame.
- For this purpose, on the contrary, large modules are often used, the length of which can reach six meters - but today we are not talking about them. Adhesive cladding with large-format ceramic tiles on vertical surfaces is not welcome.
A large weight requires anchor fixation, otherwise it will not last long. The price of coverage is also increasing - and this is not beneficial to anyone.
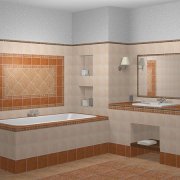
Most often, facade tiles imitate the shape of a brick, and are close in size to it. The photos shown as an example are the best proof of this.
Tile Decor
The tile acquires its basic properties after applying a decorative layer to it. It is he who makes the shard waterproof and immune to pollution. Well, of course, the aesthetics of the product also depends on it.
- Ceramic products are decorated in a variety of ways. For example, a tile is glazed: after a single firing, a thin layer of an aqueous dispersion of glass powder is applied to it, but previously an underglaze layer is applied to the surface.
- This is done to improve the adhesion of the glaze with the shard, as well as to prevent the formation of gas bubbles in the glaze. After this product is sent to the furnace for secondary firing. To obtain a colored tile, mineral pigments are added to the raw material charge, and they are also applied under the glaze, or heat-resistant dyes on it.

- Thanks to the computerization of production, in recent years both the formulations of glaze and the methods of its application have undergone significant changes. If previously it was believed that double-fired tiles have the best quality, today the situation has changed radically.
- Many European manufacturers prefer a single firing. The aesthetics of the tiles is also improved due to the repeated introduction of pigments of different colors into the raw material mixture with layer-by-layer pressing.
- To obtain the color gamut inherent in natural stone, soluble salts are introduced into the mixture along with mineral pigments. The ceramic base, by analogy with a laminate, can be pressed with a decorating material having a given pattern. This method is often used in the production of granite.
In the production of facade tiles, as well as stove tiles, a relatively new invention is used, which is called: ceramic mass for facing. This is a raw material mixture, including fusible and refractory clay; porcelain and glass battle; expanded vermiculite sand and sulphite-yeast mash.
Such masses make it possible to obtain a stronger and lighter weight tile with excellent thermophysical properties.
Facing work
Choosing a beautiful and high-quality tile is only half the battle. The main thing is that the technology of ceramic cladding is met exactly. Only in this case, the result will please, and there will be no extra costs.
The instruction presented in this chapter is to help those who are faced with this work for the first time:
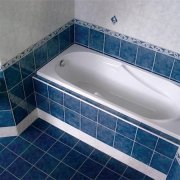
- Facing the facade of a house is not the same as wall decoration in the kitchen or bathroom finish. First of all, the volumes of work differ. Therefore, so that the process of their implementation does not become too time-consuming and does not drag on in time, you need to purchase a tile cutter.
In addition, you will need a drill with drills and a nozzle "mixer"; tile cutters; rubber mallet; rule with level; marking cord and plumb line; notched trowel; curved embroidery and brush - and even better spray. Well, of course, you should take care of the scaffolds or forests that allow you to work at height.
Adhesive quality is the key to a durable coating
The main consumable material used in the performance of cladding work is the adhesive solution. You can make it yourself, but you can buy it.
- The second one is somewhat more expensive, but with a small amount of work, this difference is not too significant. If the building is large and it is supposed to be completely lined, it is more profitable to mix the solution yourself. We draw your attention to some significant nuances.
- Cement is the binder of the mortar for mounting ceramic tiles. When it comes to outdoor work, the brand of cement used should not be lower than M300 - in any case, when the base for facing is concrete or brick.
- Relief is permissible only for installing tiles on plaster, insulation or when facing asbestos-cement partitions inside buildings. Here is one of the rules adopted in construction, which should be observed: the strength of the adhesive solution should be close to the strength of the base.
- In order to strengthen the strength characteristics of the adhesive layer, modifying additives must be present in its composition - they are also in factory mixtures. So that you do not have to dose these or those additives when making the solution yourself, it is easiest to buy plasticized Portland cement.

- The necessary additives are used in its production, while the brand of cement rises to M400 or M500. The plasticizing effect is necessary to reduce the proportion of water in the solution, and, consequently, increase its density. In this case, the composition acquires frost resistance and water-repellent properties.
- Sand is also an obligatory element of tile glue, and it would be a mistake to think that its quality does not affect the quality of the solution. Affects, and how! For the manufacture of facing solutions, sand should have a medium or large fraction and the content of impurities in it should not exceed 1% of the total mass.
- The ratio of cement to sand in the solution depends on the brand of cement. If it is M500, then the dry ingredients compose 1: 6. Water is added until a convenient consistency is obtained - this is approximately 30% of the total mass of dry aggregate. By the way, repair of ceramic tile cladding can be done with the same solution.
The amount of glue made in one batch should be such that it can be managed to develop before loss of ductility. It is useless to reanimate a hardening mixture by adding water to it.
Base preparation and cladding
The durability of the facade ceramic finish depends not only on the quality of the tile and the correct mortar for its installation. An important role is played by the quality of the base, which is to be faced.
So:
- In order for the result to ultimately please, the vertical surface must be thoroughly cleaned, if possible smoothed and primed. External corners in ceramic tile lining are of utmost importance. They must be smooth, otherwise it will be difficult to mount the corner tile elements.

- The corners, as, indeed, the walls of brick houses, are especially sinful. Therefore, the first thing to do after stripping is hanging. That is, with the help of a plumb line and a rule, it is necessary to identify deviations of the surface from the vertical, circling them with chalk. All the recesses with a depth of more than 1.5 cm must be plastered - for this you can use the same mortar that will be used for gluing tiles.
- If the irregularities turn out to be more significant, ceramic tile technology provides for the preliminary installation of the plaster mesh. Do this throughout the area or only in those places where there are recesses, you need to navigate according to the situation. For alignment of corners it is better to use a plaster corner with a grid.

- In any case, the mesh will improve the adhesion of the mortar to the base base and make the lining more durable. If the walls are very uneven, in order to bring their surface into a single plane, it is necessary to install beacons before plastering. How this is done correctly, you can easily understand by watching the video. After the walls are aligned, the sticker of the tile becomes, as they say, a matter of technology.
- The main thing that you need to pay attention to is the thickness of the adhesive layer. It must be at least 7 mm and must not exceed 15 mm. The minimum and maximum thickness is set by building codes. The fact is that when facing, especially in hot weather, water from the solution is actively absorbed by the heated surface of the walls.

Note! The thinner the adhesive layer, the faster it loses moisture, which means that the strength of the screed will decrease. As a result, the tiles will peel off the walls - if not immediately, then in the near future. Therefore, sun-heated surfaces are not lined.
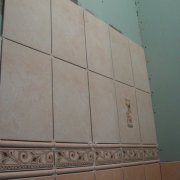
- Excessive thickness of the adhesive layer also contributes to the loss of tiles. In this case, the reason is the shrinkage of the solution. That is why, when facing tiles, they are not mounted closely, but horizontal and vertical seams are left. Their uniformity is ensured by installing crosses between the tiles.
- The permissible width of the joints is also regulated and depends on the format and thickness of the tile. The horizontal seams are ensured by installing a wooden plank or metal corner along the lower perimeter of the wall. After all, the facing is from the bottom up, starting from the corners, and the starting bar serves as a support for the first row of tiles.
- If the wall is long, it is quite difficult to ensure the horizontal position of the remaining rows by eye. For reference, experts use a mooring cord. The verticality of the rows is controlled using a plumb line.

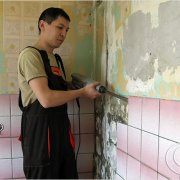
You do not need to wet the tile before the sticker. A solution is put on it with a notched trowel, leveled and pressed to the base. The position of the tiles in the cladding is adjusted with light taps of a rubber hammer, and excess solution is removed.
Then, without waiting for the solution to solidify, a sample is made from the inter-tile seams using curved seams. Subsequently, these recesses will be filled with grout.