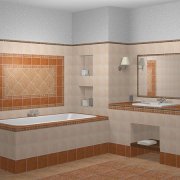
How to lay tiles on the wall in the bathroom - the experience of specialists
Laying tiles in the bathroom has its own distinctive features and methodology. In this article, we will consider the main points of this process and identify several important details and features during such repairs.
The content of the article
Progress
How to lay the tiles in the bathroom is decided by its size, the number of transitions and the screen in front of the bathroom.
So all the work will be done in several stages:
| Make a plan | First you need to make calculations. To do this, take measurements and select the tile. It can be of different sizes and you need to choose the optimal one. After all, waste should be minimized. |
| Material procurement | In this matter it must be taken into account that in any case there will be waste. And this is not less than 5%. Also, when buying, the instructions for the material should be studied. There are usage parameters. Also pay attention to the back of the tile. It should not be porous. |
| Plane preparation | The plane must be flat.
|
| Cladding | How to lay tiles on the walls in the bathroom will be described below. But do not forget that you must have the whole tool. They will need to not only lay the tiles, but also cut them. |
Laying tiles in the bathroom on the walls is also a creative thing. So it will be necessary to immediately draw up a pattern. The work management system will largely depend on this. Now let's take a closer look at how to lay tiles on a wall.
Preparatory work
Laying tiles on the wall in the bathroom begins with the preparation of the base plane. It is on it that tiles will be glued in the future. It is necessary to make a special screen (as a rule, drywall is used as the material for the manufacture).
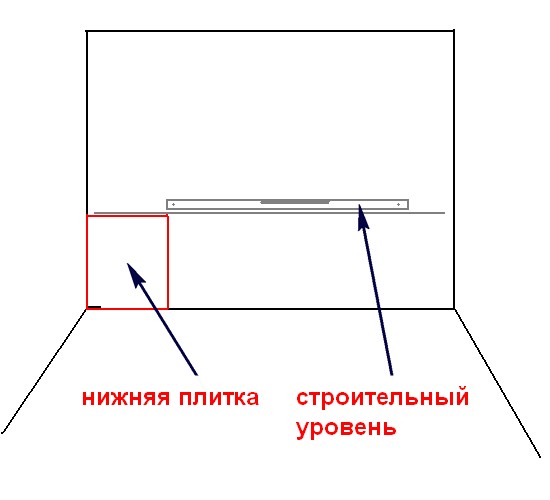
Initial actions are always the same. It is recommended to install the bath and connect it to the sewer. When installing, it is important to use a level so that it stands as flat as possible, while not making a bias towards the drain hole.
Attention: Modern types of bathtubs are designed in such a way that they already have a special technological bias, it is for this reason that additional tilting is not required during installation, it should be located strictly horizontally.
The construction of the screen can be done in several ways.
Using brick
To do this, you need to overlay the bath itself with material. It should be noted that the laying of bricks depends on its size (it can be carried out either only along the long side, or along the side and ends).
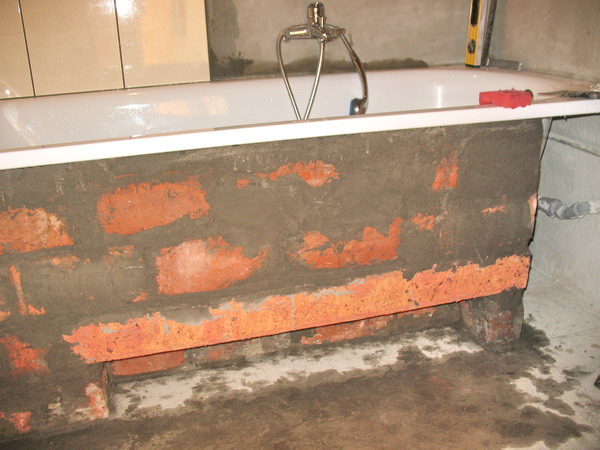
- Immediately prior to masonry, it is recommended to mark the perimeter so that the side of the bathtub protrudes outward, therefore, the brick partition will be located about a couple of centimeters deeper.
- It is not scary if the protrusion is slightly larger, this will only add space for the further plastering process (seeHow is masonry plastering done?) Work with the brick will be carried out according to the method of cracking it, since the material has standard dimensional characteristics.
Attention: In order for the splitting to take place neatly enough, it is better to use a grinder and diamond discs. Even the resulting debris can be used without much difficulty.
When performing masonry, it should be borne in mind that the upper rows are glued to the bath itself through a special tile adhesive. If you create a blank screen, you should leave a small hole for the legs in the central part of the bath, this will make it possible to have tight access to it in the future. Also in this case is done laying tiles on a putty wallThis will greatly enhance the adhesion of surfaces.
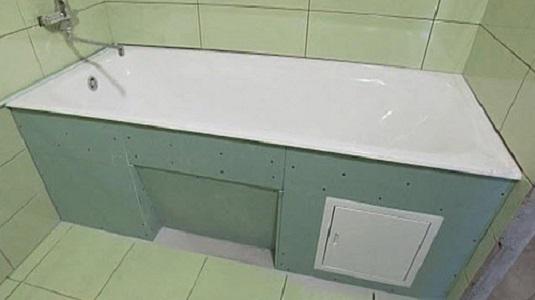
Using drywall
The price of the material is not large, and you get a flat surface. Then tile laying in the bathroom can be done without problems with your own hands. And time will take much less, unlike the first option.
- First of all, put the necessary marks using the level. It is enough to outline vertical lines at the edges that fit snugly on the side of the bathtub and set some marks on the floor.
- Further, in no hurry, you need to move the marking lines slightly inland, making it partially recessed. After the process of laying the tile, you will notice that it will lose the ability to speak. And it will be on the same level with the side.
- In order to correctly conduct indentation calculations, the sizes of the materials used should be taken into account. When adding these indicators, the value of the necessary indentation will be revealed.
- Next, attach the profile itself with dowels. The process of installing a CD profile begins with obtaining the details of the required length, after which it is inserted into the already fixed profile and fixed with several screws. In order to avoid deflection, it is better to fix it by means of wedge-stops made of wood.
- The profile will be firmly held by sticking wedges to the side of the bathroom. At the final stage, the resulting frame must be sheathed with drywall, do not forget to pre-treat the ends with a sealant, which will subsequently repel moisture.
We also note that not only the above materials can be used to create the screen, foam blocks and plywood sheets, which are characterized by increased moisture resistance, are also perfect.
Cladding
The first thing is better to decide. What kind of tile will you use in the future. In most cases, for the design of the screen, the same option is used as for the decoration of wall surfaces, however, the use of another variety also takes place. The subsequent process consists of several stages.
Surface preparation
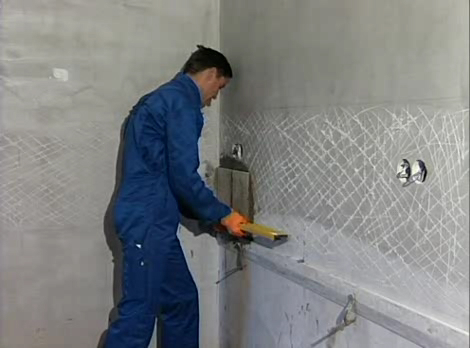
In this case, you should adhere to several fairly important rules:
- When using brick, you should purchase a light plaster, and after drying, apply the soil;
- If the work is carried out with the help of drywall, then it is enough to carefully ground it. In this case, it is better to choose a primer so that it has the ability to repel moisture;
- To carry out the process of gluing a mesh on a chipboard, use a special metal reinforcing mesh, in this case, tile adhesive must be applied in a small layer over the mesh.
Defining a tile layout
In cases where it is necessary to cut the tiles, it is better to lay the cut layer where they will be the least noticeable.
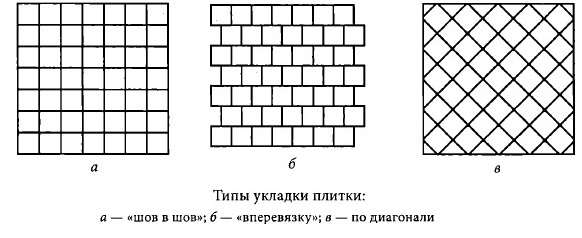
- Place the horizontal row at the very bottom, and it is better to start marking from the side of the bathtub.
- As for the vertical row of that tile. Which has been cut, its placement should be in the most inconspicuous corner.
- If during the calculation it turns out that the gap is too small, it is better to start the calculation from the central part, then the corners will be covered with tiles of equal size.
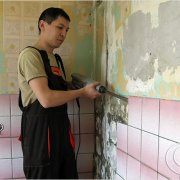
Laying tiles
This process also has its own specific rules of action.
Consider the main ones in order:
- It is better to start the work directly with the preparation of glue, as a rule, it is sold in the form of a powder, which is recommended to be diluted with water, taking into account the necessary proportions - they are indicated on the package itself;

- The resulting mass must be applied to the surface of the screen, and it is better if it is a small area on which several tiles will fit, this is due to the fact that the adhesive has the ability to dry out relatively quickly, and the leveling process is best carried out using a spatula with teeth;
- The tile should be fastened only according to a pre-made marking, and in order to clarify the correctness of its location, it is enough to slightly press on it;
- Glue is applied not only to the wall, but also to the tiles as well. After that, it is applied and pressed tightly, excess solution is removed. First, the row is laid out dry on the floor and is tried on. After all, everything should fit perfectly. If the item does not fit, it is adjusted using a tile cutter or grinder.
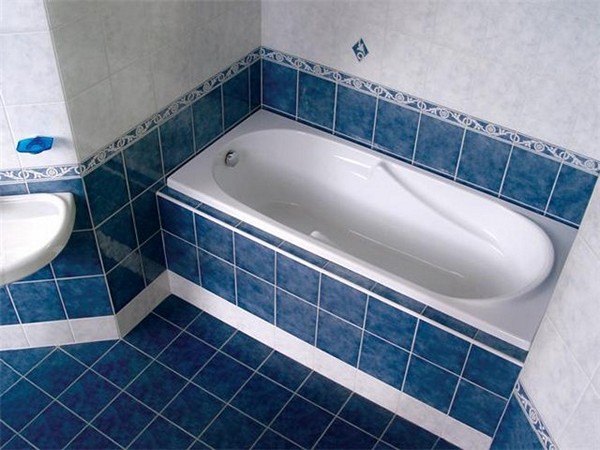
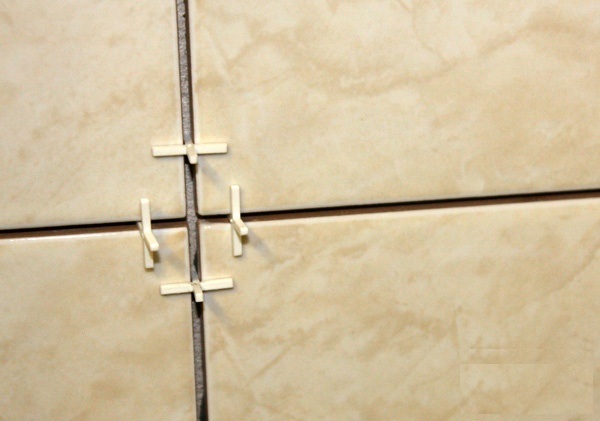
- To comply with the masonry, the seam is determined using plastic crosses. Then the seam will be uniform.
- The rest of the tiles are laid out in a similar way;
- After the glue has completely dried (no earlier than two days), it is recommended to wipe the seams so that the surface is as tight as possible. If necessary, the joints can be further treated with silicone sealant.
This kind of design makes it possible to create not only harmonious, but also impeccable interior of the bathroom. It should be noted that this finishing option helps to hide from the surrounding appearance of the pipes and the surface of your bath.
Some important tips
Particularly noteworthy are the advice of specialists with considerable experience in this field of activity:
- The part under the bathroom can be removable and created using magnets, especially since this will make it possible, if necessary, to remove it without much difficulty;
- In the central part do not forget about the leg hole, and in length it should be no more than 40 cm, and in height not exceed 15 cm.
- The screen should not be completely dull, since in case of emergency you have to completely disassemble the entire structure;
- For frame more suitable metal profile, characterized by increased strength;
- The resulting joint between the bath and the stove is recommended to be treated with special grout or silicone.
The screen under the bathroom, decorated with tiles, as a rule, is distinguished by its beauty and accuracy. It not only makes it possible to isolate the unpleasant appearance of the part under the bath, but also significantly reduces the amount of time spent on cleaning.
Now you know how to properly lay the tiles on the wall in the bathroom and you can do everything yourself. Before doing work, watch the video in this article and photos that will help you do everything as quickly as possible and without errors.