Ceramic tile clad routing: process organization

The routing for facing with ceramic tiles is a completely official instruction, according to which the future tilers and mosaics in educational institutions study the basics of this process. It provides everything: from the organization of work, to their technical and economic indicators.
In this article, we will try to summarize the contents of this document in a compact manner, as well as present to your attention a video on this topic.
The content of the article
How to organize work
Technological map for wall cladding ceramic tile provides for three stages of work. These include: preparation of substrates, tiling of surfaces with mastics and cement mortars, as well as finishing of the tiled surface.
Necessary tools
Before proceeding with the facing work, you must have at hand the following list of tools and accessories:
| Tool view | Application |
 Prefabricated scaffolding | Scaffolds, goats, or stepladders are selected, depending on the height of the room, and the forthcoming amount of work. |
 Tile Sorting Template | Tiles should be sorted not only by shades, but also by size, since deviations often occur during its production. This is done using such a template, which is shown in the photo. It is easy to do it yourself. |
 Tile cutter | At facing of a small bathroom or the working wall of the kitchen, you can use a diamond glass cutter. But when performing large volumes of work, a tile cutter is indispensable. |
 Ceramic Nippers | Tile nippers have different sizes, as well as differing clamp designs. To contact with a rough surface you need a toothed clamp, and for a slippery glazed surface - a straight line. This tool is used to bite pieces of tile along a curved cut. |
 Tile Hammer | A rubber mallet is used to upset the tiles. This is especially true when it is installed on a cement mortar. |
 Rule level | Using the construction level, leveling the surface horizontally is performed. A rule is used to level the walls, but there is an option that replaces both tools. This is a rule with the level that you see in the photo. Using such a tool is very convenient, and the price does not matter here. |
 Plumb | This tool is necessary for hanging surfaces vertically. |
 Marking cord | The dyeing thread helps to draw marking lines on the surface if you need, for example, to draw the upper border of the cladding, or mark the contours of the panel. |
 Notched trowel | In general, to work with tiles, you need three spatulas: two steel - straight and serrated, and one rubber, which will be needed when grouting. |
 Drill with Drills and Nozzles | You will probably need a drill not as a drilling tool. Using the “mixer” nozzle, you will mix dry glue or mortar. The nozzle "crown" in the tile can cut a hole for the outlet. |
 Macro brush | A brush or roller will be needed for applying to the base of the soil solution. |
This is not even a complete list of tools, which provides a routing: ceramic tile lining, produced on large areas, may require the presence of such equipment as: spray gun, compressor, mortar and mixing plant, pneumatic hammer.
Organizational requirements
Since the work can be carried out not only inside the building, but also outside, the technological map for facing the walls with ceramic tiles gives general organizational recommendations. For example, it says that before starting the cladding it is necessary to finish all other work, the production of which could lead to damage to the decorative surface.
So:
- This refers to such works as: arrangement of the roof, installation of window and door blocks, all types of hidden electrical work. The preparation of rooms with high humidity looks like this.
- First you need to waterproof the floor and leveling screed. If primary finishing is carried out, before starting the facing work, risers and pipe wiring leading to the plumbing fixtures should be mounted and crimped, brackets for their installation should be installed.

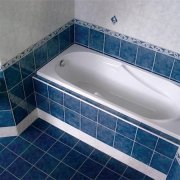
- According to the data sheet, bathtubs must be installed and wired up before tiling. But, as practice shows, bricked up the bath, nevertheless, is not worth it.
In any case, if at the same time access to its drain pipe is blocked. It is most convenient to install the bathtub after finishing the facing work, and to sew up the space under it with drywall or cement-bonded particleboards along the frame, as shown in the picture above. This design is easier to disassemble if necessary. - The air temperature in the room where the facing works are carried out should not be less than +10 degrees. If the decoration is done in a newly built house in the winter, it should be pre-heated, or use a heater.
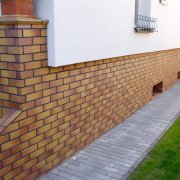
- If in the winter time the exterior finish is done with adhesive tiles, then the temperature of the solution should be at least +15 degrees. When performing facade tile work, a site around the perimeter of the house should be planned, a place reserved for storing materials, a lift is installed to move the materials vertically.

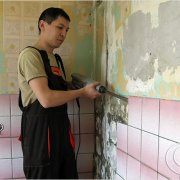
- First, the walls are hung plumb. Deviations in the plane of the base when mounting the tiles on the mortar should not exceed 15 mm. Otherwise, the surface should be leveled. It is not necessary to smooth and grind the cement screed. Concrete surfaces are pre-incised with a bushard, or a pneumatic hammer.
- In order for the ceramic tile to be mounted on mastic or glue, the deviation of the vertical marks should not exceed 5 mm per meter of height. When irregularities are within normal limits, the walls are simply cleaned from the influx of mortar, dust. If there is rust or greasy stains on the substrate, they must be removed and the surface washed.
As for the thickness of the layer connecting the base and the tile, the recommendations are as follows: if it is a cement-sand mortar, the thickness of the layer can be between 7-15 mm, the thickness of the adhesive layer (mastic) should be about 3 mm. The uniformity of the width of the seams is achieved through the use of plastic wedges or crosses, and usually does not exceed 5 mm.
Making mastic and the order of work
Today, there are many types of mastics and dry adhesives for tile work on sale. By lining a small bathroom, it is much easier to use the factory-made version.
If the volume of work is large, for example: the facade of the house, or floors throughout the house, then buying ready-made mastic is an expensive pleasure. Meanwhile, it is not difficult to make it yourself.
- The routing for ceramic tile flooring provides a recipe for polymer-cement mastic designed for loading a mortar-mixing plant with a capacity of 80 liters.For this, the following ingredients are needed: sand 14.2 kg, Portland cement M400 71.5 kg, dispersion PVA 2.8 kg. Water is added to a working consistency - approximately 30% of the volume of the remaining components.

- First, the required amount of PVA dispersion is mixed with water, and then, with continuous stirring, the remaining components are gradually added. The consistency of the mastic should be such that it does not run off when applied to the surface, and the tiles glued and deposited with a rubber hammer do not slip. It is necessary to develop such a composition in a maximum of 4 hours.
Note! Depending on the application of the mortar or mastic, the order of technological operations is somewhat different. In the first case, it is like this:
- Checking the verticality of the base
- Marking and sorting of facing material
- Installation of lighthouse tiles
- Soaking tiles in water, and applying a solution to them
- Installation, upsetting and wedging tiles
- Grouting and cleaning the finished cladding

If mastic is used, then it looks like this:
- Primer treatment
- Alignment
- Marking and installation of beacons
- Application of mastic
- Tile installation
- Grouting and surface cleaning
Typically, floor cladding is performed last, after the walls are ready. In order to support the first row of tiles on the walls, a rail or metal profile is mounted on their surface.
- Given that the base of the floor is already leveled, the indentation of the first row of wall cladding is done only by the thickness of the floor tiles. If the cladding will not be carried out to the floor, as, for example, is often done in the kitchen, the profile is mounted along the marking line.

- In the case when baseboards must be mounted along the lower perimeter of the walls, the supporting profile is mounted taking into account the thickness of the floor tiles, plus the height of the baseboard and the thickness of two horizontal joints. Then, after the walls, the floor is lined, and the plinth tile is installed last.
- To make it easier to control the thickness of the adhesive layer, and, accordingly, the vertical lining, tile beacons are installed in the corners, and a mooring cord is pulled between them. They are guided by them so that in the process of work they do not deviate from the vertical or horizontal. In any case, each row should be controlled by the level applied to the lighthouse and the laid tiles.

- It is recommended to lay the tiles of the first row, starting from the middle, and moving left and right to the walls. This is done so that the cut tiles are in the corner zones.
The second row can already be installed, starting with the extreme tiles. Edges of incomplete tiles that have to be used as additional elements must be ground using an abrasive wheel or a grinding machine - then they are joined as tightly as possible. - The procedure for laying is as follows: a solution is applied to the tile, and a relief is made with a notched trowel. The tile is pressed tightly and upset with the handle of a spatula, removing the squeezed out excess solution. The lined surface must be wiped during operation, since the hardened solution is difficult to remove.
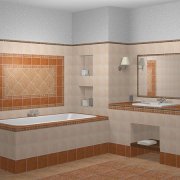
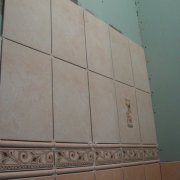
- Laying tiles can be made not only seam in the seam, but also razrabozhka, Christmas tree, according to the scheme "deck" or "maze". In design projects for the design of bathrooms, several types of patterns can be used simultaneously.
Schemes "seam to seam" and "checkers" on the walls are used more often. Other laying options look much more interesting on the floor, and it is much easier to perform them on a horizontal surface.

- To wall the walls apart, it is also necessary to install beacons and pull the cord.The width of the wall is divided in half and the tiles are laid out to determine its number in one row. It is only important to determine how the central axis will be: on the diagonal of the wall (floor), or on the diagonal of the tile.
- The key to the correct laying of tiles in reverse is the markup. In floor coverings, panels are often performed in the middle of the floor. In this case, first you need to apply its contours to the floor base, and then mark the space from the contour lines to the walls.
Typically, the floor area is divided into captures, as is done in the example above. Facing lead sequentially, starting from the far wall, and moving to the exit. The technology for facing works remains unchanged.

This article was useful to me. Thank!
I would like to know the information “about facing curved surfaces of ceramic tiles”