Glazed ceramic tiles: the right approach

In order for the wall lining with ceramic glazed tiles to please the eye and could become a “highlight” of the interior, you need to try very hard. Even if you bought a beautiful and expensive tile, but it was installed incorrectly, at least the aesthetic impression will be spoiled.
In the worst case, the cladding may simply crumble from the wall - and this is a direct loss. If you have already decided to do the tiling with your own hands, do it according to existing technologies, and our instructions and video will help you with this.
The content of the article
Tile selection
Currently, the choice of ceramic tiles is so huge that it can be difficult for a person to decide which option to give preference to. The times when tile cladding was the prerogative only for kitchens have long passed, see Finishing the kitchen with tiles according to all the rules) and bathrooms (see Facing the bathroom with tiles: instructions for completing the work).
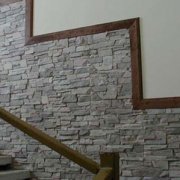
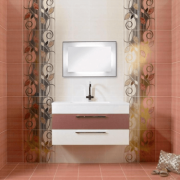
- The wonderful facial design of modern tiles allows you to use it in the design of residential premises. We think that the photo at the beginning of the article confirms this without further ado. The living room is large enough, and for placing emphasis in the interior, two types of relief tiles were used here.

- Therefore, before you buy ceramic tile, you need to take into account not only the purpose of the room, but also the concept of its design. Of course, not everyone will be able to come up with an interesting design.
- In any specialized store there are stands with photographs that show the options for combining tiles available on the market. Moreover, to the wall cladding, flooring of the same series and decors for them are also offered.
- This mainly concerns bathroom finishes. But, if you decide to use glazed ceramic tiles for interior decoration of a living room, you can reproduce the original design idea in your home by choosing the option you like on the Internet.

In principle, tiles are being produced now, the front surface of which imitates the texture of natural materials: wood, leather, stone (see Ceramic stone tiles for interior decoration: key features), brick. It is enough to wall it with a floor and at least one wall, and you will get a beautiful interior, if, of course, such an emphasis is correctly entered into the general concept of the room.
Glazed tile for interior decoration
The fact that ceramic glazed tiles for interior wall cladding is made of clay is known to everyone, but few people know how such a decor is carried out. Glazing is one of the options for processing ceramics.
- A product with such a facial decor differs from unglazed tiles in a very strong and smooth surface layer. Glaze not only ennobles the appearance, it also closes the pores of the burned tile, making it practically immune to moisture. Moreover, the price of a tile may depend on how many layers of glaze it has - one or two.
By the degree of decorativeness, glaze is:
- transparent glossy
- opaque color
- translucent color
- matte
- dull white
This variety is achieved by arranging the various ingredients, and changing the timing of the firing. It is during this technological operation that the most important processes occur that affect the moisture permeability and strength of the products.
- Ceramic floor coverings differ in component composition from wall tiles. Since they are subject to higher requirements regarding abrasion and strength, additives such as volcanic glass (perlite) are introduced into the raw materials; silicate rocks; talc; magnesite. The firing temperature increases significantly.

- The process of decorating tiles, in addition to the glazing operation, includes three more steps: staining, pigmentation and engobing. The glaze itself is an aqueous suspension of glass flour. The strength of this layer is achieved through secondary firing.
- In order for the tile to be painted over the entire mass, the pigments are introduced into the composition of the mixture. But the coloring is done superficially, with the application of the coloring composition either under the icing or on top of it. As for engobing: this is the underglaze layer, ensuring proper adhesion of the crock and glass fill.
- Manufacturers strive to improve the technology, try to improve the aesthetics of products, developing new reliefs and patterns, using photo printing. In the manufacture of ceramics, multiple introduction of colored granules into the raw materials, with layer-by-layer pressing of products, is also used. As a result, ceramic tiles become very similar to granite and marble.

- If a smooth tile is first pressed and then decorated, then to obtain a relief, its base is pressed together with the decorating layer. All the decor options mentioned above are used not only for ceramics, but also for porcelain stoneware.
The structure and production technology of these materials has nothing in common, and in appearance it can be difficult to distinguish between them. Previously, porcelain stoneware only imitated stone, and was used mainly for facade work, but today in design it practically does not lag behind real ceramics, and has long moved to residential and office interiors.
How to properly wall
Tile cladding is the most durable coating, and if it is done correctly, it will serve for several decades. Therefore, it is performed once and for all.
If the decoration is in the new building, then you need to keep in mind that tile laying can only be started at a certain stage of the building’s readiness.
Preparatory stage
The premises must be completed: insulation work; all leveling screeds, including ceiling and floor; and also installed door and window blocks. Before starting the lining, you must complete the laying of pipelines and the wiring of electrical wires.
All fasteners designed for equipment installation must also be installed in advance.

- The requirements for the preparation of surfaces, as well as the facing process itself, are regulated by a standard technological map (TTK). It says that concrete surfaces, as well as brickwork with full seams, must have a notch. It is carried out with the help of a notch hammer or a drill with a “butchard” nozzle.
- After that, you can start painting the ceiling and those fragments of walls that will not be revetted. If the tile will be combined in design with a roll coating, then it is glued after the tile.
Laying the flooring should be done after facing all vertical surfaces.Simply, the marking of the first row of tiles on the wall should be carried out taking into account the thickness of the floor tiles, as well as baseboards, if such is provided for in the design.
Work order
If the walls are pre-qualitatively aligned, you don’t even have to hang them before facing. You can immediately start marking the starting line - an aluminum corner is mounted on it, on which the first row of tiles will rest.
So:
- With large volumes of work, craftsmen install string beacons, and in a small room, you can do without them. Then they do this: the wall is divided into four captures using a dye cord, or, as in the picture below, a laser level gauge.

- Since the lining is from the bottom up, then first, on one of the lower grips, ordinary tiles are installed. The same thing happens on the second lower grip, after which you can go to the upper tier. Only corners remain empty, where full-sized tiles, as a rule, do not fit.
- After completing the installation of ordinary tiles along the entire height of the cladding, you can start cutting the corner elements. This is done using a glass cutter, or a hand saw. Professionals usually have at their disposal a tool called a tile cutter. Edge grinding can be done on a regular abrasive wheel. Facing the door slopes is the last.
- In those days when the current SNiPs and TTKs were developed, ceramic tiles did not differ in special quality. Therefore, these documents stipulated its mandatory sorting by template, and soaking before installation. As for the irregularities of the tile, they, of course, often take place now. It all depends on the manufacturer, and, of course, its cost.

- But the deviations from the nominal sizes are not so large, and can be detected visually. As for pre-wetting, it now does not need to be done, since, thanks to modern technologies, glazed tiles are almost waterproof.
- It is enough to ground the surface before facing with concrete contact (see Concrete contact - primer for surface preparation), and you can glue the tile. All modern building mixtures, which include tile adhesive, are now sold in dry form. It is already balanced by the manufacturer in terms of components, and it remains only, according to its instructions, to add water.
- In such mixtures, there are modifying additives that improve the plasticity of the solution, enhance the adhesion of the layers, and increase the strength of the screed. So, with proper surface preparation, and using factory glue for installation, the tile lining will hold tight.

- But in order for it to be not only durable, but also beautiful, it is necessary to ensure that the tile seams are the same thickness. It is provided due to plastic crosses inserted between the tiles. It is important that after facing, no hardened solution flows remain on the surface.
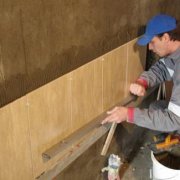
- This is especially true in cases where the installation of tiles is done on the solution, with the simultaneous alignment of the walls. TTK does not provide such a method of installation, but in practice, many masters, saving time, work just that. During installation, excess mortar is removed with a spatula, and the cement milk remaining on the glaze is washed off with a cloth moistened with hot water.
- Ideally, the thickness of the solution layer should be between 7-15 mm. When there are deeper troughs on the wall, they must be leveled in any case. If the tile is glued to an already leveled surface, the thickness of the adhesive layer usually does not exceed 3-4 mm. As a rule, it is regulated by the manufacturer of glue.

- Speaking about tile cladding, one can not help but say that there are several ways to lay tiles. The simplest, and therefore the most common, is the chess method, when a tile is laid in a seam in a seam, as if drawing a wall into squares or rectangles.
- A more complex and very beautiful laying option is the diagonal way, when the tile is not located along the horizontal lines, but along the diagonals. In this case, the marking of the walls made before the cladding should be carried out taking into account this installation scheme.
- In general, the choice of a particular laying method is dictated by the configuration of the tile, the nature of the relief or pattern on it. Small rectangular tiles can be laid with offset joints, simulating masonry. There are schemes "herringbone," labyrinth "," deck ". Some styling methods, like tile formats, can be combined in the design.
- You just need to remember that large tiles in a small room will not look. For visual expansion of space it is better to use a smaller format. The rectangular configuration of the cladding elements can affect the visual perception of the dimensions of the room. In a room with a low ceiling, it should be placed vertically.

- If the room is narrow and long, the tile can be placed horizontally on a short wall. The diagonal way of laying square tiles also helps to expand the space visually. And, of course, the right combination of shades, the selection of decors for cladding, and their location on the walls contribute to this.
As you can see, ceramic tile is not only a material for a banal bathroom lining, but also a great option for the implementation of the design of any other room. To make it exclusive, you need to make a lot of effort and creative imagination.