Insulation of walls from the inside with mineral wool plus drywall: Part 1

We welcome all our regular readers, as well as beginners, who have stopped by to find out something on a specific topic. You have come to the address!
With this material, a small series of articles on the decoration of attics and attics in private houses and cottages starts. We will start with the insulation of the room, namely: insulation of the walls from the inside with mineral wool, plus drywall.
The content of the article
We rise under the roof
As usual, we will consider the workflow as an example of a specific object, in the decoration of which the author of the article was directly involved. At our disposal was a fairly spacious attic (46 m²), which the owner of the house, for reasons known only to him, decided to convert it into a living room.
Visual assessment of upcoming work

Going upstairs, we saw the following picture: the floors are littered with drywall and boards, from which we had to assemble a frame for drywall. Their end section was 25x100 mm, and their length was about six meters. All this greatly complicated our task, since the constant movement in a heaped room takes up a lot of strength, nerves and time.
Advice! Always, at the first opportunity, take away from the room all the tools and things that are unnecessary in the process of work in order to provide yourself with the most comfortable conditions.
But the main difficulty was different:
- Non-planed boards, like any inexpensive lumber, should not serve as the basis of a drywall frame, as they have many irregularities, and can be behaved in planes.
- Boards may have thickness differences. This shortcoming can be eliminated during the installation process, but it will take you more time.
- This type of frame will not work if you intend to paint the walls in the future, since over time the board may crack and deform, which will lead to cracks at the joints of the drywall sheets.
- The large dimensions of the boards exclude the possibility of working alone.
We set to work, only making sure that the customer is going to glue the wallpaper (seeWall repair and wallpaper sticker: do it yourself), in addition, he did not present special requirements for the evenness of the walls.
Advice! If you want to create a high-quality finish in the room, then you should not save on the material for the frame, since when you collect it, you lay the future strength and evenness of the entire structure.

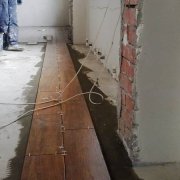
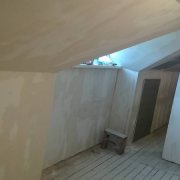
In the second half of the room there was a chimney and a hatch with stairs, which we also have to ennoble. The pipe, as an object in the middle of the room, does not cause any particular difficulties during the work, but we will encounter it several times along the way and tell you how to properly sheathe the space around it.
Preparing for insulation

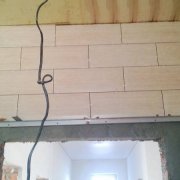
In the photo above, the numbers indicate a group of vertical beams that will form the basis for the future wall. They were installed by "roofers" to strengthen the roof supporting frame. It is between them that we will lay the insulation.
- But before starting the mineral wool wall insulation, it is necessary to make a base for the heat insulator, which will hold it in the planned openings.
- For these purposes, you can use ordinary belts from a rail screwed to the back of the beams. This method is suitable for those who want to save a little.
- But in our case, it was required to leave access outside the walls for maintenance of communications laid behind, including heating.
Accordingly, moving a person outside the walls with an open insulation will cause certain inconveniences, so we decided to completely sew up the back of the beams with 10 mm OSB panels.

For ceiling planes, nothing of the kind will have to be done, since the insulation will hold due to its own weight and density, which does not allow it to bend much. Therefore, even before laying the first sheets of mineral wool, we begin to mount the frame under the drywall, which will hold the insulation.
We did it as follows:
- First of all, they wrapped belts on the ceiling. If you, like us, are assembling the base from planks or battens, then constantly check with a thread to avoid strong distortions of the plane.
- Also do not forget to pre-check the evenness of the beams themselvesthat you fit into - no one guarantees the correct location.
- Next, we mount the upper belts on inclined planes. Do not immediately install all the belts, otherwise it will be much more difficult to lay the insulation.

Attention! How to geometrically accurately assemble a wooden frame of such complexity, we will describe in the next article, where we will directly touch upon the installation of drywall, and for now we will consider the main issues related to insulation.
The choice of insulation and its installation
The purpose of any insulation is to create a heat-insulating layer that prevents the interaction of temperatures. Today, there are many types of these materials, among which mineral wool occupy a special place, since as before, they remain an affordable and reliable solution for the user.
What you should know about mineral wool
Mineral insulation for walls (wool) is the generalized name for a group of heaters from inorganic raw materials made by similar technology, but from different materials. They have a fibrous structure containing an air gap, so that they are able to retain heat in the room.
Mineral wool is made from some types of rocks, slag and glass. All raw materials have non-combustible properties, as a result of which, the finished product becomes suitable for use in rooms with a high temperature, and with a high probability of fire.
Mineral heaters are produced in three types: rolls (it is convenient to use when laying between long beams of floor floors), layers (the best solution for warming facades and frame walls) and cylinders for insulation of pipelines.

So:
- Glass wool - This is the most common budget decision, the average price of which is 120 - 150 rubles per square meter (two layers). It is produced mainly in rolls, but recently there have appeared options in the form of plates for insulating facades.
This insulation is very light and able to decrease by compression by 6 times, which greatly facilitates its transportation.
Glass wool fibers are very small and spiky, and can easily penetrate even under tight clothes. They are harmful to human breathing, therefore, when deciding to warm with this material, take care to completely cover it and prevent harmful particles from entering the air in the living room.

- Stone wool - This is a material made mainly from basalt. In terms of heat-insulating properties, it is much better than glass wool, in addition, it tolerates vibration and mechanical loads more resistant. This material practically does not absorb moisture and does not burn. It was he who we chose to warm our facility.
- Basalt wool does not contain glass, and is relatively harmless to human health. It comes in different densities, so be sure to check out the annotations before you buy.
The instruction contains information about the thickness and density of the material, which is important for the selection of material. Tighter options are designed for flat areas with potential mechanical stress. Soft cotton wool is designed for structures with curved geometry, not experiencing stress.

- Slaggy - This is a rather specific material, which is made from waste blast furnaces in the smelting of cast iron. It has a whole set of disadvantages, it retains heat much worse, so we will omit the review of this insulation.

What is still good mineral wool for use in private homes and cottages? Few people think about this, but the factor is very significant - it is resistant to rodents, in contrast to, say, polystyrene, which they simply adore.
We think that few people will want to have these pests in the neighborhood, which over time can process almost the entire insulation layer, you yourself know what. Yes, and the constant clatter of small paws on a voiced foam overhead will cause a lot of inconvenience.
Of the disadvantages that minerals have, it is worth noting the following:
- The allocation of phenol-formaldehyde vapors is still an open question, since there are no precise observations on this issue, but the study of the insulation itself shows that the amount of resins in modern materials is negligible, and it is officially believed that they cannot harm human health .
- High dusting - this drawback greatly complicates the work with this material, especially for slag and glass wool. It is recommended to work in tight clothes with long sleeves, using glasses, gloves and respiratory protection.
- Fear of moisture - some types of mineral wool do not tolerate the effects of moisture, because when wet, they lose their insulating properties. So, when moistening glass wool by 2%, the thermal conductivity of the material increases by 10%.
That is why, mineral insulators must be covered on both sides with special insulation. An under-roof waterproofing film acts on top of this layer, and a vapor barrier layer on the bottom, blocking the access of moisture from the room, but more on that later.
Start to warm up
In this chapter, the technology of wall insulation with mineral wool will be presented to your attention. We will try to cover the entire process as fully as possible, focusing on the main subtleties. However, we will not forget about important trifles.
At the end of the article, you will find the video “wall insulation with mineral wool”, in which the process will be repeated in action.

We will warm the room in three layers, which will be 15 cm of insulation. On paper, the thermal insulation properties of mineral wool are quite large, but in fact, to achieve a good effect in a cold, blown place, such as an attic or an attic - three layers is not a luxury, but a necessity.
We will start from the ceiling and bevels, since at this stage it is most convenient to lay insulation in these places. We take three layers at once, and insert them into the seat. Where for some reason this cannot be done, you can thread the plates one at a time.

After installing the whole layers, add pieces of insulation of the desired width, closing the opening completely. You can cut mineral wool with a clerical knife.
Make the cut piece a couple of centimeters wider than the installation site, so, due to compression, it will firmly close the cracks, and will not fall. Watching the video “insulating walls from the inside with mineral wool” will help you better navigate this process.

And now a very important point. Each layer should be staggered in relation to the previous one. This is done so that there are even fewer possible gaps, and the draft does not freely walk through the insulating layer.
The procedure will be as follows:

We seal the first layer. On the wall, this is easiest to do, since the insulation layer can stand statically and not fall. With the ceiling a little more complicated, but the basic principle is the same.

A solid slab of mineral wool of the second layer should close the joint of the previous one, and the mortise piece is placed on the other side. Similarly, all subsequent layers are set.
On the ceiling, we first install three solid layers at once, then insert the farthest piece, and shift the two lower plates. Next, the next inset is placed, and the lowest layer, etc., is shifted.
The process is very tiring, in addition, small spiky fibers are constantly showered on the head, but it is worth it, since the result will be much better.

If the frame does not allow you to freely move the layers, then in this case you can leave everything as it is, but it is recommended to close the joints of the joints of the layers with foam.
Make sure that the insulation does not hang loose in its place. Best when it is a little spring from the beams. So you guarantee a tighter connection.
If the voltage pushes the slabs out of the opening, then until you install the drywall frame belts, support them with scraps of the board or slats, as shown in the following photo.

Also, you can fix the plates with the help of special fasteners, but in our case this would cause some difficulties, since under each one we would have to drill holes in the base.
After you install the entire insulation, you can mount all the remaining belts, and go to the next step.
Vapor barrier
Next comes the previously mentioned vapor insulator - the membrane is stretched over the insulation and shoots with a building stapler.

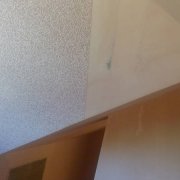
The vapor barrier is a thin film that is sold in rolls. It is designed in such a way that it is capable of passing steam through itself, but only in one direction. Therefore, it is very important not to confuse the parties, otherwise moisture from the room will fall on the insulation.

The photo above shows the two sides of the vapor barrier film. Please note that one of them is matte and the other is glossy. The first passes steam, and the second does not. That is, when rolling the film, make sure that the glossy side is directed inside the room.
It’s more convenient to do all the work together: one rolls the roll, and the other shoots the canvas. Tighten the vapor barrier tightly so that there are no sagging on the surface.

To join two pieces of film, make a small overlap (5-6 cm), and glue the joint with reinforced tape, which, having a good adhesive base, will reliably connect the joint.

If you install a vapor barrier on top of the frame, then make sure that it is not tense in the inner corners of the room - otherwise, it will interfere with the installation of drywall.
This, perhaps, concludes our review on the insulation of attics and attics. We hope you have received an exhaustive answer to the question: "Can walls be insulated with mineral wool from the inside?"
As you can see, all of the above works are easily done by one’s own hands, without the involvement of specialists. It is enough to know the nuances that we voiced during the article.
Read also the continuation:
- Attic decoration: how to install a wall made of drywall with your own hands - part 2
- Attic finishing: part 3 - do you need to putty plasterboard for wallpaper
- Decorating attics and attics: Part 4 - Do I need to prime the walls before wallpapering
And finally, the promised video in this article: