How to fill floor screed on lighthouses
The first stage of arranging the rough floor - pouring screed from concrete mortar. The quality of the installation of the finish decorative coating and heating floor equipment depends on how smooth the surface will be. To achieve a perfectly flat plane in construction installation of beacons for floor screed. These are long planks of metal, wooden blocks, plasterboard profiles or other products. Laid on the base, these elements serve as a guideline for the distribution of casting mass over the entire area, and also indicate the level of floor height. Sometimes beacons for screeds made simply from a solution. Concrete mixture is poured in parallel on the base in the form of strips of the desired height. After solidification according to these guidelines align the mixture poured on the floor.
The content of the article
Preparatory work
Do-it-yourself flooring with lighthouses begins with the preparatory phase.
Stock up on the necessary funds:
- electric drills, screwdrivers, electric perforators;
- chisel and hammers;
- film polyethylene;
- metal rule one and a half meters long;
- self-tapping screws;
- dry building materials;
- spirit level, laser level;
- broaching lines, painting cord;
- tanks for mixing solutions.
Proceed to the first stage, proceed in the following sequence:
- dismantle the old destroyed screed - carefully remove residual fragments, clean off exfoliated areas;
- inspect the cleaned concrete slab, find the damage (cracks, cracks, holes) and repair (use cement mortar or tile glue);
- wipe the surface;
- ground the base;
- cover the floor with a waterproofing and soundproofing mixture.
The degree of readiness for filling the screed is determined taking into account the type (connected, floating, on the separation layer).
- For a bonded screed, the requirements for thickness are maintained (at least three centimeters).
- Screeds on the separation layers are laid on the waterproofing.
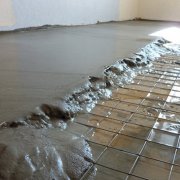
- A thickness of at least five centimeters and wire mesh reinforcement is provided for a floating screed.
If the screed is laid without beacons of factory production, and with the use of mortar slides, the time for preparation for pouring increases. Pouring the leveling mixture is permissible after complete hardening of the made reference points. To speed up the hardening of the heaps, add alabaster to the composition. Hardening time will be reduced to 15 minutes.
Markup
The marking begins with breaking a horizontal line. Use the spirit level for measurements or work with the laser level.
- Put marks on the walls, maintaining a suitable height, draw a line with a dyeing thread.
- Find the minimum and maximum points in height. To do this, measure with a tape measure the distance from the floor to the intended horizontal in 15-20 places. The maximum point lags behind the base by the smallest height. Please note that the minimum screed thickness is three centimeters. The maximum point is determined by stretching the masking cords horizontally in the central part of the room. Additional measurements are made at peripheral sites. If an excess value is detected, the mark is shifted to the newly found maximum point. If the protrusion is local, simply knock down the tubercle with a puncher and leave the previous mark.
- Draw a revealed level on the walls, use bright and clearly visible colors.
- Draw beacon lines on the floor surface.
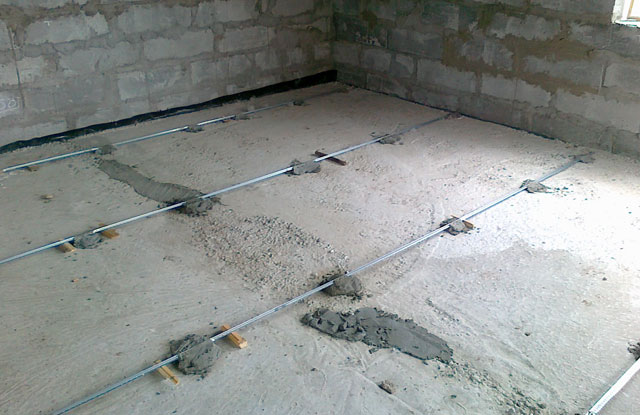
Installation of beacons for leveling the floor
Install beacons with the following recommendations:
- Leave the gaps between the walls and the outer slats within 50-100 mm, so that when leveling the rule covers two beacons and reaches the wall.
- A typical lighthouse length of two and a half or three meters is inconvenient for display. Cut the slats into one and a half meter fragments for easy layout.
- Use beacons made of metal with a height of at least one centimeter.
- Place the beacon lines so far from each other that the length of the rule exceeds the gap by 200 mm.
- Begin installing beacons from the front door towards the wall opposite the entrance.
Considering the length of the rule and the distance from the wall to the extreme bar, count the number of parallel rows. Measure the length of the room, calculate the total linear footage of the lighthouses, purchase and bring. The choice of the appropriate type of beacon depends on the personal preferences of the buyer:
- Factory products designed for screeding.
- Plasterboard profiles of the U-shaped section 27x28, which are inserted one into the other to enhance rigidity and obtain a square section. Advantages - easy rule gliding on the surface.
- Wooden beam 3x3 cm. Before installation, it is wetted to avoid absorption of mortar moisture.
Begin laying by determining the installation location of the first beacon that overlaps the maximum point. Drill a hole with a diameter of five to ten millimeters at the end, insert a wooden chop and screw the screw. Repeat the operation at the second end and check, using the level and rule, that the fasteners are located in a single horizontal plane. Pull the fishing line between the screws and drill along the length of the hole with an interval of sixty millimeters. Insert choppers and screw in the screws, check the location of the tops of the screws according to the level of the fishing line.
Set the neighboring lighthouse parallel to the first landmark, pull the test cord across the fishing line. Observe a single horizontal line along the length of the bar and the intermediate distance between the beacons at the control points. At a distance of 10 cm from each other, lay marks from the tile adhesive between the fasteners and press the beacon strips to them. Check that the working surfaces of the beacons are in contact with the rule, run the tool along the entire length of the strips. Put down the remaining beacons in this way.
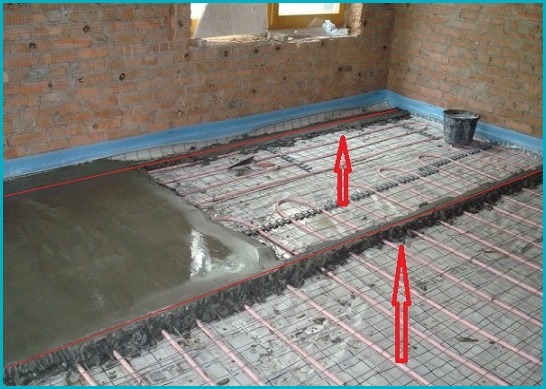
Important! If the screed is laid with a layer exceeding 5 cm, add expanded clay under the beacons to insulate and improve the structure of the future base.
Beacon flooring
After the beacons are exposed, proceed to pour the screed. Start from the farthest corners and move gradually towards the front door.
ATit is important! To avoid inconvenience to neighbors, carefully grind the joints between the wall and floor before pouring screeds. Then the liquid from the solution will not leak onto the ceiling of the residents below you.
Pour mortar from one part of Portland cement M400 and four parts of washed sand, or buy a ready-made dry screed with polymer components. The addition of plasticizers improves the properties of the screed and reduces the hardening time. Thoroughly mix the pouring mass, use a special mixer, mixer, or work manually with a spatula, then start laying.
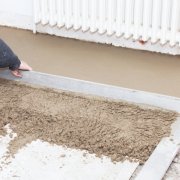
- Bring a solution tank to the pouring place, put the mass in the far corner into the space between the landmarks. Spread, roll out the mixture from the far wall towards the entrance.
- Lay one strip between adjacent landmarks, evenly beat with a spatula or trowel so that the upper edge of the mass protrudes slightly above the beacons.
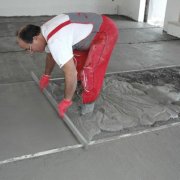
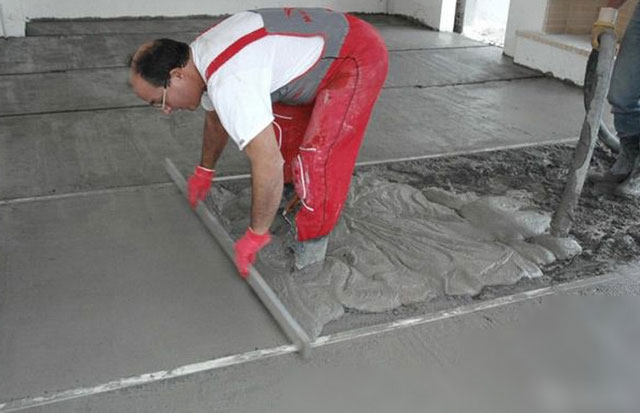
- Take the rule, set it with a sharp edge perpendicular to the planks and draw from the far wall to yourself, stretching the solution. Swing the tool left and right, while pulling it towards you, so that the solution moves to the door. Do not make sudden movements, act smoothly, do not tear the rule from landmarks.
Important! Use your working time rationally and involve a partner or a helper in pouring. The best option for joint action: one person kneads the solution, the second puts the mixture between the beacons. With this approach, screed pouring takes place at a time, without loss of time, and ensures uniform hardening of the floor sections.
- Cut off excess casting mass. Add mortar to the recesses and tamp with a trowel.
- Fill the gaps between other beacons, achieve a flat surface across the floor, without holes and protrusions.
- Cover the flooded screed with polyethylene film and wait for complete hardening. While the screed is drying, moisten the surface with a roller.
Important! For a warm floor, add basalt or polypropylene screeds to the structure fiberglass, and for a bonded screed, apply a contact layer with a notched trowel. Try to fill in one go.
Leveling the floor of the lighthouses. Technology
Within a day, the screed dries, after which it withstands walking in flat shoes. The total drying time of the cement-sand mixture is 28 days. If plasticizers were present, the floor will dry in a week. Make sure that there are no traces of movement on the surface. This means that you can take out the installed beacons and proceed with leveling. Step on the screed carefully, do not place heavy buckets and tanks, put plywood pieces under your knees to evenly distribute the load.
Perform alignment with a spatula or trowel, cut off the sag, fill the pits with tile glue. Gently rub the top layer 3 mm deep so that after drying the surface does not crack or dust. Eliminate delamination with a wooden grater. Follow the surface of a freshly screed with a rule, controlling the level with a level. Permissible roughness of the finished screed is not more than two millimeters.
Despite the tedious process of pouring and leveling the screeds along the beacons, as well as the duration of the operations and the expectation of complete drying and hardening, it is necessary to strictly adhere to technological rules and deadlines. Errors, rush, negligence of the performer will lead to the rapid destruction of the floor. If you follow the recommendations for laying the floor on the lighthouses - the floor will be strong and durable.
We recommend watching thematic video: