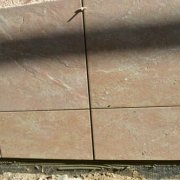
Finishing the basement with stone: how to do it

The stone for finishing the basement of the house is probably used forever. And despite the fact that a lot of modern materials have appeared, such a finish is in demand to this day.
Although it’s worth saying that this type of material is not suitable for any room. Also, this work can be performed by two different types of stone, this is an artificial stone basement finish, and it is possible to use natural stone to finish the basement.
This type of cladding will be devoted to our article. For starters, you should look at the photos and videos on this topic and decide on the design of the finish.
It depends on you. We will help to understand this issue and make the right finish with your own hands, this will significantly reduce the cost of all work.
The content of the article
Basement finishing functions
Before you pick up material and make a purchase, it's worth figuring out what is being done. base trim and what functions should it perform. After all, this is not only the appearance of the building, but it also carries many useful functions.
So:
- Finishing should perform the functions of waterproofing the foundation. It determines the occurrence of the dew point.
And this is extremely important. The watertightness of the basement largely determines the humidity not only in the basement, but throughout the room.
Determines the durability of the entire structure and the creation of the desired microclimate in the room; - The base also smoothes out temperature changes. It is quite useful in the offseason;
- When finishing, additional warming of the house is also performed, which will positively affect the energy costs, and, accordingly, the material costs of the owner of the room.
Attention: When decorating the house, do not forget about the blind area, which improves the quality of decoration and carries many positive qualities.
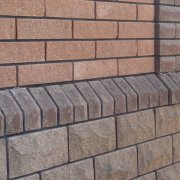
Advantages of artificial stone for finishing the base
Stone finish the cap is made in two versions of the material. The basement can be made with artificial stone, and the basement can be made with natural stone.
In our article we will talk about the first option, it is simply used more often in our time and there are reasons for this.
So:
- The price of this material is much lower than natural. And sometimes several times;
- Artificial stone for finishing the basement has a significantly lower weight. Therefore, it will not be necessary to do a significant strengthening of the foundation.
The weight of the whole structure will increase and not so much. - This material perfectly tolerates high humidity and temperature extremes. You can do the facing in any type of room;
- It tolerates a low temperature, which allows it to be used in our climatic conditions;
- In retail, there are many colors and shades that can be selected according to the desired shape and you can make the design unique;
- All work can be done completely with your own hands and without resorting to outside help. Instructions will be given below.
Division of the basement with artificial stone
Finishing stone basement is done according to certain rules and according to the desired scheme. All stages are important here.
Therefore, they should be carried out adhering to the description. Any inaccuracy will reduce the effectiveness of the work.
Surface preparation
This will be the first step in completing the work. Finishing stone basement floors begins with this work.
The quality and durability of the entire structure depend on it.
Attention: Before starting work, it is worth consulting with a specialist whether the foundation will support the extra weight. After all, although the material is not too heavy, it has weight.
So:
- To begin with, we need to completely clear the surface of the previous coating. To do this, use a brush for metal.
If the old plaster is strong, then you can use a hammer and a chisel. This is not such a difficult job if your base is made of stone or concrete.
Mounting to such a plane is not difficult, the materials are fully compatible; - After cleaning, it is worth making incisions on the surface with an ax. Or you can just deepen the seam by one cm.
This will significantly increase the adhesion of surfaces; - Now you need to cover the entire plane with a primer. This is done with a brush or spray gun, give preference to deep penetration fluids;
- If the material of the plane is not uniform, then it is worth applying a building grid to the surface. It will significantly increase the quality of joining surfaces.
To do this, drive the nails into the seam. If the solution is too high quality, then first you need to make holes with a drill and then screw in the screws.

Attention: If you are laying through a grid, then you should not connect directly to it. First you need to make a spray to the surface.
This is done using a bucket and there is no need to pour the solution. It must be thrown to the surface.
After that, let it dry a bit and begin work.
Now, for the correct execution of the work, we need to decide on the installation line. The plane of the earth is not always exactly in relation to the house.
Therefore, we need to draw a correct and even line of fastening. This will mainly affect the appearance of the structure.
- We put the risk at the place where we have the finish;
- Now it should be transferred to other walls. To do this, apply the hydraulic level, which is worth buying or making yourself. It is with his help that you can do this job correctly. We transfer the size to other walls;
- After that, we need to combine the risks posed. For this, it is worth using a simple nylon thread.
With it, we simply beat off the desired line. Now we have a flat line to start work.
The right tool
For high-quality work, you should prepare the necessary tool so as not to be distracted during the execution of work:
- You will need a grinder who will need to cut the stone, so you should also buy cutting wheels on the stone;
- An electric drill is also required, it is worth buying a mixer for kneading the solution;
- It will take a building level, it is advisable to take about one and a half meters. We will need to measure the level of arrangement of the order.
It is also worthwhile to put a square nearby; - Trowel, spatula, mother;
- For the correct execution of the seam, you will need a template;
- You will also need a rubber mallet with a bar, with this tool we will do the fitting of elements;
- Paint brush and brush for metal;
- Stitching, which will need to finish the seam.
Make a solution
Finishing the basement of the house with your own hands is done only at a positive temperature. There are mixtures that are true and allow you to perform work at sub-zero temperatures.
But it should be said that they will serve less anyway. The solution largely determines the durability of the structure and appearance.
The speed and quality of work depends on its correct preparation. Most often, cement mortar is used.

Attention: The elevated temperature, over 25 degrees, will also not have the best effect on the performance of the work. With it, the solution loses moisture much faster and therefore the adhesion will be of poor quality.
So:
- To begin with, you should prepare a container for kneading.You should choose a container with smooth edges and bottom.
It is not necessary to take a relief surface; - After that we fill up sand and cement. We apply a ratio of 3: 1, this is for the M300;
- Now mix dry. We achieve the identity of the mixture;
- Now we need to make a completely homogeneous mass. To do this, it is best to use a drill with a nozzle. With its help, you can make the composition completely homogeneous.
Caution: If you use river sand, not mountain sand, then the solution will quickly set. To avoid this, it is worth adding a pinch of any washing powder.
This way you get rid of this problem.
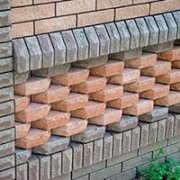
Do the masonry
Finishing the base with your own hands is done according to certain rules. The principles of conduct that we give below should be applied.
There are two types of masonry. It is seamless and with a seam.
In the first embodiment, the work is much simpler, here you only need to select the right elements. In the second option, and it is the most common, it is necessary to properly ditch and correctly install the stone.

So:
- Work starts from the corner of the room. All rows must be ligated.
This is not so difficult to do, just the seam should not coincide when ordering; - When laying, you always need to apply a level, for this, a check is made for the laying of each row. Until you perform it qualitatively, do not proceed with installing the second;
- We apply the solution to the surface and apply it to the installation site and press. At the same time, we make slightly rotational movements.
This will allow the solution to distribute more evenly and avoid the appearance of voids in the masonry. When working, you can also apply a rubber mallet.
With its help, you can sometimes make better shrinkage; - For the correct execution of the seam, you should always use a template that will make this line the most high-quality and even;
- When laying, special attention should be paid to the lining of corners. Deviations must not be allowed.
To do this, we use a plumb line and check the correctness of the material fastening; - First, you should lay two elements in the corners of the room. After that, pull a fishing line from their top and draw a line for it for other elements.
Then we can see all the deviations; - For proper installation, we need to cut the material. To do this, use a grinder with a cutting wheel.
First, you should try on the part and put a mark, and after proper trimming, you can apply the solution; - So do the lining of the entire plane;
- We take a mixture for grouting and do this job. Many simply cut a corner in a plastic bag and then fill it with a solution and fill the seam.
After this, it is necessary to allow the solution to dry, not to dry, namely to dry and to make a joint.

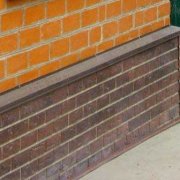
We make a blind area
This structural element is a must. Without it, the finish of the base cannot be considered complete.
It protects the base from external influences and does not allow moisture to penetrate near the foundation, which makes the shrinkage of the house the most uniform. With the completion of this work, the finish will look complete.

So:
- The width is determined by the location of the eaves. The width of the planted area will also affect the width.
If it is not large, then the width of the finish should be wider. The minimum width of the blind area cannot be already 60 cm ;; - To do the job, you must first install the formwork using unnecessary reem. They should be slightly sprinkled with earth, then moisture will not leak:
- Pour crushed stone, for this you can apply all the stones from the site that are not needed;
- We make a solution, but only a liquid one. He must completely shed rubble;
- After pouring, let it dry completely.
Now we direct the marafet and just pour gravel on the surface. This will be necessary so that when rain does not fall spray on the base.
The most important thing is not to rush and do everything right.
Also on our resource you can find out about basement interior decoration.